Creating a clean, safe, and visually consistent tile to carpet transition is essential for any flooring project. Whether you’re renovating a home, working on a commercial space, or simply fixing an uneven threshold, choosing the right carpet to tile transition strip prevents tripping hazards, hides height differences, and delivers a polished, professional finish.
Below you’ll find the four best transition solutions, when to use each one, and practical installation tips with recommendations on tools that ensure precision. For additional installation insights that can be very useful, explore how to lay tile professionally.


What is a tile to carpet transition strip?
A tile to carpet transition strip is a finishing accessory designed to create a seamless meeting point between hard tile and soft carpet. Without it, the carpet edge can fray, the tile edge can chip, and height differences can become tripping hazards.
Transition strips are available in several materials (metal, vinyl, wood, and engineered profiles such as Schluter) which accommodate different budgets, traffic levels, and design preferences. Choosing the correct transition type depends on how much height difference exists, the overall look you want to achieve, and how durable the transition needs to be.

Option 1: Metal transition strip
Metal transitions (usually aluminum or steel) are among the most durable and professional-looking solutions for carpet to tile transition areas.
Pros and cons of metal transition strips
Pros
- Long-lasting and resistant to wear
- Ideal for heavy foot traffic
- Sleek, modern appearance
- Stable solution for noticeable height differences
Cons
- Can look too industrial for some home styles
- Requires proper cutting tools, often with diamond blades
- More visible than vinyl or wood options
How to install a metal carpet to tile transition
Installing a metal strip is straightforward, but precision is key:
1. Start by measuring the transition area carefully.
2. Cut the metal strip with a suitable saw to ensure a clean, straight edge.
3. Position the metal profile so that the tile edge sits neatly beneath it, providing protection for both materials. Once aligned, secure the strip using screws or adhesive depending on the model.
4. Finally, stretch the carpet toward the metal channel and tuck it firmly inside, ensuring no loose fibers remain exposed.
For the cleanest possible transition, make sure the tile was leveled during installation using leveling systems, preventing uneven edges that could disrupt the fit of the strip.
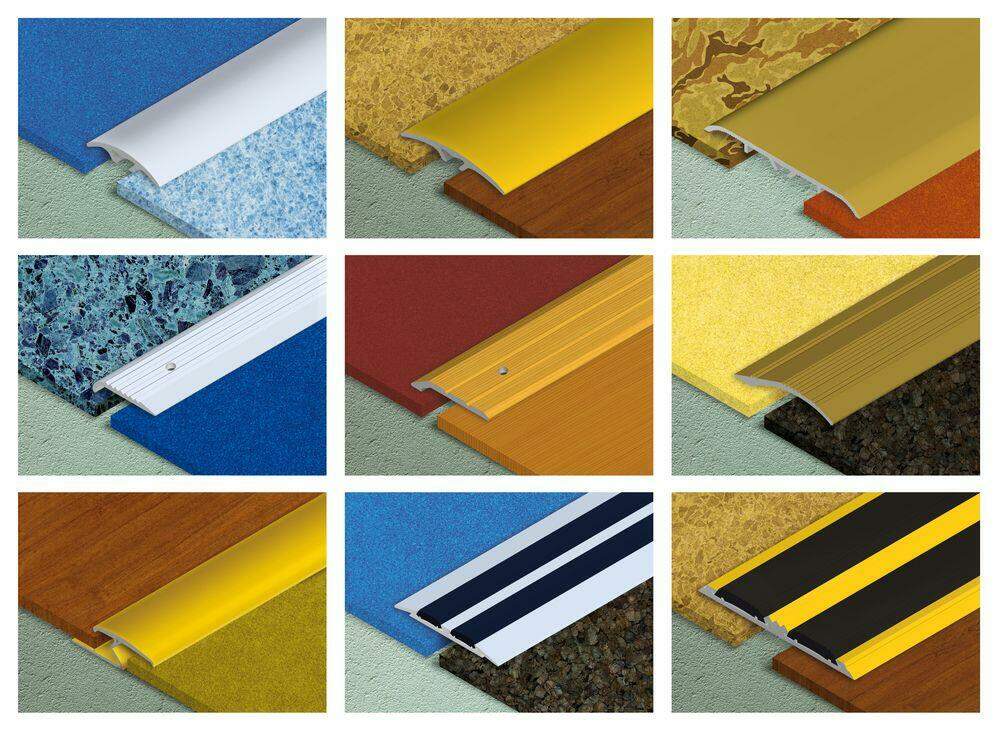
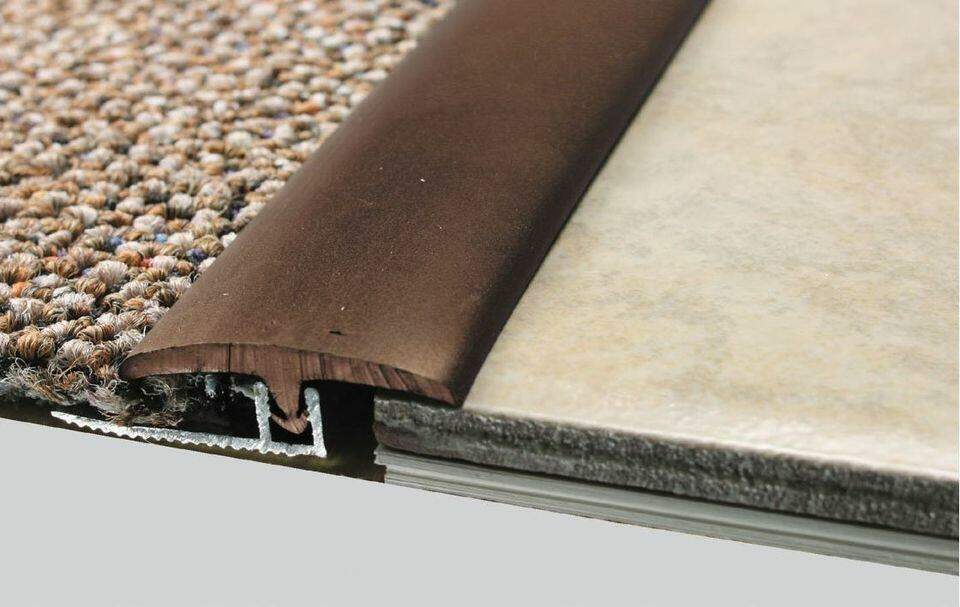
Option 2: Rubber/Vinyl reducer strip
Rubber or vinyl transition strips offer a softer, more flexible solution, making them ideal for residential settings, children’s rooms, basements, or spaces where comfort and affordability matter. Because they bend slightly, they adapt well to small height differences and irregular subfloors.
Pros and cons of rubber/vinyl strips
Pros
- Affordable and easy to install
- Soft to the touch and safer for households
- Available in many colors and styles
- Suitable for mild height differences
Cons
- Less durable than metal
- May wear or discolor with time
- Less premium appearance compared to wood or Schluter profiles
Installation steps for vinyl transition strips
1. Begin by cleaning both flooring surfaces to ensure proper adhesion.
2. Measure the transition area and cut the strip using a utility knife.
3. Many vinyl strips come with a track system: fix the track to the subfloor first, then click the strip into place.
4. If the model requires adhesive, apply it evenly along the underside and press firmly into position. Once secured, stretch the carpet edge and tuck it under or into the track as indicated by the manufacturer’s system.
This option is particularly user-friendly for DIYers due to its forgiving nature and lower installation complexity.

Option 3: Wooden/Hardwood transition strip
Wood transitions are the go-to choice when the goal is achieving a warm, elegant, or traditional look. These strips pair beautifully with wood trim, doors, or cabinetry, allowing the transition to blend seamlessly into the room’s aesthetic. They are often used in living rooms, bedrooms, or spaces where moisture is not a concern.
Pros and cons of wood transition strips
Pros
- Attractive, natural finish
- Easy to paint or stain to match interior décor
- Works well for moderate height differences
- Adds warmth and visual continuity
Cons
- Sensitive to humidity and dents
- Requires precise cutting and fitting
- Not suitable for bathrooms or damp areas
Best practices for installing a wood transition
1. Since wood is less flexible than vinyl or rubber, accurate measuring is essential.
2. Cut the strip using a fine-tooth saw to avoid splintering.
3. Before installation, dry-fit the piece to confirm it aligns perfectly between the tile and carpet.
4. Use construction adhesive or screws depending on the subfloor material, making sure the strip sits flat without rocking. After installation, stretch the carpet to meet the wood edge and tuck it neatly underneath.
For tile edges adjacent to wood strips, achieving a perfect cut using professional tile installations tools will greatly improve the final aesthetic.

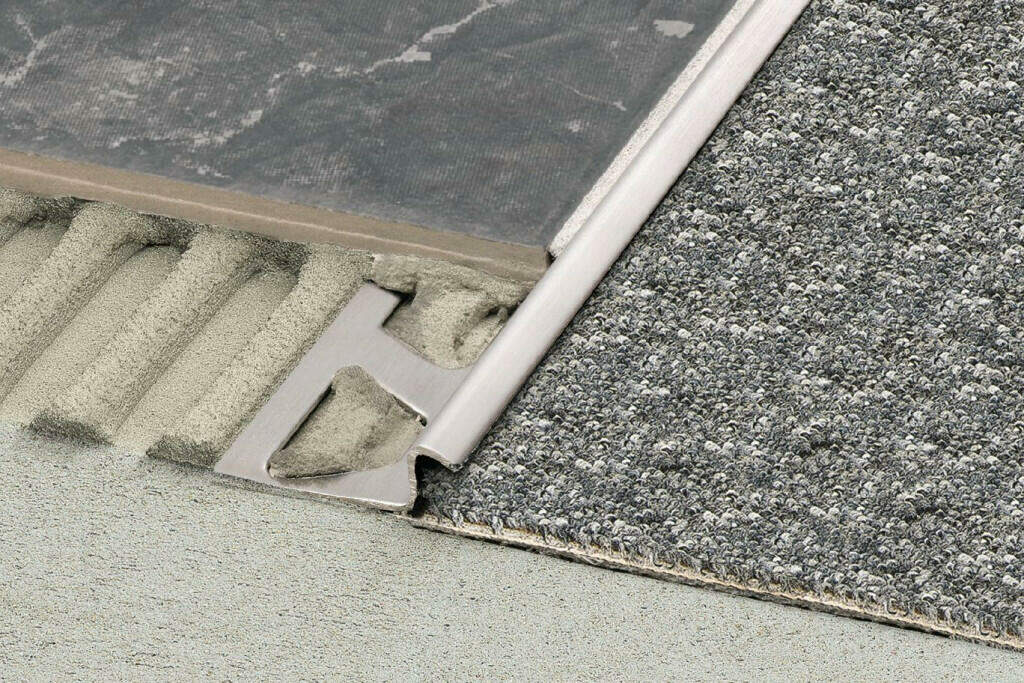
Option 4: Schluter or edge profile
Schluter-style profiles are engineered transition pieces designed for high-performance and refined aesthetics. They are especially popular among tile professionals due to their precision, durability, and ability to protect vulnerable tile edges. These profiles are available in different shapes and finishes, allowing you to choose the one that best fits your project’s style and height requirements.
Pros and cons of Schluter/Edge profiles
Pros
- Sleek, minimalistic finish
- Exceptional protection for tile edges
- Very durable and moisture-resistant
- Ideal for achieving a premium, professional appearance
- Compatible with complex tile layouts
Cons
- More expensive than basic strips
- Requires skill to install correctly
- Less forgiving if tile heights are uneven
Installing an edge profile for a tile to carpet transition
1. Start by cutting the profile to the exact length needed, using a tool compatible with metal, preferably equipped with diamond blades.
2. During the tile installation, place the anchoring leg of the profile beneath the tile and embed it in thinset. Make sure the top of the profile aligns perfectly with the tile surface.
3. Once the tile is set and the profile secured, bring the carpet to the edge and tuck it firmly against the vertical lip of the profile.
How to transition from carpet to tile: Step-by-step guide
Creating a secure and visually appealing carpet to tile transition requires proper preparation and tools. Follow this methodical approach for the best results.
Step 1: Measure and prepare the subfloor
Evaluate both flooring materials and check for height variations. Uneven tile installations can complicate transitions, so before installing the trim, ensure the tile is flat and free of lippage using leveling systems during installation greatly minimizes this issue. Clean the area thoroughly to remove dust, adhesive residue, or loose carpet fibers.
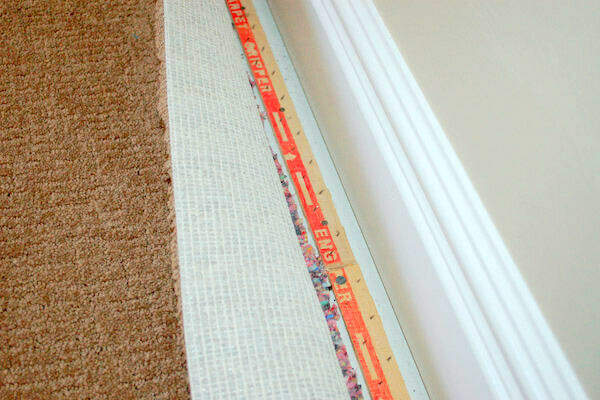
Step 2: Install the carpet tack strip and pad
Place a tack strip approximately ¼ inch from the tile edge. Secure it using nails or adhesive depending on the subfloor. Trim the carpet pad so it ends right at the tack strip; the carpet itself will stretch over this gap and lock onto the tacks.
Step 3: Secure the chosen transition strip
Once you’ve selected the metal, wood, vinyl, or Schluter profile, position it carefully between the materials. Ensure it sits flush with the tile and aligns with both flooring surfaces. Depending on the product, secure it with screws, tracks, or adhesive.
Step 4: Stretch and secure the carpet to the transition
Use a knee kicker to stretch the carpet tightly toward the transition. Hook it onto the tack strip or tuck it into the designated channel. Trim any excess fibers to achieve a smooth, clean finish.
FAQs about carpet to tile transitions
What is the best way to transition from tile to carpet?
The best solution depends on height differences, durability needs, and design style. Schluter profiles offer the most premium finish, metal strips excel in high-traffic areas, vinyl strips are great for budget-friendly DIY installations, and wood strips bring warmth to interior spaces.
Can I transition carpet to tile without a strip?
You can technically use only a tack strip, but it’s not recommended. Without a transition strip, the tile edge is vulnerable to chipping and the carpet can fray quickly, reducing the lifespan of both materials.
How do I fix an uneven transition between carpet and tile?
You can correct height differences by adding underlayment beneath the carpet, using a reducer strip, or choosing a taller profile such as Schluter Reno-U designed specifically to manage uneven surfaces.
What is a reducer strip?
A reducer strip is a sloped trim piece used when one flooring surface sits higher than the other. It creates a smooth and safe transition commonly used in tile to carpet transition strip installations where the tile is thicker.

I need an aluminium strip to finish off a plastic garage floor where it ends at the garage door.
Length about 6 meters. Width about 70 cm. The strip needs to cover the plastic layer and overlap the cement at the entrance.
The examples on your website looks like what I want, but I cannot see the width I need.
Can you help?
Thanks for the useful information. Personally, I prefer the last type of connection and Z-Bar Transition. Reducer strips can be found at most hardware or home improvement stores, and they can be found in a number of different shape and styles to provide a seamless carpet-to-tile transition. The T-shaped reducer strips are popular and are used to bridge the space between the materials. A Z-Bar transition is a another great option for carpet-to-tile flooring. This option will not only deliver a seamless transition, but also ensure your carpet has an added level of security, as it hides the carpet edging to keep it from getting pulled out.
Asking questions are actually fastidious thing if you are not
understanding something fully, however this paragraph offers
pleasant understanding yet.
What can I use to transition a curved tile floor to vinyl wood flooring? I’d like the least obstructive way to do this. Thank you.
There are special transition strips designed for curved floors. Basically they are designed to be flexible so that you can fit them to any shape necessary to fit your transition. There are lots of options for this kind of product online so if you google “curved transition strip wood to vinyl” you will definitely find something.
How can I raise carpet height by 20mm to meet adjacent room tiles height?
It sounds like what you need is something called a overlap reducer. It’s basically a transition strip designed for unifying floors that aren’t at exactly the same level.
What if the tile was already installed and the edge of the new carpet comes in higher?