
Herringbone tile layout has a timeless elegance that can transform any space into a work of art. The intricate arrangement of interlocking rectangular tiles creates a visually stunning design that adds depth and sophistication to floors, walls, or backsplashes. Planning and executing a herringbone tile layout requires careful measurements and precise cuts, particularly when using a manual tile cutter. In this blog post, we will provide you with a step-by-step guide on how to tile and plan for a herringbone tile layout, including measuring techniques and tips for making accurate cuts using a manual tile cutter.


Tools and Materials for a Herringbone Tile Layout
Before you begin, ensure that you have all the tools and materials required for the project.
Always check that the tiles you’ve chosen will work nicely with a herringbone layout. Some tiles with uneven edged will make achieving a consistent grout joint difficult or impossible. Ideally, the tiles you select should have a length divisible by their width.
Also be vigilant with the batches you purchase. Inconsistencies in tile colour and size will cause headaches down the line, and we want to avoid those as early as possible.
When it comes to adhesives, a slower setting option may be the right choice. A slow set adhesive will allow you to work with the tiles laid for a longer period of time before they set completely.
Other materials you will need include a trowel, spacers, a level, a tape measure, a pencil, and a manual tile cutter, preferably one that can cut at multiple angles with the help of a rotating set square. Our TX Max range is ideal for this.

Measure the Space and Calculate Tile Requirements
Measure the area where you plan to install the herringbone tile pattern. Multiply the length and width of the space to determine the square footage.
It’s advisable to add an additional 10% for waste and cuts. Sometimes wastage is unavoidable. Not every tile will cut perfectly, some splinter, some get dropped in transit, other times you make silly mistakes. Planning for this will prevent any unnecessary headaches down the line. Remember, fail to prepare means preparing to fail!
Now, calculate the number of tiles you will need by dividing the total square footage by the area of a single tile. Remember to account for the orientation of the herringbone pattern. Are you going for a classic 45-degree or the ever growing in popularity 90-degree herringbone tile layout?
Determine the Starting Point
Decide where you want to begin laying the tiles. This is a vital step. It’s common to start in the centre of the space to ensure symmetry, especially at the edges.
Mark the starting point with a pencil and use a level to draw a straight reference line, alternatively you can use a laser level to help you with this. This line will serve as a guide throughout the installation process.
It’s also advisable to check the angles of the walls and floor in the room you’re tiling. If the corners aren’t at a true 90-degree angle, then you’re likely to have different cuts on either side. But if you start from the centre and work your way out, the room will still look symmetrical.

Cutting for the Herringbone Tile Layout
Using a manual tile cutter, follow these steps to make accurate cuts for the herringbone pattern:
- Measure the width of the tile and mark the desired cutting point with a pencil.
- Place the tile in the cutter, aligning the mark with the cutting guide, using the help of the rotating set square the ensure the tile doesn’t move.
- Apply gentle and even pressure with the scoring arm to score the surface of the tile.
- Using the breaking mechanism on your manual tile cutter, carefully apply pressure to snap the tile along the scored line. Be careful not to cut your hands on the newly cut edge of the tile.
- Smooth any rough or sharp edges with a polishing pad.
Cut your tiles row by row to save you some time and ensuring that you’re making the right cuts and aren’t wasting materials. Always measure twice before you cut to avoid any mistakes.
Installing the Herringbone Tile Pattern
Begin by applying tile adhesive to a small section of the floor or wall, following the manufacturer’s instructions. Start laying the tiles along the reference line, placing the first tile at a 45-degree angle (or 90 degrees if that’s the pattern you’re going for).
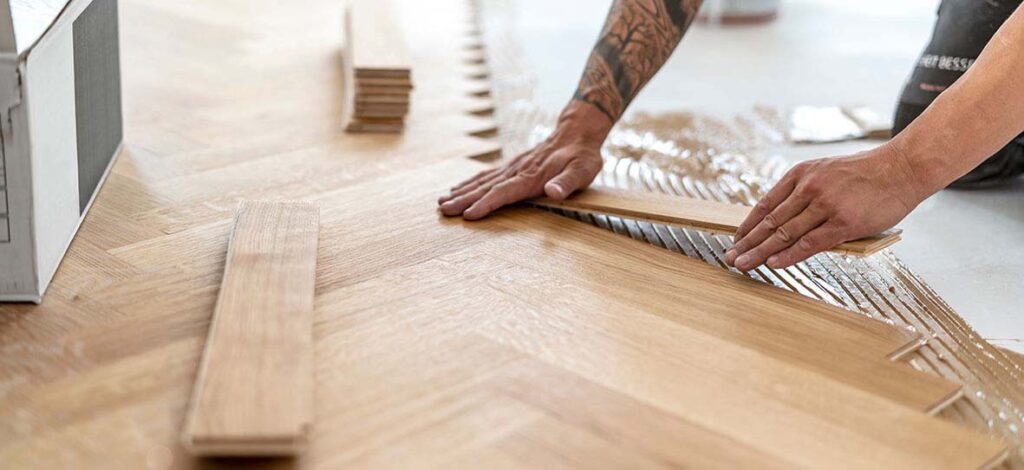
Insert spacers between each tile to ensure consistent spacing, finishing off with levelling clips. Continue laying tiles, overlapping at the very top of the tiles at a 45-degree angle to create the herringbone tile layout. Ensure that you’re aligning the edges and corners as you go, making adjustments when you need to.
The rotating set square on the manual tile cutter will make the harder corner cuts easier, leaving you with a perfectly symmetrical pattern.
Grouting and Finishing Your Herringbone Tiles
Once the adhesive has dried, remove the spacers and levelling clips, and prepare the grout according to the manufacturer’s instructions. Apply the grout, working it into the spaces between the tiles with a grout float.
Wipe off excess grout with a damp sponge, taking care not to disturb the tiles. Allow the grout to cure before applying a sealant to protect the tiles and grout. This will make your work more durable and keep the tiles and pattern looking just as it did the day it was installed.
You’re Now a Master of Herringbone
Planning and executing a herringbone tile layout requires precision and attention to detail. By following the steps outlined in this guide, including measuring the space accurately and making precise cuts with a manual tile cutter, you can achieve a stunning herringbone pattern that will elevate the aesthetic appeal of any room.

Post a comment