
You’ve chosen your tiles and you‘re ready to tile the room, but have you thought about how you’re doing to finish off the edges? If you’ve read our other blog on ‘MITRED TILING’ you’ll know that the devil’s in the details. Achieving a smooth transition around each corner and edge is key to leaving your room with a perfect finish!
However, mitring tile does require some experience. You want to make sure you make the cut correctly and don’t chip the tile. For an alternative design aesthetic that can actually help protect your tile, you could opt for tile trim.
Trims are available in a large variety of colours, shapes and finishes. Read on to discover which trim would be best for your project and how to fit tile trim to perfectly finish off your installation.


WHAT IS TILE TRIM?
Tile trim is used to finish the edges of a tiled area. It’s typically used in corners where, without an alternative such as mitring, you will be left an exposed tile edge. This can be subject to damage and leave you with an unfinished look. Tile trim helps provide a perfect finish for your tiling job. It also helps cover sharp edges or corners that could become a hazard.
HOW TO CHOOSE YOUR TILE TRIM
There are four main types of tile edge trim that can be used to finish the perimeter of your installation. These include stone, plastic, metal, porcelain or ceramic trims.
If you are going to use a trim to finish your edges, we recommend matching the colour and material of the trim with the actual tile before you begin installing.
It’s also important to note the size and depth of trim you need. When choosing trim, match the depth of your trim to your tile, as this will leave it with a professional looking finish. When measuring this, you must account for the use of adhesive when laying your tile. Choosing a trim one size up from the depth of your tile is key!
For example, if your tile is 10mm thick, we suggest a 12.5mm trim to ensure a smooth fit and clean finish.

CALCULATING HOW MUCH TILE TRIM YOU NEED
To make sure you have enough tile trim for your installation, it’s important to get the right measurement. In case your tile trim is bigger or smaller than the tiles you are using, measure the edge of your tiles surface and then divide that number by the width of your trim.
For example, the edge you are adding the trim to is 500mm and the trim that you want is 10mm long. 500 ÷ 12.5 = 40
We usually recommend adding 10% to account for any accidental chipping or damaged tiles. If the number calculated isn’t a whole number, round up.
TYPES OF TILE TRIM
Tile trims come in plastic or metal strips in a variety of different shapes and designs to choose from. You can match the colour of your trim with the tile for a seamless look, or create a contrasting accent such as a metallic trim over a coloured ceramic tile.
Trim also come in a range of finishes. This provides versatile and alternative design opportunities to help you get the best finish.
There are also many different trim accessories to facilitate your installation.
 Inside and Outside Corners
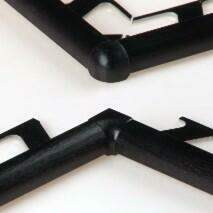
For areas where your tile curves or meets a right angle.
nnnn
nnnnn
Connectors
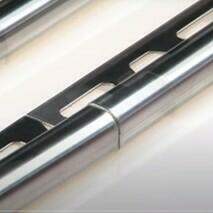 Connectors
Ror a continuous and clean trim finish.
nnnn

Endcaps or Corner Pieces
To give the edge a clean, water tight finish.
nn
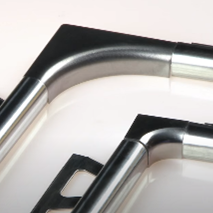
Cornering
For tiling around areas such as kitchen sinks.
Materials and Finishes for Tile Trim
When selecting tile trim, the material and finish are key factors that influence both the durability and aesthetic appeal of your tiling project. Common materials include metal, plastic, and ceramic, each offering different levels of strength and resilience.
Finishes range from matte and gloss to brushed or textured, allowing you to match the trim with the overall look of your tiles. For example, a brushed metal trim might complement modern, sleek tiles, while a ceramic trim in a glossy finish could enhance a more traditional setting. Choosing the right combination means that your tile trim not only protects the edges but also adds a refined touch to your space.
HOW TO CUT YOUR TILE TRIM
Cutting Your Trim
For certain areas of your project you may need to cut your trim to fit round the corner of a tile. For example, this may happen if you’re planning to trim around a window. In this case, you’ll want to create a frame of tile trim to sit around the window’s lip. When you make your cuts, we advise cutting the corners at a 45-degree angle so the separate pieces fit together nicely and leave a clean finish.
To cut your angles, place the trim on a mitre block and choose which angle to cut your trim. We recommend using a junior hacksaw or something similar. Using the assisted gaps, confirm the angle you want to cut your trim at.
Make sure to mark where the cut needs to be made and saw though your trim. Remember to hold the trim steady and press it firmly against the edge of your block to ensure a clean cut.
Once you’ve made 2 cuts at opposing angles, test them against the tile, making sure both pieces of trim fit together correctly.
Bending Trim Finish
If, for example, you’re tiling a small area such as a bathroom sink splashback and want to avoid any sharp edges, you may want to bend your trim around the tile rather than making separate cuts.
To do this, start by cutting your tile to size so it’s ready to be installed. Measure the trim along the line of one of the exposed sides of the tile and mark where it meets the corner. Then, using some trim snips, cut the trim at two opposing 45-degree angles. It should look like you’ve cut an arrow or upside-down V.
Next, simply line up your trim again against the tile and bend the trim round the corner. Continue to mark and cut the trim where appropriate until you have a complete bending trim finish. And there you have it!
INSTALLING TILE TRIM
When it comes to installing your tile trim, mix your adhesive and using a notched trowel. Apply your adhesive as you normally would, specifically to the area where you are going to apply your trim.
Then push your trim into the bed of the adhesive along the edge. Make sure the trim is held into the place with the adhesive.
Continue to lay your tile onto the surface, making sure to apply the adhesive to the back of the tile as well before applying to the trim to ensure a strong bond between tile and trim.
If this is an area that’s likely to get wet, such as a shower niche, you will want to be sure that there is a 2mm gap between the trim and the tiled edge. This will allow you to properly grout the space, making you tiles watertight and avoiding any added risk of water getting in-between your trim and tile.
Common Mistakes to Avoid with Tile Trim
Installing tile trim may seem straightforward, but several common mistakes can detract from the final result. One frequent error is miscalculating the amount of trim needed, leading to either waste or insufficient coverage.
Additionally, improper cutting techniques can result in uneven edges, compromising the trim’s appearance and effectiveness. Another mistake is selecting the wrong type or finish of trim for the tile, which can clash aesthetically or fail to provide adequate protection. To avoid these issues, take precise measurements, use the appropriate tools, and carefully consider the trim’s compatibility with your tiles and overall design.
Post a comment