
You lay the first few tiles and everything looks flat. By the third row, one edge sits half a millimetre proud. On a polished porcelain floor, that tiny step catches the light immediately. Lippage is not just cosmetic, it becomes a call-back risk. This is where choosing the best tile levelling system stops being optional and starts being part of professional workflow.
Tile levelling systems are no longer reserved for large commercial projects. In the UK specialist market, they are standard practice for achieving flatness, speed and repeatable quality, especially with today’s larger porcelain formats.

Why use a tile levelling system?
What it does
A tile levelling system is designed to control lippage by applying mechanical tension between adjacent tiles while the adhesive cures. It does not simply space tiles; it actively pulls edges into the same plane.
On site, that means fewer high corners, less manual tapping, and reduced reliance on constant straightedge checking. When correctly installed, the system distributes pressure across tile edges, helping ensure consistent flatness across the installation.
The real benefit is control. Instead of chasing uneven edges after placement, you pre-empt movement during curing.
When it’s necessary
Large-format porcelain has changed expectations. Tiles measuring 600 x 600 mm, 900 x 900 mm, or even 1200 x 600 mm behave differently from small ceramics. Minor adhesive inconsistencies become amplified across wider surfaces.
If you are working with:
- Rectified edges
- Polished porcelain
- Large-format or thin panels
- Tight joint widths
then using the best tile levelling system for large format tiles is not just recommended, it is practical risk management.
On walls, especially with heavy porcelain, gravity introduces additional movement during curing. A levelling system reduces downward creep and keeps joints aligned.
What it can’t fix
A levelling system is not a substitute for preparation. It will not correct:
- A poorly prepared substrate
- Excessively uneven adhesive beds
- Structural deflection
- Incorrect adhesive selection
If the subfloor is out of tolerance or the wall is bowed, tensioning tiles together simply locks defects into place. Levelling systems refine placement, they do not repair foundational errors.
Main types of tile levelling systems
Understanding the mechanical differences helps you determine the best tile levelling system for your workflow.
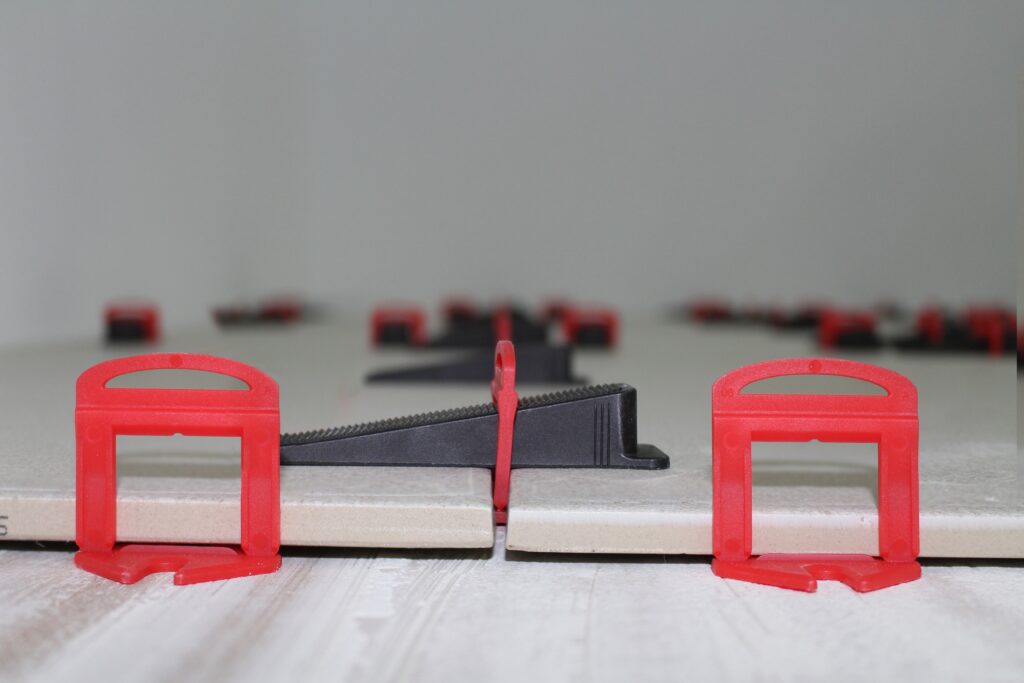
Clip-and-wedge systems
These are among the most widely used systems in the UK. A disposable clip sits beneath the tile, and a reusable wedge slides into the clip to apply tension.
They are fast, intuitive, and effective for most floor installations. Many professionals consider this style among the best tile levellers for everyday use due to their balance of speed and cost.
RUBI’s professional-grade options can be explored under their full range of Levelling Systems.
Reusable systems
Reusable levelling systems reduce waste by replacing disposable clips with mechanical components that can be used multiple times.
They appeal to contractors looking for sustainability and long-term cost control. However, they require careful cleaning and handling to maintain performance.
In commercial environments with repeated large-scale installations, reusable solutions can offset initial investment.
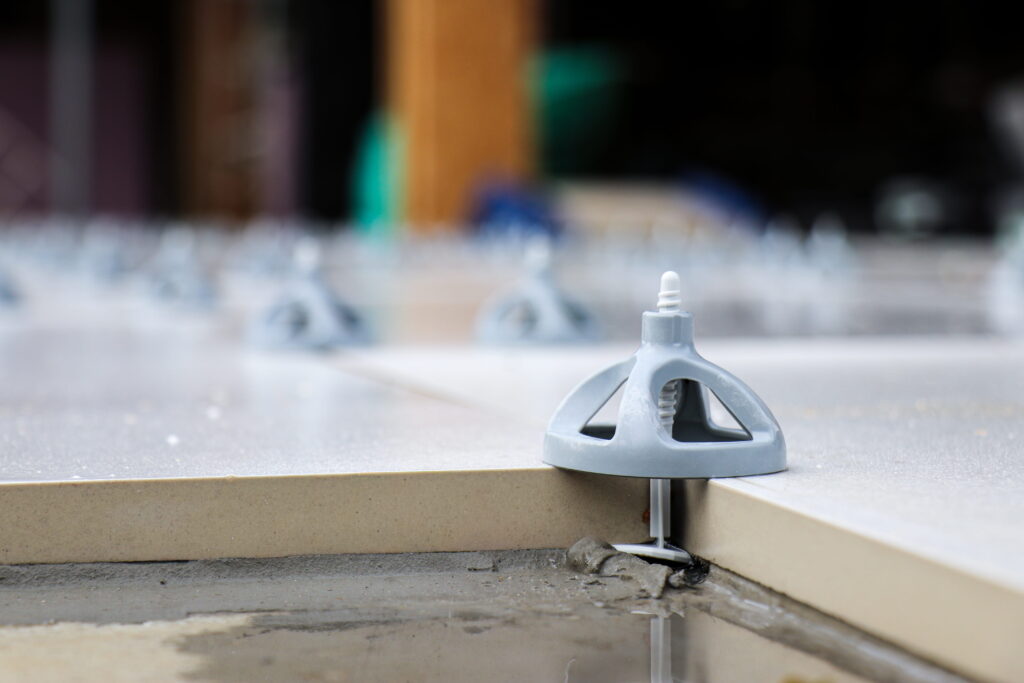
All-in-one or spinning systems
Spinning or screw-down systems combine the clip and tension mechanism into a single piece. Installers tighten by hand, which makes them attractive for DIY users or smaller projects.
An example of this approach can be seen in systems like the Cyclone Levelling System, which simplifies tightening without additional tools.
They are easy to learn but can offer less precise tension control compared to professional wedge systems.
Spacer-integrated levellers
Some levelling systems incorporate built-in spacers, effectively combining joint spacing and levelling in one unit.
This reduces the need for separate best tile levelling spacers, streamlining workflow. However, flexibility is reduced if a project requires varying joint widths.
Pros and cons of each tile levelling system
Below is a structured comparison for quick reference.
| System Type | Advantages | Limitations |
| Clip-and-wedge | + Fast installation + Affordable + Strong tension control | − Clips are single use |
| Reusable systems | + Sustainable + Lower waste over time | − Higher upfront cost |
| Spinning systems | + Easy to use + DIY-friendly | − Less calibrated tension control |
The best tile levelling system ultimately depends on how much control you need versus how quickly you need to work.

How to choose the best tile levelling system
Tile size and thickness
Large-format porcelain demands higher tension and wider clip bases to prevent flex. For panels and heavy floor tiles, choose a system rated for thickness range compatibility.
If you regularly install 900 mm or 1200 mm formats, selecting the best tile levelling system for large format tiles should be your priority. Thicker clips and reinforced caps prevent breakage during tensioning.
Type of project
Floor installations typically require higher compressive strength than walls. Outdoor installations introduce additional factors such as temperature movement and thicker adhesive beds.
For high-volume commercial floors, durability and speed matter most. For feature walls, precision and minimal surface marking take precedence.
Reusability and cost efficiency
Single-use clips are economical per unit but generate ongoing material cost. Reusable systems reduce waste but require disciplined cleaning.
Consider your workload. Occasional use may justify disposable clips. Regular large projects may favour reusable components.
Ease of use and breakage quality
Clip breakage matters. A clean break below the tile edge prevents sharp remnants within the joint.
Poor-quality clips snap unevenly, leaving fragments that interfere with grouting. This detail separates budget systems from professional-grade solutions.
When evaluating the best tile levellers, always test breakage behaviour before committing to large quantities.
Expert tips for perfect tile levelling results
Check alignment before tightening
Once tension is applied, adjustment becomes harder. Always confirm alignment with a straightedge before fully tightening wedges or caps.
Clean clips before adhesive sets
Adhesive build up around clips can compromise clean removal. A quick wipe during installation prevents hardened residue interfering with clip breakage.
Remove tension gradually to avoid chipping
When curing is complete, remove systems by kicking or striking in the direction of the joint. Sudden upward force risks chipping rectified edges.
Controlled removal protects both tile surface and joint integrity.
Combine with quality spacers for a flawless finish
Although some systems integrate spacing, many professionals still rely on dedicated spacers to ensure consistent joint width.
Levelling ensures flatness. Spacing ensures visual rhythm. The two should work together, not replace one another.
Tile levelling systems are no longer optional accessories. They are workflow tools that improve consistency, reduce rework and protect margins. Choosing the best tile levelling system means matching mechanical tension, tile format and project type with a solution that fits your method of working.
For specialists who demand precision without unnecessary complexity, RUBI continues to develop professional levelling solutions engineered around real site conditions. When flatness matters, the right system is not just helpful, it is fundamental.
Post a comment