
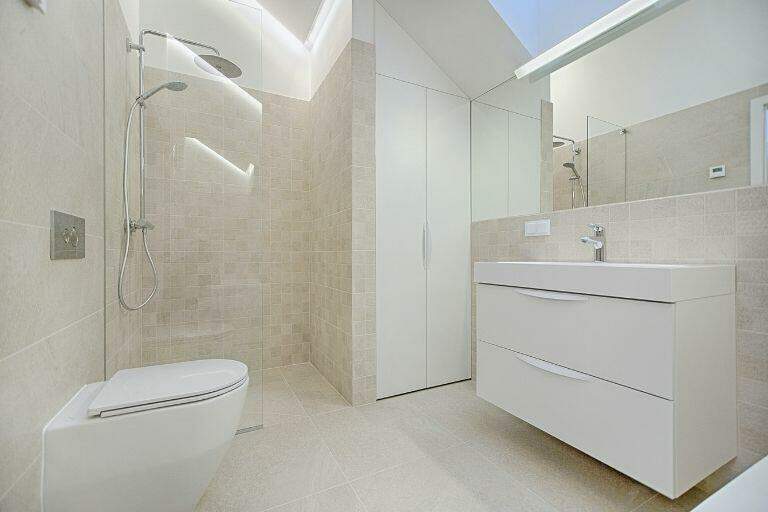
Tiling a bathroom floor has become very popular, gone are the days of damp and smelly carpets as they quite rightly are seen as unhygienic and dated. Often you will get a professional tradesman in to do the work, but if you are a keen DIYer or just fancy having a go yourself it may be easier than you think. All you need for tiling bathroom floor preparation are the correct tools, a bit of research, correct advice and some hint and tips.

RECOMMENDED TOOLS FOR Tiling Bathroom Floor Preparation
You have a few options for cutting your tiles depending on the material of the tile and the finish you want to achieve.
The easiest way to do a straight cut in a ceramic or porcelain tile is with a manual tile cutter. It is the fastest method and is very simple, all you need to do is line up the cut and score the tile with the scoring wheel, using the breaker to cut along the scored line.
You can also use the scoring wheel on a manual cutter to score a tile and you can use tile nippers, if for example, it’s just a small amount you need to trim off or a bump in the wall you need to cut around. Score the tile lightly with your cutter, and then use the tile nippers to break away at the scored line.
To give your tile a cleaner finish, we recommend using a RUBI diamond polishing pad to help you with smoothing the tile edge. This will also help reduce the risk of chipping or damaging the tile.
In this video you can see a RUBI TZ cutter in action.
The other option is to use an electric tile cutter, this uses a diamond blade to accurately cut the tile and can give an excellent clean finish to a cut. This cutter will need to be used if you are using natural stone tiles or if the cuts are going to be visible or if you want to mitre the tiles, although most of the cuts needed on a bathroom floor will be hidden by wall tiles or skirting board.
Here you can see the finish you can achieve using a Rubi DU-200 EVO.
SETTING OUT THE FLOOR
Setting out is basically planning where you are going to lay the tiles. This is a very important step. It’s worth taking your time in doing this as it can affect the overall look of the job so you want it to look good aesthetically and also work out what cuts it will leave you around the edge of the floor.
You don’t want to leave yourself putting a tiny sliver of tile on one side and ¾ of a tile on the other. You will need a tape measure and marker to help you do this. Laying down the tiles dry is a very good tip as this will give you a more visual idea on how the overall effect will look and is easy then to try different ways of laying before you commit yourself.
Don’t forget to use the spacers at this point because this can throw out your measurements quite significantly even though they may only be a few millimetres in size.
CUTTING THE TILES
Regardless of which type of Tile Cutter you have chosen you will want to get the best results from it, here are some hints and tips as we talk you through the process.
MANUAL CUTTER
Before we cut a tile it’s important you set up the manual cutter somewhere flat and steady, you can use the floor but you may find using a workbench easier as it is more comfortable to use that way.
You will have marked the tile at each end of where you want the cut to be, place the tile on the bed of the tile cutter and line up the cut using the scoring wheel by placing it on both of the marks either end of the tile. You then need to score the tile, it’s important to keep the score smooth and with an even pressure all the way along.
If you use too little pressure you won’t have created enough of a weak point and the cut won’t follow the line you want. Too much pressure and you’ll damage the edge of the cut giving a poor finish. Using the correct sized scoring wheel will help you achieve the best results. You can find that info on our website.
Once you have scored the tile, use the breaker on the manual cutter and the tile will cut in half along the score.
The type and size of tile you are cutting or working with may affect the type of manual cutter you may want or need.
Here you can see the Rubi FAST cutter in action.
ELECTRIC CUTTER
Again you need to set up the electric tile cutter somewhere level and even. The electric cutter uses water to cool the diamond blade so you need to set it up outside or somewhere you don’t mind getting wet!
Place the marked tile on the bed of the cutter and line up the cut, if you have a cutter with a plunge effect you can line it up on both marks as you would a manual cutter. If it is a fixed head cutter then line up the one end with blade and the other with the centre-point between the guides.
Using the correct diamond blade for the material you are cutting and making sure you put the blade on the right way (look at the direction arrows on both the blade and the machine!) we are ready to start the cut. When cutting, let the machine do the work and the cut should be done at a steady pace throughout the cut. It’s important not to force the cut, let the blade cut at its own pace using only light pressure.
LAYING THE TILE
You need to be able to lay (or fix) the tiles whether they are cut or uncut and there is a lot to do and consider before you start to do this.
PREPARATION
It’s important that the floor doesn’t move, the majority of bathrooms in the UK are upstairs so there are specialist tiling boards you can put down to do this.
SETTING OUT
As we have said earlier it’s important to take time to set out your tiles correctly.
ADHESIVE
Use the correct tile adhesive for the job and ensure you follow the manufacturer’s instruction when you mix the adhesive with an electric mixer.
TROWEL
Choose the correct sized notched trowel for the materials and ensure you spread out the adhesive in the same direction so there is no air trapped between the adhesive and tile.
BACK BUTTERING
If you are laying larger format tiles you must butter the back or the tile as well as trowelling the floor to achieve the maximum adhesive coverage under your floor.
BEDDING IN
When placing the tiles it’s important to bed them into the adhesive, a slight twist of the tile and then tapping down with a rubber mallet will help you do this.
For further assistance to achieve a strong bond with your tile and adhesive, we recommend using the RUBI TRILLER. The RUBI Triller, is a lightweight and compact vibrator specifically designed to remove air bubbles between the adhesive and the back of the tile. This helps to facilitate an ideal adhesion and strong bond between the adhesive and the tile.
PERFECT FINISH
Use a levelling system to ensure you have no lips between the tiles and use T or Cross spacers to ensure grout lines are uniform throughout.
GROUTING
Mix the grout with an electric mixer and mixing paddle as per the manufacturer’s instructions to achieve uniform colour. Apply with a rubber grout trowel pushing the grout fully into the joint. Leave for a few minutes (as per manufacturer’s instructions) then clean off excessive grout going in a diagonal direction across the joints so as not to remove the grout.
FINAL CLEAN
Once the grout is dry you can do the final clean and polish off the whole floor. Don’t forget to keep your tools clean as you go along.
A correctly installed job will look great and last you many years. We hope this guide helps you in achieving this.
If you have any questions please leave them in the comments!
For more tiling tips & tricks, check out more of our blogs here.
Post a comment