
You’re looking for a way to take a space from mundane to magnificent, and you’ve decided laying finger tiles is the way to go. But… how do you make this project a reality? Today we’re equipping you with the knowledge and techniques you need to do your finger tile instalation so that your finger tiles not only look great but also stand the test of time!

Materials Used for Finger Tiles
When you decide to use finger tiles in your project, you’re choosing a material that will add beauty and personality to your space. But before you start, it’s important to know about the different types of materials available and how they might affect your installation process.
Ceramic Tiles
Ceramic tiles are popular for many reasons. They’re durable and easy to clean, making them a great choice for areas that see a lot of action, like kitchens and bathrooms.
When you’re working with ceramic finger tiles, you’ll find they’re forgiving and easier to cut, which is great for DIY projects.
Porcelain Tiles
Porcelain tiles are known for their strength and moisture resistance. They are an excellent option for floors and walls in bathrooms and outdoor areas.
Installing porcelain finger tiles can be a bit more challenging than ceramic because they’re harder, requiring sharper tools for cutting.
Glass Tiles
Glass tiles bring a unique, glossy look that can make any space shine. They come in a wide range of colors and can create a stunning mosaic effect.
But glass is delicate. You’ll need to handle these tiles with care, especially during cutting, to prevent chipping.
Natural Stone Tiles
Natural stone tiles, such as marble, granite, or slate, offer a touch of natural beauty. Each piece is unique, giving your project an exclusive look.
Stone tiles need more attention during installation, including sealing and specific adhesives, to ensure they stay beautiful over time.
Preparing the Substrate
Before you start laying down your finger tiles, you’ll need to prepare the surface underneath. This step makes sure your tiles will not only look good but will also last a long time.
Importance of a Clean and Level Surface
The first step is to make sure the surface, or substrate, is clean and level. Any dust, dirt, or bumps can cause problems later on.
Imagine laying your tiles on an uneven surface; they might crack or get loose over time. That’s why starting with a clean, smooth surface is so important.
Choosing Suitable Backer Boards or Underlayment
Next, think about what’s going under your tiles. Depending on where you’re installing them, you might need a backer board or underlayment.
These materials provide a sturdy base for your tiles. They help protect against moisture and make sure your tiles stay put.
There are different types for different projects. For example, in a bathroom, you’d want something that can handle a lot of moisture without getting damaged.
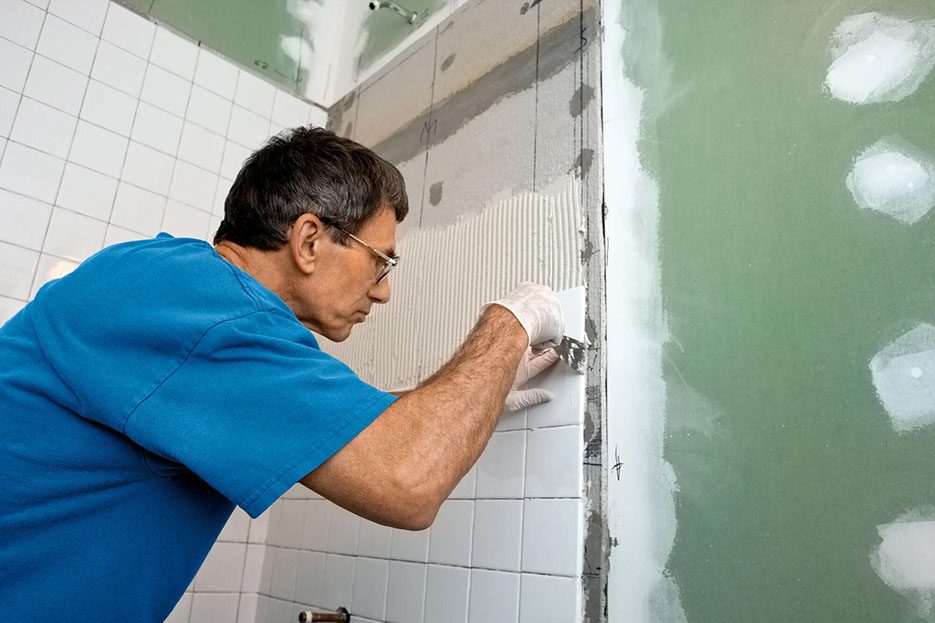
Applying Adhesive or Mortar
Getting the adhesive or mortar right is a big part of making sure your finger tiles stay where they should be. This part of the process makes sure each tile sticks firmly to the surface below.
Selection of Adhesive or Mortar
There are different kinds of adhesives and mortars, and the best choice depends on the type of tile you’re using and where you’re placing it.
For example, if you’re working with glass tiles in a wet area like a bathroom, you’ll need a waterproof adhesive that can hold up in moist conditions. On the other hand, ceramic tiles might not need something so specific.
The key is to pick an adhesive that matches your tile’s material and the conditions in the room.
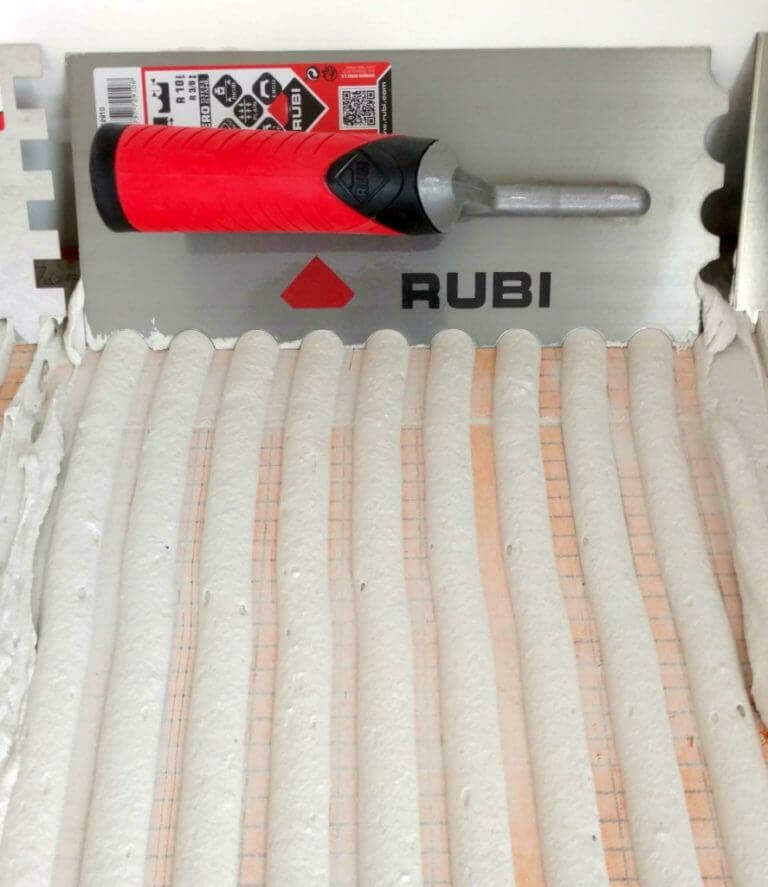
Techniques for Applying Adhesive
When you’re ready to apply your adhesive, using the right technique is important. You’ll want to spread it evenly over the surface you’re tiling.
A notched trowel is the tool for this job. It helps you spread the adhesive in ridges of the same height. This method ensures that when you press your tiles into place, they stick evenly across the whole back.
Make sure you’re also applying some adhesive to the back of each tile, especially if they’re larger or if you’re working in an area that gets a lot of use. This extra step helps make the bond even stronger.
Laying Tiles and Maintaining Spacing
Laying finger tiles correctly and keeping the spaces between them consistent are key steps in creating a beautiful surface. Whether you’re working on a wall, a floor, or a backsplash, how you place and space your tiles can make all the difference.
Placing Finger Tiles
Once your adhesive is ready, it’s time to start placing your tiles. Gently press each tile into the adhesive, making sure it makes good contact.
It’s important to place them one by one and press them down evenly. This helps avoid air pockets or loose tiles later on.
You don’t need to press too hard. Just make sure each tile is securely attached to the surface below.
Consistent Spacing Between Tiles
Keeping the spacing between tiles consistent is important for a professional look. Spacers are small tools that can help you here.
They come in different sizes, so you can choose how wide you want the gaps between your tiles to be. Placing spacers at the corners of each tile as you go can help keep everything lined up and even.
This step might seem small, but it has a big impact on the final look of your project.
Adjustments for Corners, Edges, and Transitions
Working around corners, edges, or transitions can be tricky. You might find that a full tile doesn’t fit. In these cases, you’ll need to cut tiles to fit these spaces.
Measuring carefully and making precise cuts will help ensure that these adjusted tiles fit well and look good. When you get to these more challenging areas, take your time. Accurate work here helps make sure the overall project looks great.

Cutting Techniques for Finger Tiles
Cutting finger tiles correctly is a big part of making sure your project looks good and fits well in your space. Different materials might need different tools and approaches for cutting.
Tools and Equipment for Cutting Tiles
For most tile projects, a few key tools will help you make clean cuts. A manual tile cutter works well for ceramic and porcelain tiles. It scores the tile, then snaps it cleanly along the line.
For tiles made of glass or stone, a wet saw is a better choice. The wet saw uses water to keep the blade cool, which helps prevent chips and cracks in these more delicate materials.
Always wear safety glasses when cutting tiles to protect your eyes from small, flying pieces.
Best Practices for Cutting Different Tile Materials
Each type of tile material requires a bit of a different approach when cutting. Ceramic and porcelain tiles are more forgiving and easy enough to cut with manual tools.
Glass tiles need a very gentle touch to avoid chipping, so using a wet saw with a fine blade is important. For natural stone tiles, the key is to go slow and steady, allowing the saw to do the work without forcing it.
Grouting and Finishing
After you’ve laid your finger tiles and they’re securely in place, the next step is grouting. This process fills the gaps between the tiles and gives your project a finished look.
It also strengthens the installation by keeping tiles in place and protecting edges from chipping.
Selecting Suitable Grout
Choosing the right grout is important. There are different types, including sanded and unsanded grout. The choice depends on the width of your tile gaps and where the tiles are installed.
Sanded grout is usually used for larger gaps and areas that get a lot of foot traffic, like floors. Unsanded grout works well for thinner gaps and walls.
The color of the grout also matters. It can match your tiles and make the surface look seamless. Or it can contrast with them, highlighting the tile shape and pattern.
Applying Grout for Aesthetic Effect
Applying grout properly ensures your tiles look great and the surface functions well. First, mix your grout according to the manufacturer’s instructions.
Then, using a grout float, press the grout into the spaces between the tiles. Make sure to fill them completely. After you’ve filled all the gaps, use a damp sponge to wipe away any excess grout from the tile surfaces.
This step might need to be repeated a few times as the grout sets to keep the tiles clean. Finally, after the grout has dried, applying a sealant can protect it from moisture and staining, especially in areas like bathrooms and kitchens.
Installing Tiles That Make Your Project Last
Laying finger tiles with precision from choosing the right materials to applying grout carefully ensures a stunning and durable result. Now you know the essential techniques for a beautiful project with finger tiles, enhancing any space with their unique charm and elegance.
RUBI is a leading manufacturer of equipment and tools for laying tiles and construction. Let us help you with information and necessary tools for all your tiling needs!

Post a comment