
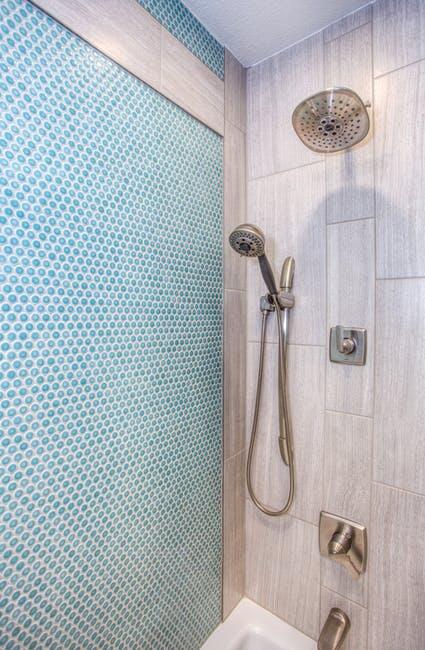
You’re looking to transform your shower from simple to stunning. So what’s a classic and charming way? The answer is a penny tile shower floor! First though, you must find out how to do a penny tile installation.
These tiny tiles pack a big design punch, offering endless possibilities to elevate your bathroom’s aesthetic. Today we’re taking you through the process of tile-laying this great-looking product!

Overview of Penny Tiles
Penny tiles might just be the small touch your shower floor needs to stand out. These little rounds of tile bring a unique look and feel to any bathroom. Unlike larger tiles, penny tiles create a detailed pattern that catches the eye and adds texture to your space.
Penny tiles come in a variety of materials, each with its own set of benefits. You can find them in ceramic, porcelain, glass, and natural stone. Let’s explore what each material has to offer.
Ceramic tiles are popular because they are cost-effective and easy to work with. They come in many colors and designs, giving you plenty of options to match your bathroom’s style. While ceramic tiles are durable, they might not hold up as well as porcelain in very wet conditions.
Porcelain tiles are known for their strength and water resistance. They’re ideal for shower floors because they can handle the constant moisture. Porcelain might be a bit more expensive than ceramic, but its durability makes it a smart choice for a long-lasting floor.
Glass tiles shine and reflect light, adding a bright and airy feel to your shower. They offer a look that other materials can’t match. However, glass tiles can be tricky to install and may cost more than ceramic or porcelain options.
Natural stone tiles bring the beauty of nature into your home. Each piece is unique, giving your shower floor a one-of-a-kind look. Stone tiles require more maintenance to keep them looking good and can vary in durability.
Choosing the right penny tile material for your shower floor means balancing style, durability, and budget.
Preparing for Installation
First things first, the shower floor must be clean, level, and dry. This ensures that the tiles will stick properly and stay put. Start by cleaning the area thoroughly to remove any dirt or debris.
If the floor isn’t level, you may need to use a leveling compound to fix any dips or bumps. This step is vital because an uneven surface can lead to tiles cracking or not fitting together well.
Layout Planning
Before you start sticking tiles to the floor, it’s a good idea to plan your layout. This means arranging your tiles on the floor without any adhesive to see how they’ll look.
It’s a great way to make sure you’re happy with the design before making it permanent. Pay special attention to the edges of the room and around the drain. You might need to cut tiles to fit these areas, so planning helps minimize waste and ensures a symmetrical look.
Taking the time to prepare properly and plan your layout will make the installation process smoother.
Installation Process
The first step is choosing the adhesive that will hold your tiles in place. There are different types of tile adhesive out there, and the best choice depends on the material of your tiles and your shower’s specific needs.
For most penny tiles, especially those made from ceramic or porcelain, a waterproof adhesive is essential. This keeps water from seeping underneath and causing damage.
Applying Adhesive
Once you have the right adhesive, the next step is to apply it to the shower floor. Using a notched trowel, spread the adhesive evenly across the surface.
Make sure to work in small sections so the adhesive doesn’t dry out before you can place the tiles. The notches in the trowel help create ridges in the adhesive. These ridges are key because they help the tiles stick better and ensure that the adhesive covers the entire back of each tile.

Laying Penny Tiles
With the adhesive down, you can start setting your tiles in place. Begin in the corner of the shower and work your way out. Press each tile firmly into the adhesive to make sure it sticks.
Use tile spacers between tiles to keep your grout lines even. This step requires patience and attention to detail to ensure the tiles are evenly spaced and aligned.
Cutting Tiles
You’ll likely need to cut some tiles to fit around the edges of the shower floor and fixtures. Tile nippers are the tool for this job.
They allow you to snip off pieces of tile to get the size you need. Cutting tiles can be tricky, so it’s a good idea to practice on a few spare pieces first.
Grouting Process
After laying down your penny tiles, the next big step is grouting. This is where your shower floor really starts to come together.
Grouting is about filling the spaces between the tiles, adding strength, and preventing water from getting underneath.
Selecting the Right Grout
Choosing the right grout is key. There are two main types: sanded and unsanded.
Sanded grout is usually used for larger gaps because the sand adds extra strength. But for penny tiles, which often have very small spaces between them, unsanded grout is usually the better choice.
It’s smoother and works well for those tiny gaps. The color of the grout is also important. You want to pick a color that complements your tiles and fits the look you’re going for in your bathroom.
Mixing Grout
Once you’ve chosen your grout, you need to mix it. Follow the instructions on the package carefully. The goal is to get a smooth, paste-like consistency.
If it’s too thick or too runny, it won’t work as well. You want the grout to be easy to spread but thick enough to stay in the gaps without running out.
Applying Grout
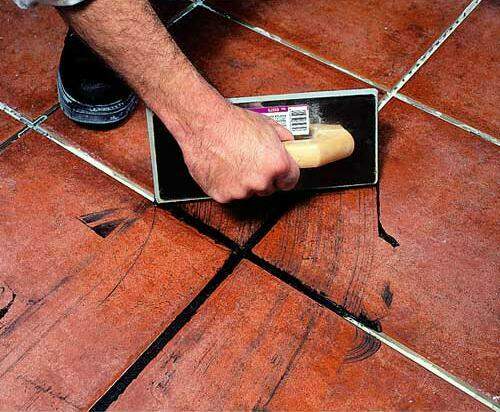
Applying the grout is a hands-on task. You’ll use a tool called a grout float to spread the grout over the tiles, pressing it into the gaps.
Move the float diagonally across the tiles to avoid pulling grout out of the spaces. After filling the gaps, use the edge of the float to scrape off any excess grout from the surface of the tiles.
Finishing Touches
After applying the grout, you’ll need to clean up. A damp sponge works well to wipe away any grout residue from the tile surfaces.
Be gentle and rinse the sponge frequently to avoid spreading the grout residue back onto the tiles. Once the grout has dried according to the instructions, it’s a good idea to apply a sealer. This protects the grout, making it more resistant to moisture and staining.
Tools and Equipment
When you’re ready to start your penny tile project, having the right tools and equipment on hand is essential. These tools help ensure that the installation process goes smoothly and that the end result looks professional.
First up, you’ll need tile nippers, as we mentioned earlier. These are crucial for cutting tiles to fit around edges, corners, and fixtures. Tile nippers allow you to snip off small pieces of tile, giving you a precise fit every time.
It might take a little practice to get the hang of it, but once you do, you’ll find they’re invaluable for custom cuts.
Next, tile spacers play a big role in keeping your tile layout even. They help maintain consistent spacing between tiles, which is especially important for penny tiles to keep the pattern neat.
Choosing the right size of spacers depends on the look you want, but for penny tiles, smaller spacers are usually the way to go.
Another key tool is the grout float. This tool is used to apply and spread grout over the tiles, pushing it into the gaps, and removing excess. A good grout float should have a firm rubber pad, which allows for even application and minimizes the chance of damaging the tiles.
Lastly, you’ll need a notched trowel for applying adhesive. The notches help ensure you’re applying the right amount of adhesive in ridges, which grips the tiles securely. The size of the notches should match the manufacturer’s recommendation for the type of tile you’re using.
Maintenance and Care
For daily maintenance, a soft cloth or mop and mild, non-abrasive cleaner are all you need. It’s best to avoid harsh chemicals that can damage the tiles or grout. Also, make sure to clean up any spills quickly to prevent staining.
Over time, you might notice the grout between your tiles getting dirty or discolored. Using a soft brush and a grout cleaner can help restore the grout’s appearance. Be gentle to avoid scratching the tiles.
Lastly, resealing the grout periodically can help protect it from water and mildew. Generally, checking the sealant once a year and applying a new layer when necessary can make a big difference.
A Gorgeous New Penny Tile Shower Floor
Installing a penny tile shower floor is a commitment to craftsmanship and care. By selecting the right materials, meticulously installing each tile, and maintaining the surface, you create a space that’s both beautiful and enduring.
RUBI is a leading manufacturer of equipment and tools for laying tiles and construction. Let us help you with information about all your tiling needs!

Post a comment