
Are you facing a renovation that requires surgical precision? Sometimes, a tile installation is already complete, but a change in plans like adding a new fixture or repairing a pipe, requires you to cut into the existing surface. Unlike cutting a loose tile on a workbench, cutting tile on a wall presents unique challenges: you are fighting gravity, managing dust in a finished environment, and trying to avoid cracking adjacent pieces that must remain intact.
If you want to learn how to cut tile already on wall surfaces, this guide will elevate your technique from a basic to a professional execution. We will focus on vibration control, specialized diamond blades, and the cleanliness required for high-end indoor jobs.


Expect to read about the tools you’ll need, the process of cutting tile, and safety tips.
Essential Tools for Cutting Tile on a Wall
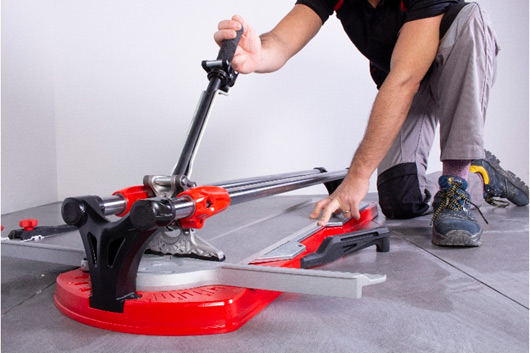
Success in cutting tiles on wall applications depends entirely on your arsenal. You aren’t just looking for “a cut”; you are looking for a clean, chip-free edge that looks like it was installed that way. While a manual cutter is your best friend for floor layouts, a wall that is already set requires power and portability.
The Power of the Angle Grinder and Diamond Blades
The most versatile tool for this task is a high-quality angle grinder. However, the tool is only as good as the edge it carries. To prevent the “chatter” that leads to cracks, you must select the right diamond blades for angle grinders.
For fine, decorative finishes, a blade like the RUBI CPC is ideal for porcelain due to its continuous rim. If you need to both cut and grind the edge to smooth out a rough opening, the RUBI ECD (a 2-in-1 blade) is a professional favorite because it allows for “shaving” the tile after the initial cut. Remember, the goal is vibration control; a high-quality, well-balanced blade reduces the micro-impacts that can loosen the adhesive bond of the surrounding tiles.
Protective Gear and Jobsite Preparation
Before the first spark flies, you must protect both yourself and the client’s home. Because wall work often puts you in awkward positions, investing in professional knee pads is a necessity. They provide the stability needed to keep your hand steady during the cut.
Furthermore, you must plan for preventing injuries by wearing wrap-around safety goggles and cut-resistant gloves. Working on a vertical surface means debris falls directly toward your body, so your stance and protective gear must be optimized for downward trajectory..
Safety First: Preventing Damage and Dust in Indoor Environments
One of the biggest “content gaps” in standard tutorials is the failure to mention the sheer volume of dust created when cutting tile on wall indoors. In a finished home, silica dust is your enemy.
Dust Management: Using Vacuum Attachments
Using dust suction and vacuum attachments is the only way to perform this task in an inhabited space. These attachments clip directly onto your angle grinder, capturing up to 95% of the particles at the point of contact. This not only keeps the air breathable but also prevents fine white powder from settling into the grout lines of the rest of the installation.
Protecting Adjacent Tiles and Surfaces
To avoid collateral damage, you should apply heavy-duty masking tape to the edges of the tiles you intend to keep. This provides a minor “buffer” against vibration and prevents the metal guard of the grinder from scratching the glaze of the wall. Additionally, hanging a plastic “curtain” around your immediate work area will contain any stray sparks or water droplets if you are using a handheld sprayer for lubrication.
Comparison: Choosing the Right Blade for the Wall
| Blade Type | Best For | Technical Advantage |
| Continuous Rim (CPC) | Porcelain & Hard Tiles | Ultra-fine finish, minimal chipping. |
| Turbo/Segmented | Fast Utility Cuts | High speed, but requires more edge cleanup. |
| Electroplated (ECD) | Cut & Grind | Versatile for outlets and smoothing rough edges. |

Step-by-Step: How to Cut Tile Already on a Wall Without Cracking It
The key to cut tile already on wall surfaces is not power, but control. When a tile is thin-set to a substrate, it becomes part of a rigid system. Any excessive vibration can travel through the grout lines, potentially loosening the bond of the surrounding pieces.
Phase 1: Precise Measurement and Marking
Before making a single rotation with your grinder, use a steel rule and a non-stain pen (like a Chinagraph pencil) to outline your cut. Professionals always use the “double-check” method: measure from the nearest corner and the floor to ensure the cut is perfectly level.
- Expert Tip: Apply a layer of high-quality masking tape over your cut line and mark your line on top of the tape. This stabilizes the glaze of the tile and significantly reduces the chance of surface chipping during the initial contact.
Phase 2: Making the Initial Score (The Relief Cut)
Never attempt a full-depth cut on your first pass. Start by scoring the surface (about 1/16″ deep) along your marked line. This “relief cut” creates a guide path for the blade and breaks the surface tension of the glaze. If you are cutting tile on wall areas that are particularly brittle, this initial score prevents the crack from wandering away from your intended path.
Phase 3: The Full Depth Cut and Material Removal
Once the score is established, make 2 or 3 additional passes, increasing the depth each time. If the blade is struggling, use a handheld sprayer to provide a light mist of water; this acts as a lubricant and keeps the diamond blades cool, extending their life and ensuring a smoother edge.
To remove the waste material, use a small pry bar or a flat-head screwdriver. Gently tap it into the joint and apply outward pressure. The goal is to pop the tile away from the adhesive without prying against the edge of the “good” tile you wish to keep.
Cutting Ceramic vs. Porcelain Tiles on the Wall: Key Differences
At this point, we may think: is it better to use ceramic or porcelain tiles for a specific repair or modification? Here’s some key differences to choose them:
- Ceramic Tiles: These are softer and have a red or white clay body. They are easier to cut but the glaze is prone to “spider-web” cracking if the blade is dull.
- Porcelain Tiles: These are much denser and more brittle. Cutting porcelain on wall installations requires a blade with a higher diamond concentration and a slower, steadier hand to manage the heat buildup.
Best Diamond Blades for Porcelain (Hard Materials)
For porcelain, we recommend a thin-kerf blade like the RUBI TVR. Its reinforced core prevents the blade from flexing, which is the number one cause of “diagonal cracking” when you are mid-way through a vertical cut.
Techniques to Avoid Chipping in Glazed Ceramic
To keep glazed ceramic looking pristine, ensure your grinder is running at full RPM before the blade touches the tile. Entering the cut at a low speed causes the blade to “grab” the glaze, leading to unsightly chips.
Professional Tips for Specialized Cuts (Outlets and Pipes)
When you need to cut a square hole for an electrical outlet or a round hole for a pipe, the approach changes:
- For Outlets: Use a 4-inch grinder to make four intersecting plunge cuts. Stop just short of the corners and finish the corners with a rotary tool for a clean 90-degree angle.
- For Pipes: If the tile is already installed, use a diamond hole saw with a vacuum-cup guide to prevent the bit from “skating” across the surface.
Common Mistakes When Cutting Installed Tiles (And How to Avoid Them)
- Ignoring the Grout Joint: Never cut through the grout joint if you can avoid it. Remove the grout first with a dedicated scraper to “isolate” the tile you are cutting.
- Pulling Instead of Pushing: Always move the grinder away from your body. This gives you a clearer line of sight and prevents the tool from kicking back toward you.
- Lack of Support: If you are removing a large section of a wall, start from the top and work down. This prevents the weight of the upper tiles from collapsing onto your blade.
Conclusion: Achieving Flawless Results with RUBI Tools
How to cut ceramic tile that is already installed is a skill that separates the amateur from the master. By focusing on the right equipment, you can perform complex renovations with zero collateral damage.At RUBI, we provide the specialized tools necessary to make vertical cutting as precise as bench cutting. For more information on our full range of professional solutions, visit our contact page here.
FAQ: Frequently Asked Questions about Cutting Tile on Walls
Can I cut a tile that is already glued to the wall?
Yes. By using a high-speed angle grinder and a specific diamond blade, you can perform precision cuts on installed tiles. The key is managing vibration so the adhesive bond on neighboring tiles remains intact.
What is the best blade for cutting porcelain on a wall?
A continuous rim diamond blade is the professional choice. It provides the cleanest edge on hard materials like porcelain and reduces the need for manual filing afterward.
How do I prevent dust when cutting tile indoors?
The most effective method is using dust suction and vacuum attachments designed for grinders. Alternatively, a constant light mist of water can suppress dust, but this requires careful management of the runoff in a finished room.
Will the vibration break the nearby tiles?
Not if you use a high-quality, balanced blade and avoid forcing the tool. If the grout is removed around the target tile first, the vibration is isolated, significantly reducing the risk to the rest of the tile installation.

Post a comment