
In the world of high-end interior design, the difference between a standard renovation and a luxury installation lies in the details. While the average American bedroom occupies about 224 square feet of floor space, the true test of craftsmanship isn’t how you cover the center of the room, but how you handle the perimeter.
Left untreated, tile edges can look unfinished, exposing the raw “biscuit” of the ceramic or the jagged micro-chips from a saw blade. Learning how to finish tile edges is more than a construction step, it is the final touch of an architectural guide that separates amateurs from master installers.

Why Finishing Tile Edges is Crucial for Your Project
Finishing tile edges is essential because it eliminates structural vulnerabilities like moisture infiltration and physical chipping while providing the visual “stop” necessary for a professional aesthetic. Without a proper finish, the transition between materials remains a safety hazard and a design flaw.
Aesthetics: The Difference Between Average and Luxury
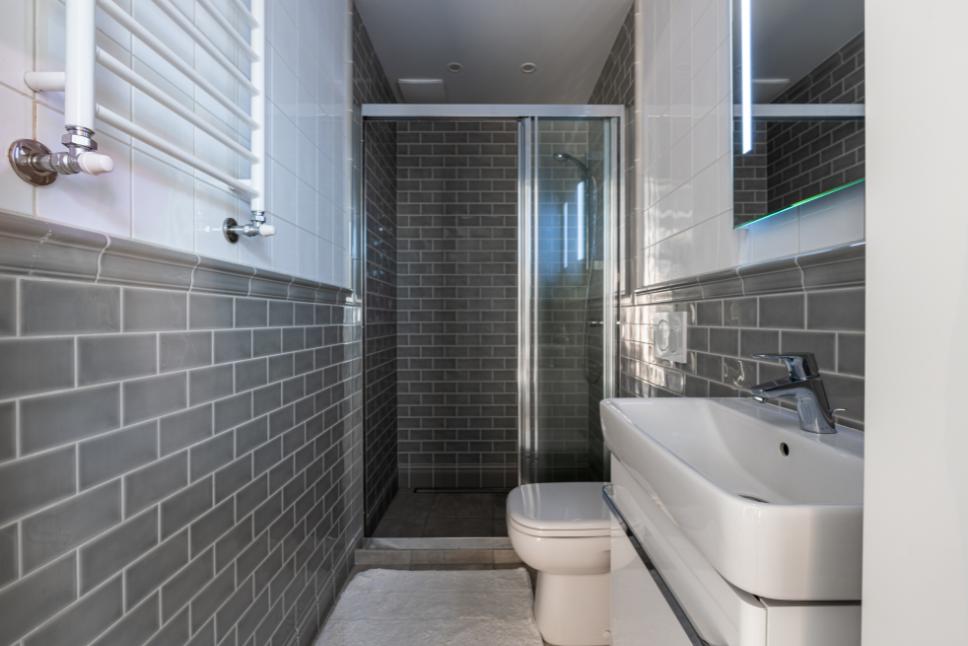
A raw tile edge acts as a visual disruption. When you look at a high-end bathroom or kitchen, the transitions are seamless. If you see the gray or tan underside of a porcelain slab, the illusion of a solid stone or high-quality material is shattered. Utilizing professional techniques to make exposed tile edges look finished ensures that the color and texture of the surface wrap around the corner, creating a sense of monolithic luxury and intentional design.
Safety: Preventing Sharp Edges in Showers and Backsplashes
Beyond looks, there is a vital functional component. In high-traffic areas or wet zones like showers, a cut tile edge is effectively a glass-sharp blade. By choosing the right method to smooth tile edges, you protect users from accidental cuts. This is especially critical in niches and external corners where the body often comes into contact with the wall. A refined edge is a safe edge.
How to Finish Tile Edges: Top 4 Professional Methods
The four most effective professional methods to finish tile edges include installing metal or PVC profiles, creating a custom bullnose using diamond polishing pads, executing a 45-degree mitered “Jolly” cut for a seamless look, or using color-matched caulking for simple, low-profile transitions.
1. Using Trim and Profiles (Schluter and more)
One of the most popular and durable ways to manage transitions is through the use of profiles. These metal or plastic strips tuck under the tile and provide a clean, straight line that hides the cut edge. Whether you want a sleek chrome finish or a matte black accent, you can effectively install a tile border that protects the porcelain from impact while adding a modern touch to the room’s geometry.
2. Creating a Bullnose Edge with Diamond Pads
When a matching factory bullnose isn’t available, pros create their own. This involves grinding the edge of a field tile into a radius. To do this effectively, you must use high-quality diamond blades to make the initial cut, followed by a sequence of polishing pads. This method is the gold standard for natural stone and through-body porcelain, as it allows the material’s natural beauty to flow over the edge without any external metal visible.
3. The Mitered Edge (Jolly Corner): The Seamless Look
For those seeking the pinnacle of refinement, the mitered edge, often called a Jolly corner, is the answer. This technique involves cutting the meeting edges of two tiles at a 45-degree angle. When joined, they form a perfect 90-degree corner where only the glazed surface is visible. Achieving this requires precision beveling and mitering equipment to ensure the two points meet without “chattering” or breaking. It is the preferred method for modern, minimalist architecture.
4. Caulking and Painting: Quick Fixes for Simple Tiles
In scenarios where the tile is thin or the budget is tight, you can still learn how to make exposed tile edges look finished by using specialized color-matched caulk or tile paint. This is often seen in subway tile installations.
By applying a neat bead of caulk along the top edge and smoothing it to a 45-degree angle, you create a transition that blends into the wall, making the raw edge effectively disappear.

How to Sand Ceramic Tile Edges for a Smooth Finish
To achieve a factory-grade finish on a cut tile, you must follow a mechanical polishing process using diamond abrasives. Starting with a coarse grit to remove material and ending with a high-count grit to restore shine is the only way to professionally sand ceramic tile edges.
Dry vs. Wet Sanding: When to Use Each Technique
Deciding how to sand tile edges depends largely on your environment. Wet sanding is the professional preference for porcelain and stone because the water acts as a coolant, preventing the tile from cracking due to heat while also suppressing harmful silica dust.
However, for quick onsite touch-ups or when working with softer ceramics, dry sanding with a high-quality hand pad is a viable and efficient alternative that allows for better visibility of the finish as you work.
Recommended Diamond Grit Progression for Porcelain
To truly smooth tile edges, you cannot simply use a single grit. You must follow a “progression of refinement.” For a professional porcelain finish:
- 3000 Grit: The final stage to achieve a high-gloss factory shine. Following this sequence will speed up your tiling process by ensuring you aren’t fighting deep scratches at the final polishing stage.
- 50-100 Grit: For aggressive material removal and shaping the radius.
- 200-400 Grit: To remove the scratches left by the previous step and begin honing the surface.
- 800-1500 Grit: This is where the satin sheen begins to return.
Tools You Need for a Flawless Edge Finish
A flawless edge requires specialized diamond technology. You need a combination of hand-held diamond pads for detail work and mechanical beveling systems.
Diamond Polishing Pads and Hand Pads
Standard sandpaper will not work on modern porcelain. You require diamond polishing pads which are engineered to withstand the hardness of the material. Hand pads are excellent for sanding tile edges that have minor imperfections, while velcro-backed pads for grinders are necessary for creating a full bullnose. Having these in your kit ensures you can handle any site-specific challenge.

Beveling and Mitering Machines (RUBI JOLLY)
For large-scale projects, manual sanding is inefficient. This is where professional tile cutting tools come into play. A dedicated machine allows you to create consistent bevels with surgical precision. When paired with a high-performance leveling system, you ensure that every mitered corner aligns perfectly, preventing “lippage” and protecting the fragile points of the mitered edge.
Common Mistakes When Finishing Exposed Tile Edges
Even experienced installers can stumble when it comes to the finer details.
One of the most common errors is skipping grit levels during the sanding process. If you jump from 100 to 1000 grit, you will leave deep “swirl marks” that become visible under bright bathroom lighting.
Another mistake is over-polishing. If you are working with a matte tile, polishing the edge to a high gloss will make the edge stand out for the wrong reasons. Finally, always remember to seal the edge if you are working with natural stone after you have finished sanding, as the newly exposed surface will be porous and prone to staining.
If you want to ensure your next project moves from “average” to “luxury,” make sure to shop our range of professional tools designed to give you the perfect edge every time.
Frequently Asked Questions about Tile Finishing (FAQs)
How do you hide the cut edge of a tile?
The most effective way to hide a cut edge is by using a metal profile or by placing the cut edge in a corner where it can be covered by a factory edge or a bead of silicone. If the edge must be exposed, sanding and polishing it to match the tile’s face is the best way to make it “disappear.”
Can you sand down porcelain tile edges?
Yes, you can sand porcelain tile edges, but you must use diamond-infused abrasives. Porcelain is much harder than ceramic, so traditional sandpaper will wear out instantly without making a dent in the material.
What is the best way to finish subway tile edges?
For subway tiles, the most “classic” look is achieved using a matching bullnose piece or a simple pencil liner. If those aren’t available, a neat bead of caulk or a very slim, minimalist Schluter-type profile provides the cleanest modern finish.
Do I need a special tool to create a bullnose edge?
To create a professional bullnose, you need a variable speed grinder, a set of diamond polishing pads, and ideally a bullnose profile wheel. For small DIY projects, a set of diamond hand pads can work, though it requires significantly more physical effort.

Post a comment