

The most renovated kitchen feature is countertops, with this being the remodeling choice 91% of the time. Backsplashes come in at a close second at 86%. If you are going to be remodeling any counters, you may need tile edge trim. This is the perfect finishing touch for different types of tiles in your kitchen. Although, just about any tile installation could use a tile edge trim. This is something you will want to look into if you are doing some home remodels.
Keep reading to find out how to install tile edge trim and everything you need.

How to Install Tile Edge Trim
You are going to need to understand tile installation for this project. If you are doing that yourself, research is going to be a big part of preparing for installation.
There are certain steps you will need to follow to do this project the right way. After all, doing it the right way is going to guarantee a beautiful finished result.
This will impact the longevity of your counters since they need to be installed properly. Here are the steps you should follow during tile installation.
Choose the Trim
The first thing you need to do is look at tile materials. There are so many kinds of trim you could choose depending on the look you want.
The trim must match the thickness of the tile for it to work. In fact, it is best to choose a slightly thicker trim for a more professional result where the tiles are flush.
It is also important to make sure the trim matches the tiles. This is not necessary, but it will create a seamless look where you won’t be able to see the trim itself.
If you are going for a more dramatic look, you could choose contrasting colors. But for the most professional look, it is usually better to create a similar color palette.
For kitchen counters, you will usually need two straight trim pieces with a rounded interior edge. This will change depending on where the trim is going to go.
If you are adding this to a bathroom or a sink, you may need different trim accessories. This is why you need to do research into the type of project you are taking on.
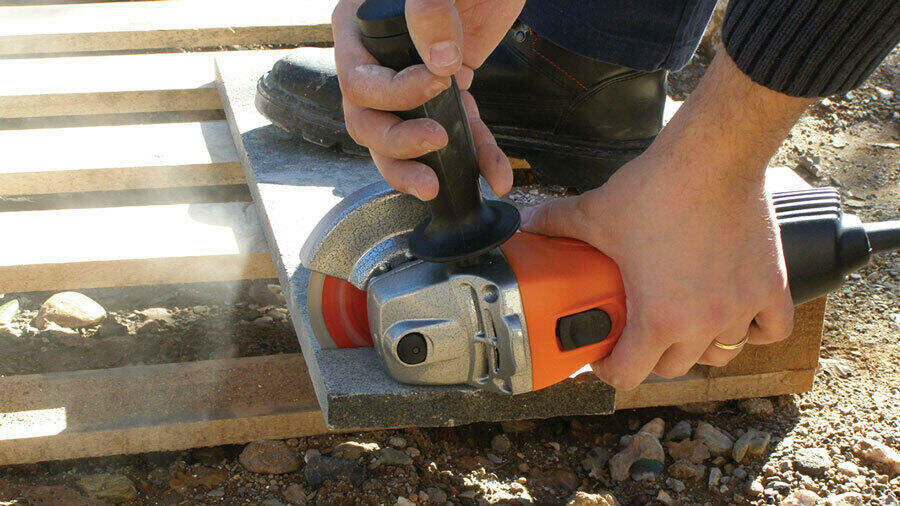
Cut the Trim
When installing tile edge trim, you will need to also cut the trim. Some time is necessary to do this the right way since you need to align the trim with the tile edge.
You can either do this by eye, marking the areas where you need to cut with a pencil. Or you could measure the tile edge and cut the trim with those measurements.
You will need cutting tools to cut the trim accurately and with straight lines. You will often need to cut at an angle, so you may want special cutting gear.
Take some time to get to understand these cutting tools before starting. This will help you to avoid making mistakes that will result in you needing to buy more trim.
Secure It
The next thing you need to do is secure the trim in place. The most common way to do this is to use tile adhesive; a caulking gun will make this easier.
Only apply the adhesive where you are currently working. It dries quite quickly, and you don’t want to have to scrape it off and start again.
If you want extra security, you could always use screws in the trim. Keep in mind that this may look a bit messy if you aren’t careful, ruining the professional appearance.
Cut and Lay the Tiles
When the tile edge trim is installed, you can cut and lay the tiles. You will need another type of saw to cut the tiles without breaking them.
Mark where you need to cut on the tiles so that you don’t make mistakes. Then you need to secure the tiles in place and try to make them as even as possible.
You should be using tile mortar and tile spacers for security and a professional look. If you make any mistakes, you can always pull up the tiles, and re-position them.

What Materials You Need for Tile Edge Trim
To install tile edge trim yourself, you need a few tile tools. The main things that you need are the tiles and the trim that either match or contrast in color.
Tile adhesive is also necessary for both the trim and the tiles. You should have a caulking gun or an adhesive spreader to spread out the adhesive evenly.
You also need it to have spacers so that the tiles are evenly spaced out. It is also a good idea to have a level to make sure everything is sitting even.
You should also have cutting tools to help you cut the trim and the tiles. There are a variety of tools available to do this, so you may want to do a bit of research.
Cleaning rags may also be helpful in cleaning up the space as you go; as well as a vacuum or a broom, so that you can work in a clean space.
You don’t want dust and debris getting in the way of your adhesive doing its job.
Tips for Tile Edge Trim Installation
Now that you know how to install tile edge trim, there are a few tips to remember. These tips will help you to get a professional look with your tile finishes.
This also ensures that the finished result will hold up for a long time. Doing the job correctly is very important in making sure your countertops withstand wear and tear.
You also want to make sure you are doing this safely so that you don’t injure yourself.
Use Thick Gloves
Make sure you are wearing heavy-duty gloves when applying tile edge trim. You will be cutting the trim and the tiles, so you need to protect your hands.
You may also be handling sharp pieces of trim and tile during installation. Gloves will protect your hands, and make sure you don’t accidentally cut yourself.

Choose the Right Materials
DIYers also need to make sure they are buying the right materials for their tile project. For instance, tile counters in bathrooms and kitchens may require different materials. You also want to make sure you are getting the most durable material for your home. This is not an area where you want to try to save a few dollars.
Wear Safety Glasses
You also need to make sure you are wearing safety glasses when cutting items. There’s always a chance of something being cut off and coming toward your face.
This is also a good idea when you are applying the tile adhesive. It may end up in your eyes, and you definitely don’t want to have to deal with that.
Take Your Time
When applying tile edge trim, it is very important that you don’t rush the process. Take your time and work from one small area spreading out.
For professional results, you need to make sure you step back and see what you have done. This allows you to catch issues early on before you finish the project.
When Do You Need Tile Edge Trim?
You may be wondering if you need to add trim to your tile countertops. The reality is that this is usually necessary if you want a good final result.
A tile edge creates a finish that replicates professional countertops. It creates a seamless look so that all of the counters pull together.
This also helps to protect the countertop tiles from wear and tear. The edges of the tiles will not be exposed, reducing the risk of chips and broken tiles from occurring.
These kinds of repairs are very time intensive and costly. That is why it is better to make the investment into adding a trim to prevent these issues.
Tile Edge Trim: Everything You Need to Know
If you have added tile to your kitchen, you may need tile edge trim. This is the best way to complete the job and give it a professional and polished look.
Installing tile edge trim is more simple than you may think. There are only a few steps in the process with a few materials that are absolutely necessary.
The majority of DIY enthusiasts would be able to tackle this project with plenty of success.
Are you interested in installing tile edge trim on your tile project? Contact us today at Rubi for high-quality tile installation tools.

Post a comment