Tile installation can be tricky, but picking your pattern can also be tough. There are plenty of simple patterns out there, so what should you choose if you want a more unique look? That’s where Penrose tiling comes in! Here’s an overview of this fascinating tile pattern and how to install it.


Periodic and Aperiodic Tiling
To understand Penrose tiling, you first have to understand periodic and aperiodic patterns. This may sound complicated but don’t worry! We break it all down for you.
Basically, periodic tiling is what you most commonly see in any sort of construction. Oftentimes, square tiles are set in a simple grid pattern. More complex tile shapes, such as triangles or hexagons, may also be used, but they are almost always placed in regular, repeated patterns.
This means that if you look at the pattern, it will eventually be repeated if you shift from side to side or up and down. This is called translational symmetry. Even a lot of fancier designs will eventually be repeated with translational symmetry.
Aperiodic tiling, on the other hand, does not repeat. There are many patterns of aperiodic tiles, but the idea remains the same. As you move in any direction, you won’t get repeated patterns.
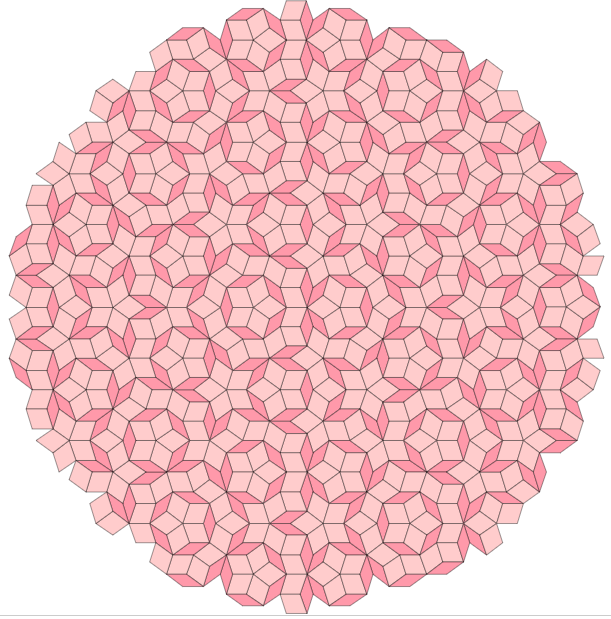
What Is Penrose Tiling?
Named after Roger Penrose, a mathematician and physicist, Penrose tiling is a pattern that can produce beautiful, unique art. Penrose tilings are a form of aperiodic pattern. Like other aperiodic patterns, this means they don’t repeat themselves.
Part of what makes Penrose tiling so beautiful is that it can have rotational symmetry and reflection symmetry, even though it doesn’t have translational symmetry. With a Penrose tile pattern, you can rotate it around a central point and it’ll still look the same. However, if you slide it sideways, it won’t.
The mathematics behind creating a Penrose tile pattern are fairly complex, and it typically takes someone with a lot of time on their hands and good mathematical knowledge to create this type pattern. But the end results are amazing works of art!
Picking Your Pattern
Thankfully, you don’t have to be a mathematical genius to find a Penrose tile pattern that suits you. There are several premade patterns you can copy to use in your home renovations.
However, you can also use an online app to help you create a new pattern. You can customize your choices and play around to see what kinds of styles, colors, and tile mosaics work for you.
This takes a lot of the work out of calculating how your tile will look, so all you have to do is find a pattern you like and copy it down! Make sure you copy the pattern or write it down so that you won’t get shapes mixed up. You can fix mistakes if you lay your tile wrong, but it won’t be fun.
Picking Your Tile
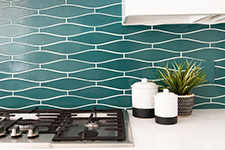
Once you have selected a Penrose pattern you like, it’s time to pick the tiles that will fit your pattern. Many people go with two contrasting colors to really make the design pop. Others will only pick one color and just let the pattern speak for itself.
While white and off-white are very common colors for tiling projects, there are plenty of other choices out there. You could contrast black and white, or go with blue and orange if that’s what your heart desires. Whatever choice you go for, make sure it’s one that suits the style of the space you are working in.
It can be a good idea to go to a tile supplier and ask if you can get some samples. You can place those sample colors where the tile will go, and see how you feel about the combinations of colors.
When you decide what tile you want to buy, it’s important to find the size and shape that fits your project. At the very least, make sure you can cut the shapes you need! Sometimes you can buy precut tiles in the shape you need, but other times you’ll have to cut the tiles on your own.
Cutting Tile
But how do you cut tile? Isn’t it made of ceramic?
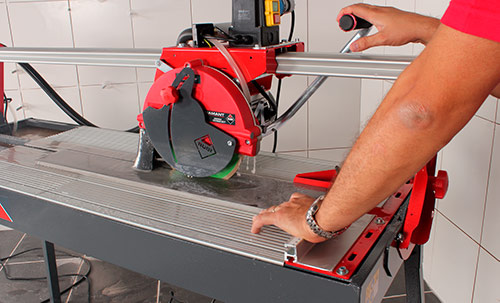
Yes, most tiles are ceramic, but that doesn’t mean they can’t be cut! RUBI offers both electric and manual tile cutters as well as plenty of other tiling tools to help you cut, shape, and lay tile.
Whether you get a wet tile saw or a manual cutter to cut your tiles, you should be able to make both straight and angled cuts. Many tile projects involving Penrose tile patterns will have regular shapes like diamonds, which you should be able to cut easily. If you want to use irregular shapes, you’ll have to determine whether a particular type of tile cutter can perform irregular cuts.
Either way, it’s important to follow all the safety procedures for cutting tile. Besides the cutters themselves, the edges of the tile can be quite sharp when cut!
It’s also always a good idea to buy more tiles than you plan to use. Some of them will be great to keep as replacement pieces for down the road, but you’ll almost certainly break some pieces as you try to cut them. Having extras on hand gives you the ability to experiment a little bit and get your pattern down without the fear that one mistake could ruin the whole project.

Laying Tile
Once you have your pattern all set and your tiles picked out, it’s time to actually lay the tile! This can be a tricky process, but the end result is always amazing.
First, take a look at the surface you’re tiling. Is it smooth, or is it rough and porous? You’ll want to tile onto a layer of something like concrete board or plywood for the best results. You should outline your pattern on this surface to guide you as you lay your tile.
Once you have a good surface, spread enough tile mud or tile adhesive for a few tiles. You should start in a corner or space that won’t be seen a lot. This way, any mistakes you might make aren’t easily visible.
Then take something like a RUBI notched trowel and scrape grooves in the mud at a 45-degree angle. You should apply a thin layer to the back of each tile as well. This makes it easier for the tile to stick and not slide around.
Now you’re ready to place the tile! Put the tile in its position and push down, wiggling a little bit to get everything even and smooth. Many people use levels to ensure the tile is even.
As you put more tiles in place, remember to include tile spacers to give you an even space between your tiles for grout. Eyeballing the distances can be tough, so having firm objects to keep your tiles in position is the best option.
Gently wipe off any tile mud that got on top of the tiles (preferably while it’s still wet), then let the tiles sit for at least 24 hours. After this, you should be able to walk on the tiles and start grouting!
Grouting Tile
Finally, the fun task of grouting. You can either get a powder and mix the grout yourself, or you can buy a premade mix. Either way, try to pick a color that will fit well with the tile color (or colors) you’ve chosen.
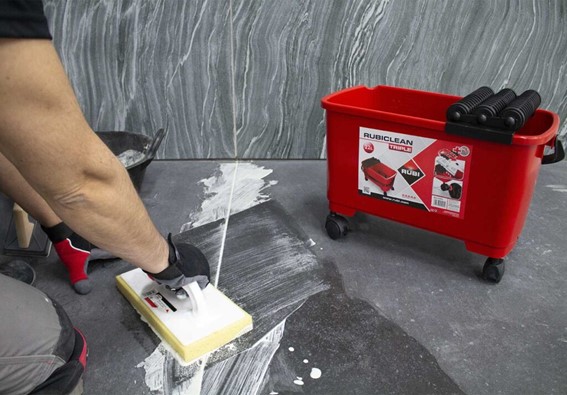
Basically, you place a good amount of grout on the tiles and spread it with a rubber grout float. Make sure you’re filling in all the cracks and edges completely and smoothly! Once you have one area completely grouted, scrape the excess grout away or towards your next section with the float.
Then, get a damp sponge and wipe the tiles off, being careful not to remove the grout in the cracks! When working with a team, someone can follow behind and do the cleanup on one section while you start the next, but it’s possible to do it all on your own as well. After the grout has hardened, you can get a wet rag and clean the rest of the grout off the tiles.
You’ll probably want to seal your grout as well once it has hardened. There are a variety of grout sealants out there, and they have different instructions for timing and application methods, so make sure to follow the instructions exactly.
Once you’ve finished that and cleaned everything up, it’s time to celebrate! You have created a beautiful Penrose tile pattern!
Learn More About Tile Techniques and Tools
Now that you know how to pick your pattern and lay Penrose tiling to make a beautiful feature, you’re ready to get out there and get started!
If you have any questions or concerns, or need guidance on what tools to get, we’d love to help! Feel free to contact us, and we’ll provide you with the best tile equipment and advice we can offer. We want you to be confident in your tiling project and proud of your results!

Post a comment