
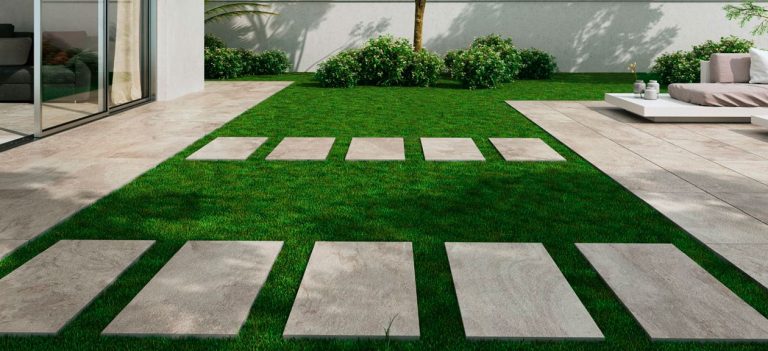
You’re searching for a new ‘look’ for your patio. Something modern & stylish that’s easy to maintain and deal with the varying weather conditions. You could consider 20mm porcelain tiles as an option for the outside of your home. It will give it a contemporary feel to your patio and is easy to maintain. In todays, how to tile blog, we explain everything you need to know about laying porcelain tiles outside.

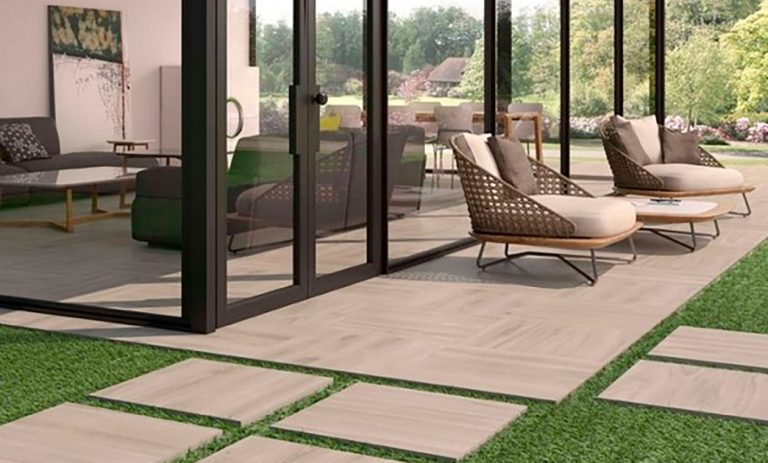
The advantages of laying porcelain tiles outside are obvious, they are very easy to clean, look beautiful and combine well with the interior as there are many finishes available such as imitation stone or wood among others. They are also very hard, do not freeze and do not slip. Other solutions may be cheaper, but they will deteriorate much faster and require constant cleaning.
There are a number of ways to lay porcelain tiles outdoors, with the most economical being to tile over a concrete base.
Another option is to go for a self-levelling pedestal system. These are more intended for balconies and terraces but can be used on the patio as well. It is a matter of researching each system and choosing the option that best suits the needs of the installation. It is also recommended if the patio is going to be above DPM level.
A third alternative for laying porcelain tiles outside, is to install them on 100 mm compacted type one subbase. It needs to be laid in 2 sections of 50 mm thick, then compacted down with a whacker plate before putting the next 50 mm down and compacting again. Once it is dry you can then start laying your 20 mm porcelain on a 30 mm bed of sand and cement mix in a 4:1 ratio.
To grout the tiles, you will be required to use a ‘brush in’ type of grout, as most grout companies won’t guarantee their product as they do not class compacted type one subbase as a solid base.
MATERIALS NEEDED
Let’s see what materials we need to lay tiles outdoors:
- Porcelain Tiles – choose very wisely, check the quality of the tile, I like to use Spanish or Italian.
- An outdoor porcelain tile should be a minimum 20mm with a R11 slip rating.
- Sub base – MOT (Type 1).
- Mortar (Sharp Sand & Cement).
- SBR/Priming Slurry.
- Jointing Compound (Choose Wisely).
We must not forget that we will certainly need to cut some pieces, for which we will need specific tools.
NECESSARY TOOLS
In addition, we will need the correct tools for laying porcelain tiles outside:
- A mixer to beat the grout and adhesive, such as our new RUBIMIX 9 Supertorque.
- An electric tile cutter with a minimum of 1.5hp motor and plunge and correct porcelain blade.
- A spirit level, the longer the better.
- A rubber mallet.
- A trowel to level the cement.
- A measuring Tape.
- A string Line
- A wheelbarrow to move the materials around the patio.
- A suction cup or 2 to help with lifting and installing like our Rubi Suction Cup With Vacuum Pump.
- A shovel to work the materials.
- A grout float (or brush if using brush in grout) to apply the grout.
- Sponges and buckets for cleaning such as our RUBICLEAN.
On the PPE side, as always, we recommend working with safety footwear, a mask for working with adhesives and cement, and gloves. Always make sure to lift correctly, keep children and pets away from the area while working, try to work in good weather & make sure to clean and tidy the area and tools at the end of each day.

Steps for laying tiles outdoors
Now that we know everything we need to know, let’s get down to the work.
Step 1 – Preparation
Before we start we need to mark and prepare the area. We have the option of installing over the existing patio or removing everything and laying on top of the concrete. The first option will save time and money by not having to pick up debris.
However, if we are starting from scratch and working above ground, we need to create a base, usually consisting of about 5-10 cm of concrete and a protective membrane.
It is important to make sure that the patio will not hold water to avoid problems. This is why we need to leave a minimum slope of 1.2 to 2 cm every metre so that rainwater does not pool in the patio and is directed to the right place.
Step 2 – Sub base
When laying porcelain paving you will need a firm and level sub base.
The recommendation in a domestic situation is 100mm compacted MOT will be suitable, in some cases if the ground is soft you may need to go deeper.
It is beneficial to install a geo textile underlay on top of your substrate to avoid ingression off the sub base into the substrate, this should be installed prior to laying your MOT.
It is essential that the dig should reflect the finished level of the intended paving to ensure water run off.
A solid sub base is required as any movement beneath the paving will cause cracking which can affect you patio surface.
As a safe guard and in addition to your sub base you can introduce a 3”-4” compacted lean mix bed which will create rigidity and help adhesion of the mortars.
Step 3 – Mortar Bed
Follow the water to powder ratios the manufacturer recommends. This can normally be found on the back of the bags, and mechanically mix with a mixer like the Rubimix 9 Supertorque.
Prepare a semi dry bed using 5 sharp sand to 1 cement ratio (5:1). This semi dry formula will have compressive strength and also by reducing the water content this will help to reduce mineral deposit which could be detrimental to your grouting system.
To ensure a correct moisture content in your semi dry mix you can test this by forming a cricket size ball of mortar and as long as it holds it shape without falling apart this will be the perfect mix.
Additives can be introduced into your mortar at this stage although it is essential to check with the cement manufacturer as sometimes these additives may have been already included. For example: Plasticiser
Step 4 – Bonding Bridge
A bonding bridge is a glue which will stick your tile to the mortar bed. This will ensure delamination of your paving during the curing process, giving your paving longevity.
Your paving will fail very quickly if this process is not carried out. The bonding agent is applied to the back of each paving tile before laying
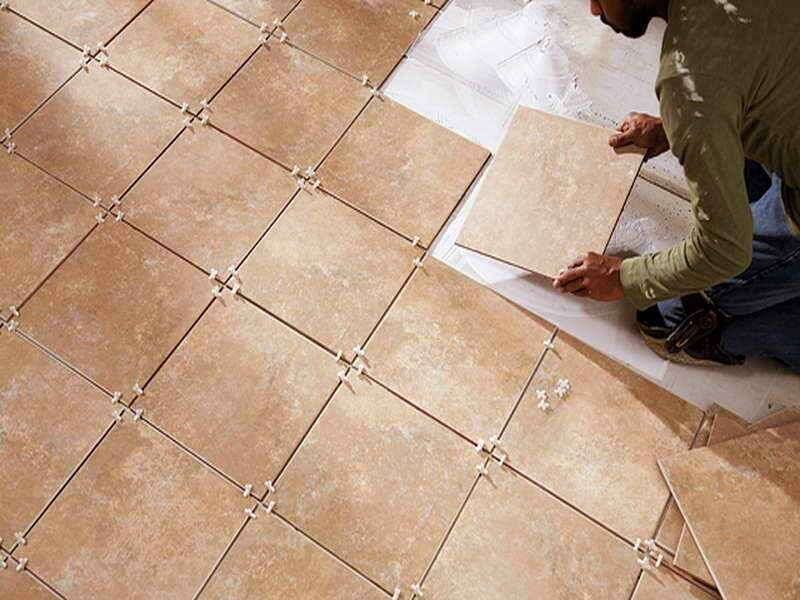
The first tile is the most important, it has to be perfectly aligned as it will be the base for the rest. Make sure you follow the line correctly, lay the tile, tap it with the rubber mallet and set it level with the help of your level.
It is important to take your time with this and not to step on any of the tiles until the adhesive has dried completely. We will go on laying the following tiles with the help of a levelling system and spacers to leave the grout joint size we want.
 Step 5 – Laying the Porcelain Tile
 Step 5 – Laying the Porcelain Tile
The porcelain tile should be laid on the full mortar bed.
To avoid water pooling on the surface of your porcelain paving it is recommended that you have a fall between 1:60 – 1:80, it is essential to run the water off the surface over the shortest distance.
Porcelain is impermeable and water tension will be apparent even with a patio with a suitable fall.
Ensure the height of the finished tile does not breach the damp proof course on any adjacent buildings.
You’re finished patio height should be 150mm or 2 bricks below the damp proof course.
Step 6 – Apply the grout and clean
This is a tricky part of the job. You have to mix the grout slowly to prevent it from drying out and clean it while it is still fresh to make it easier, so it is best to go slowly.
We apply what we have mixed and clean it with a sponge before continuing. We use a grout float to apply it and do not hesitate to fill the joints well as it is the barrier against water and gives additional support to each tile.
A full bond between the mortar and tile is important for the strength of the completed
surface.
Step 7 – Enjoy a job well done
Spacers can be used between each tile to ensure an equal joint throughout the area. I would recommend a minimum joint of 3mm for a outdoor porcelain tile, however you should follow the manufactures guidelines for grout width.
Step 8 – Clean
Follow the above steps until the whole surface area is convered
Once complete give the tiles a quick clean and remove any surface debris or primer.
Step 9 – Grouting (now this is whole subject on its own)!
Before grouting, it is essential that the mortar has been allowed to completely cure and
spaces removed.
The joints should be clean and free of any debris, including leaves, small stones or
foreign particles.
It is imperative that each joint is dry prior to grouting to avoid dilution of the grout.
(Please follow the manufacturers grouting guidelines)
Sit back & enjoy your newly completed patio! Let us know what you think of this step-by-step guide on laying porcelain tiles outside, we look forward to your comments.
For more helpful tiling tips, check them out here.

Post a comment