
Knowing how to mix mortar and adhesive is one of the key elements in every tiling job. Whether it’s tiling a bathroom, kitchen, or outdoor paving slabs, knowing how to tile with the right adhesive and mortar mix is crucial to a successful installation.
That’s why we’ve put together some essential tips and tricks to ensure that you are making the best adhesive for the job at hand. It’s necessary to know how to create the right adhesive no matter what brand or type you use.


The Basics of Mortar Mix
While each brand varies from the next, each bag should have instructions printed on it. Things that will vary include the ratio of adhesive to water, slake time, pot life*, and open time**. Once you’ve taken note of these things, the following steps should lead to no surprises.
*Pot life means the length of time a grout or adhesive can be used after mixing it. After the pot life has been reached, the product should be discarded.
**Open time refers to the time after applying an adhesive during which it will still bond and secure the tile. This can be influenced by the nature of the substrate (absorbent substrates reduce open time) and also the ambient conditions. Keep in mind that warm, dry conditions reduce the open time.
Additives
Most modern adhesives usually have at least one type of additive added into the mix nowadays, which can change the properties of the final product, such as flexibility, strength, curing times etc. Ensuring that you understand this and how it will affect the adhesive you use is crucial to a successful installation.
Dry cement mix is useless until it’s mixed with water. However, once water is added, the molecules in cement start to expand and grow small crystals. These crystals start to grow around each other and connect together, making cement strong.
However, adding a modifier to the mix helps achieve a more substantial product, especially when tiling. The polymers in the modifiers allow the cement mix to retain water for a longer period of time as the water doesn’t evaporate through the polymers. This allows the polymers to surround the cement crystals, which can then grow into the pores of the tile and substrate, creating a stronger bond.

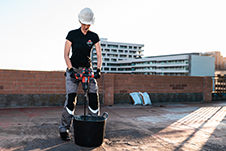
Tools for Mixing Mortar
Last but not least, you have to consider the tools you’ll use. Most importantly, you want a mixer with the right paddles. A low rpm is recommended because that way, you won’t incorporate too much air into the mix. You also want to use spiral paddles, not “egg beater” style paddles, as these will incorporate too much air into the mix.
Our range of electric mixers have the low rpm you’ll need and come with the recommended spiral paddle. Combine this with a rubber bucket or two, and you should be good to go.
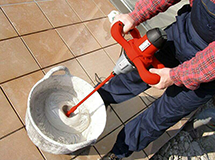
One of our first tips is to add the water to the bucket first before adding the dry mix. This way, you avoid the cloud of particles that can occur when you add the water to the dry mix. You can also ensure that everything is mixed together nicely.
Furthermore, creating the mix this way allows you to gauge the consistency and make changes where needed. The consistency you’re looking for is that of peanut butter. Add in a little dry mixture at a time and then see if the overall needs more water or more dry mix. Ideally, you want the swirls at the top of the bucket to stay there without disappearing.
Mixing Time
The next tip is to look at the recommended time for mixing. Most brands recommend 5-10 minutes of mixing to ensure each particle is saturated and blended nicely together. This isn’t a step you want to skip.
Although we know that it’s time-consuming and takes away precious time from the job, it’s essential to get the right consistency. We recommend mixing for at least 2 minutes after you’ve got the right consistency just to be safe.
Let the Mortar Rest
Another tip is to remember to let the mixture slake once it’s reached the right consistency. This means letting the mixed adhesive sit untouched for 10 minutes. If you skip this step, the mixture won’t perform correctly. It can get stiff and unworkable if you use it straight away, which won’t allow the adhesive to bond or cure correctly with the tile. Slaking also provides the maximum working time once the adhesive is thoroughly mixed.
As we mentioned, most mixes have additives in them. These are usually polymers that allow for longer exposure to water. If you don’t slake, these polymers can’t absorb the water completely, so the mixture will have dry polymers, which will lead to a weaker bond.
Once you’ve reached the right consistency and let the mixture slake, give the adhesive one last mix to ensure all the polymers and additives are evenly distributed. Do not add more powder or water to the mix at this stage! This will only result in an installation failure.
Lastly, always have a bucket of water on hand and a wire brush to quickly wash your tools and prevent the adhesive mix drying onto them.
That’s everything! Now you know how to mix the best adhesive. Be sure to share these tips with your colleagues and friends.

Mixing adhesive is a technical procedure which either qualified manufacturers or tile masons are can execute. The tile mason or construction advisor will provide the best technique and ratio for every kind of application. MYK laticrete has a large array of ready to use adhesives for every application
It would seem that mixing glue is not such a difficult task, but in fact, in construction, everything requires technological control and tracking of tasks, materials and technology.
It would seem that mixing glue is not such a difficult task, but in fact, in construction, everything requires technological control and tracking of tasks, materials and technology.
Good site you havee here.. It’s difficult to find quality writing like yours these days.
I seriously appreciate people like you! Take care!!
Thiss iss myy first time pay a visit аt һere and i am truⅼy
impressed to read everthing at single ρlace.
It’s remarkable to pay a quick visit this site and reading the views of all colleagues concerning this paragraph, while I am also keen of
getting experience.