
Whether you’ve been installing porcelain floor tiles for years or you’re just learning how to tile, you can’t deny that this material can add a certain charm to any room. From the kitchen to the bathroom to the living room, even outside, they can be used anywhere. Porcelain tiles are attractive, durable, and require little maintenance.
However, as durable and versatile as this material can be, installing porcelain floor tiles is a complex job that requires special care and preparation. You can’t tackle this project without a clear plan, prep work, and a lot of patience. Rush through it, and the tiles won’t survive the sudden spills and constant wear and tear. Learn how to install them properly so that you can take advantage of their strength and durability.
With that in mind, here’s a comprehensive guide that will teach you how to install porcelain floor tiles that will last for years to come.

STEP 1: ASSESS AND PREP THE FLOOR
First, carefully inspect the surface upon which you plan to install the floor tile. Keep in mind that as strong and durable as porcelain tiles may be, they will crack if the subfloor is uneven or thin. As a rule of thumb, make sure that the subfloor is no less than 3cm thick. Otherwise, it may flex, causing the grout to fail and the tiles to break. If you’re not sure whether the base is sturdy enough, just jump on it. Yes, it may sound silly, but it’s an excellent way to determine if there’s any flex or movement.
A concrete slab is an ideal base for a floor installation project, but wood can work as well, as long as it’s firm.
After assessing the sturdiness of the subfloor, you need to ensure that the surface is smooth and flat. Trying to install floor tile against a protrusion will result in a sloppy-looking project that won’t stand the test of time.
STEP 2: MEASURE FOR THE PORCELAIN FLOOR TILES
Before you can begin the actual installation process, you need to figure out how much porcelain tile you will need and how you should place it. You want the final result to look smooth and symmetrical, so you need to find the centre of the surface on which you will be installing the tiles. Once you’ve identified the starting point, measure the surface from the sides.
Pay special attention if the floor isn’t square because identifying the baseline won’t be as obvious. Try to find the most distinct wall and use it as the starting point. That way, the lines will be parallel to that wall, making your work look even and symmetrical.
The next step you will need to take is to estimate the amount of porcelain tile you will need. You can do that by using a simple math equation: calculate the square footage of the room and add five percent for waste.
Here’s an example: if the room is 10 ft. X 12 ft., then the total area of the surface is 120 ft. Add six square ft. (five percent) for eventual breakage and other waste. Therefore, you will need to purchase enough porcelain tile to cover 126 square ft.

STEP 3: DETERMINE THE LAYOUT
The prep work is over yet. Although you may be eager to start laying the porcelain floor tiles and see your vision come to life, you first need to ensure that the layout will be even. So, before you begin setting the tiles in place with mortar, dry-fit them over the surface to determine whether the layout is even or if you need to make any adjustments.
Make sure that the space between the tiles is uniform. Resist the urge to push the tiles closer together to reduce the width of the grout lines. Especially if you have large porcelain tiles, the space between them should be large as well. Otherwise, the grout won’t bond properly, and it will break down prematurely, thus leading to potential leaks and water damage.
Now that you’ve determined the layout, use a pencil to mark the outer edge of the tiles so that you know where to position the furring strip. This step will provide an accurate overview for when you will set the tiles in place with mortar.

STEP 4: CUT THE PORCELAIN FLOOR TILES
A dry layout enables you to see how the final result will look and if there are any adjustments that you need to make. For instance, you may notice that you need to cut some of the tiles to make them fit the surface properly. You can choose to cut the tiles before you set them or to install the full-size plates first, allow them to dry, and then add the cut ones.
Because cutting porcelain floor tiles is a complex and delicate job, you must ensure that you have the right tools to work with.
A tile cutter from RUBI specifically designed for porcelain tiles will ensure that your cuts are clean and accurate. If you decide to cut the tiles as you go, then you will need professional tile saws, like these here. These portable tile saws are excellent for projects that require you to make cuts directly at the place of installation. Needless to say, precision is of the utmost importance, so you will need tools that offer the highest accuracy and quality.
STEP 5: SPREAD THIN-SET MORTAR

The prepping part is finally over. Now begins the part where you can install the tiles and turn your vision (or your client’s vision) into reality.
Consider the room where you will be installing the porcelain floor tiles. If we’re talking about a kitchen, bathroom or hallway (rooms that are prone to moisture) then make sure to waterproof the area beforehand.
Also be sure to use adequate tile adhesive. Check the label to determine how long it will take for the adhesive to dry. Communicate the drying time to your clients as well and let them know that they should avoid walking on the tiles during this period. Otherwise, they might damage the bond between the tiles, causing them to loosen and the grout joints to crack.
Mix the thin-set with the adhesive until you get a peanut butter like consistency with an electric mixer like our new E-10 CAS Battery Mixer. Let it sit for about ten minutes before you spread it on the surface floor. This is called slaking, and allows all the molecules to fully absorb the water.
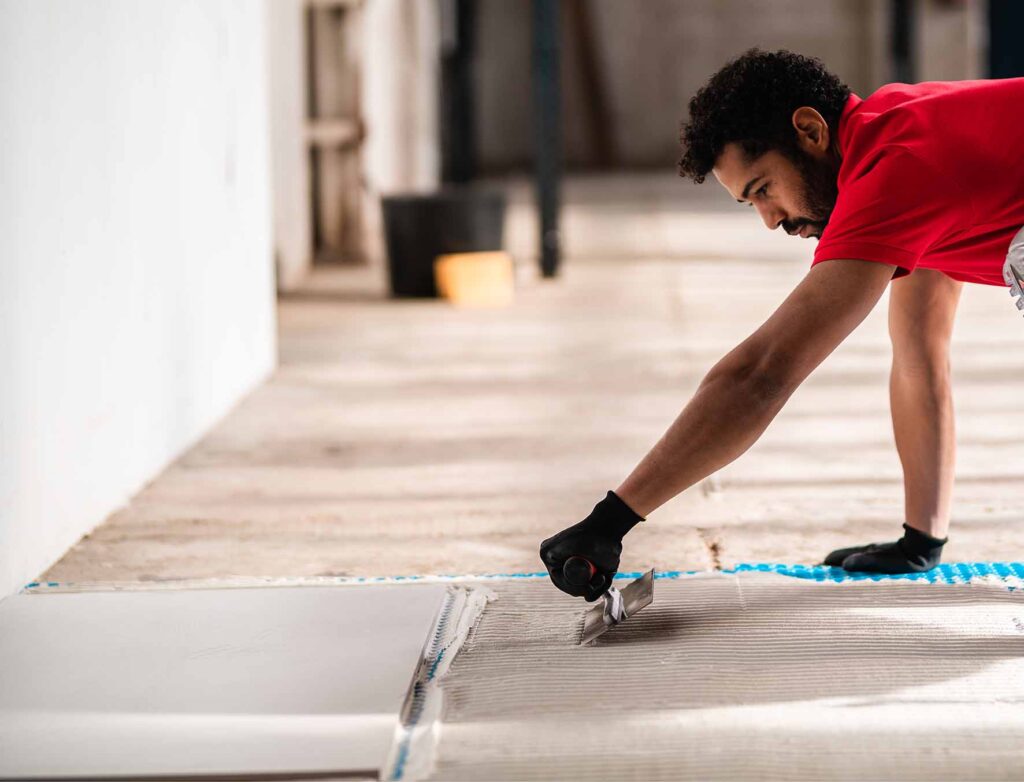
Use a trowel to spread a layer of adhesive. Hold it at a 45-degree angle to spread the mortar evenly and ensure that there are no bulges or gaps.
STEP 6: SET THE PORCELAIN FLOOR TILES
Lay the tile gently over the thin-set. Push the tile down with your fingertips to set it in place firmly. Twist your wrist slightly as you do so to spread the adhesive over the surface of the tile.
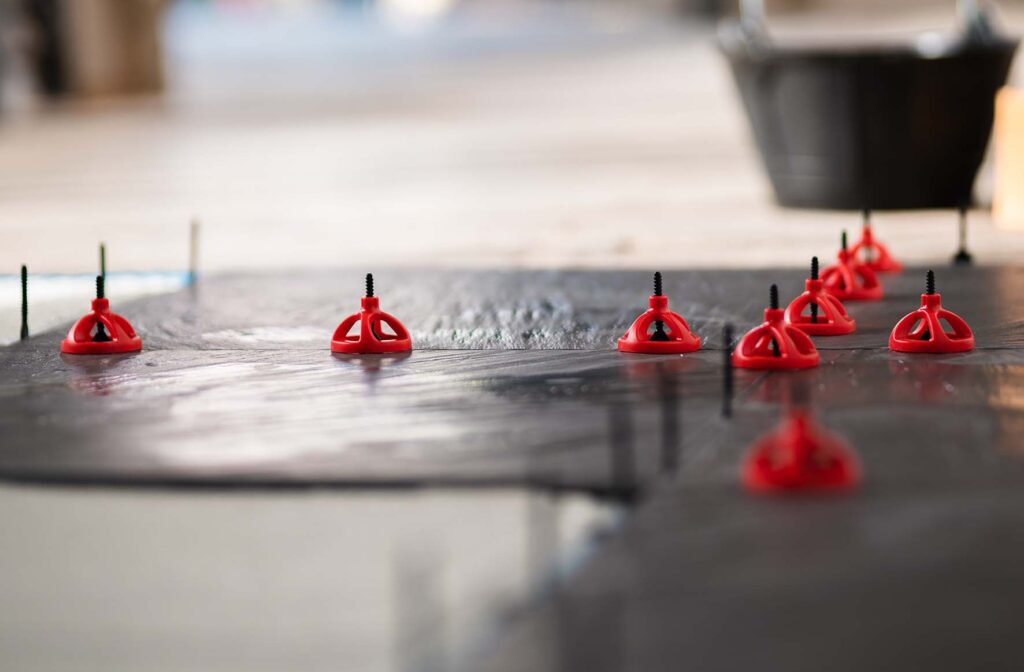
Begin from the centre of the room and move towards the walls. Apply constant finger pressure as you go to avoid lippage. You can also use levelling clips as you lay each tile to ensure there is no lippage.
Our cyclone system is great for professionals and beginners alike. The twist caps are intuitive to use, and can be used up to 20mm tiles with a 5mm grout joint, including large format tiles.
The circular base allows for even pressure across all the tiles, and once the tiles are set you simply remove them by force (either with a mallet or a kick in the direction of the grout joint).
STEP 7: FINISHING TOUCHES
Once the adhesive is dry, you can begin preparing and applying the grout. Mix it until you obtain a smooth yet firm paste. Spread the grout evenly and use a blunt stick to force it between the joints of the tile.
Use a big sponge and water to remove the excess and give the floor tile an even look. Keep in mind that this part is painstaking work and you will need to wash the surface several times to obtain the result you want.
After the grout has dried, use a dry cloth to buff the tiles. Use vinegar to remove any dirt or residue. Last but not least, apply a grout sealer to ensure that everything will be kept in place.
CONCLUSION
After several days of hard work, your job is complete! It may have been a difficult process, but the result is well worth it. Not only that, but because you’ve followed all the right steps, were patient, and didn’t skip any of the prep work, you can be confident that your porcelain floor tiles will last for years to come.

Post a comment