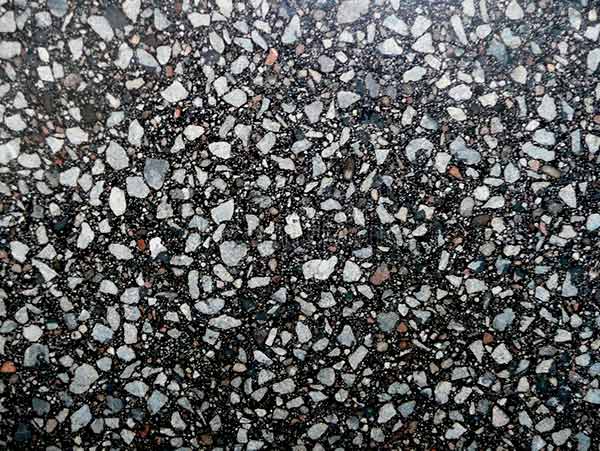
Terrazzo tile, with its timeless allure and durability, has been gracing homes and public spaces for centuries. Its unique blend of functionality and aesthetic appeal makes it a popular choice for both traditional and contemporary design projects. Whether you’re renovating your kitchen, bathroom, or creating a stunning focal point in your living space, knowing how to tile with terrazzo opens up a world of possibilities. In this comprehensive guide, we’ll delve into the art of working with terrazzo tile, exploring the essential tools, offering valuable tips, and igniting your creativity with inspiring project ideas.

Tools of the Trade
Before diving into your terrazzo tile project, it’s crucial to gather the right tools to ensure precision and efficiency. Here’s a rundown of the essential equipment you’ll need:
Cutting Terrazzo Tile
A quality manual tile cutter equipped with a carbide wheel is indispensable for achieving clean, precise cuts on terrazzo tiles of varying thicknesses. Here at RUBI we offer a vast range of manual tile cutters suitable for cutting this material.
Trowel Options
Select a notched trowel with the appropriate notch size for your adhesive. You can learn more about selecting the right type of trowel for your size tile by reading our blog here. This tool ensures proper adhesive coverage, promoting strong adhesion and minimizing air pockets.
Top Tip! Remember to trowel in the direction of the short edge of your tile. This creates a short channel in the adhesive grooves for air to escape. Air pockets left under your tile can leave weak spots, leading to a tile failure.
Grout Floats
Grouting is the last step in tile installation. But just because it’s the last step, doesn’t make it just as important as everything else. Grout protects the surface behind the terrazzo tile, creating a seal in-between each one. A grout float is essential for spreading grout evenly and smoothly into the joints between the terrazzo tiles. Opt for a rubber float for optimal results.
Wet Saws
When intricate cuts are necessary, or a tile is exhibiting signs of tension, a wet saw equipped with a diamond blade is indispensable. This tool enables you to achieve intricate shapes with ease, with a great finish on the cut edge.
Some tiles do not cut well on a manual tile cutter, as any faults or tension in the tile can cause the tile to snap away from the scored line. Whereas, a diamond blade on a saw will cut through the tile. You can view our range of wet saws available here.
Levelling Terrazzo Tile
Maintaining a level surface is crucial for a professional tile installation. A high-quality spirit level helps you ensure that your tiles are laid evenly and without any unwanted slopes or dips. However, some tiles are not made equal. In this case, a levelling kit is also needed. Using a levelling kit enables you to ensure each tile is laid seamlessly with the tiles next to it and around it, making a smooth application and finish.
Sponge and Bucket
Keep a sponge and bucket of clean water handy for wiping away excess adhesive and grout. This ensures a neat, polished finish to your terrazzo tile installation.
Safety Gear (PPE)
Don’t forget to prioritize safety. Wear gloves, safety goggles, ear defenders, and a dust mask to protect yourself from potential hazards associated with cutting and installing tiles.
Dust generated from removing and cutting tiles can lead to silicosis. Cutting tiles on a wet saw, or with an angle grinder, can also create debris which can cause harm if proper precautions are not followed.

Tile for Success
Working with terrazzo tile requires attention to detail and a meticulous approach. Follow these tips to ensure a smooth and successful project.
Plan Ahead
Before starting your project, carefully plan the layout of your terrazzo tiles, considering factors such as pattern orientation, tile placement, and the location of cuts. This preparation minimizes mistakes and ensures a cohesive, visually pleasing result.
Proper Surface Preparation
Ensure that the surface where you’ll be installing your tile is clean, smooth, and free of debris. Use a primer or sealer as needed to ensure proper adhesion and prevent moisture penetration.
Use the Right Adhesive
Select a high-quality adhesive suitable for the terrazzo tile you’ve chosen for installation. Follow the manufacturer’s instructions for correct preparation and application. Make sure to take note of the working time and curing time to achieve optimal results.
Allow for Expansion Joints
To prevent cracking or shifting over time, incorporate expansion joints into your terrazzo tile installation, especially in large or high-traffic areas. Consult with a professional if you’re unsure about placement and spacing.
Practice Proper Grouting Technique
When grouting terrazzo tile, work in small sections, applying grout diagonally across the tile joints. Use a grout float to press the grout firmly into the joints, then remove excess grout with a damp sponge before it dries.
Top Tip! Always have two buckets of water on hand for cleaning up grout. A clean bucket of water and a working bucket of water will help prevent grout haze.
Seal Your Terrazzo Tile
Once the grout has fully cured, apply a quality sealer to protect your tile installation from stains, moisture, and everyday wear and tear. Reapply sealer as needed to maintain long-lasting beauty and performance.
Some tiles will need to be sealed prior to installation and grouting, so make sure you check the manufacturer guidelines on the packaging of the tiles.
Terrazzo Tile Project Ideas
Now that you’re equipped with the knowledge and tools to tackle this project, let’s explore some creative ideas to spark your imagination.

Terrazzo Tile Kitchen Backsplash
Transform your kitchen with a stunning terrazzo tile backsplash. Choose a vibrant colour palette or opt for classic neutrals to complement your existing décor.
Statement Flooring
Make a bold statement in your entryway or living room with terrazzo tile flooring. Experiment with custom patterns or incorporate decorative borders for added visual interest.
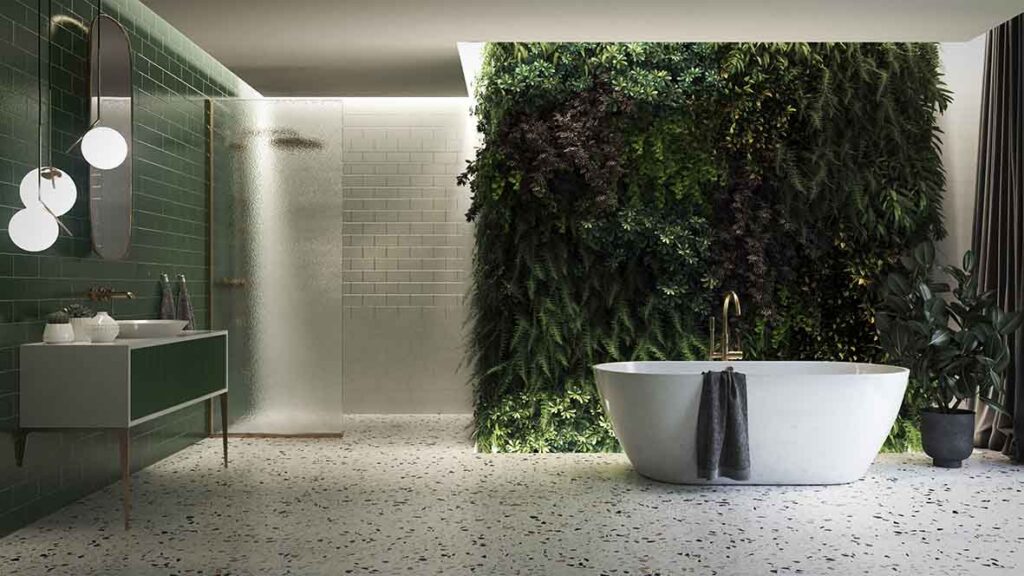
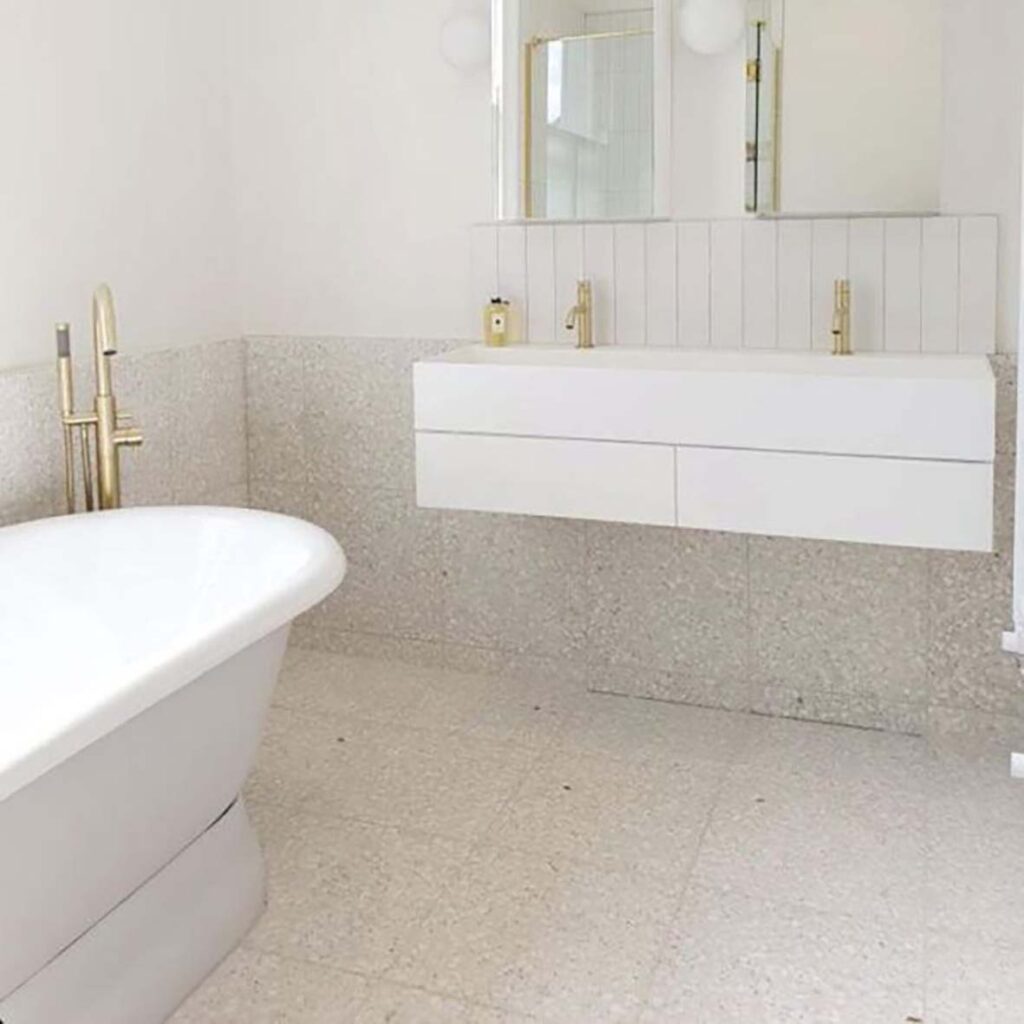
Spa-Inspired Bathroom
Create a tranquil oasis in your bathroom with terrazzo tile shower walls and floors. Pair with sleek fixtures and natural accents for a spa-inspired retreat.
Terrazzo Tile Outdoor Patio
Extend your living space outdoors with a terrazzo tile patio. Durable and weather-resistant, this tile is the perfect choice for creating an elegant outdoor entertaining area.
Working with terrazzo tile opens up a world of design possibilities, from timeless elegance to modern sophistication. By arming yourself with the right tools, following expert tips, and embracing your creativity, you can embark on a rewarding journey to transform your home with the enduring beauty of this classic tile.
Whether you’re embarking on a small DIY project or a full-scale renovation, let terrazzo tile be your canvas for crafting spaces that are as functional as they are stunning.

Post a comment