
You want to transform your space into a vibrant oasis, with touches of artistry and tradition. So where do you start? With Moroccan tile, this vision isn’t just a dream. It’s a reality within reach. Today we’re covering everything you need to know about Moroccan tiles, from selecting the perfect pieces for your bathroom and kitchen to mastering the tile installation process. Dive into the world of Bejmat and Zellige tiles, and discover how these handmade treasures can solve the puzzle of creating a captivating space that stands the test of time. Welcome to the art of Moroccan tile elegance!

Understanding Moroccan Tiles
Moroccan tiles carry a rich history, dating back centuries. They are known for their vibrant colors and intricate designs.
These tiles are not just decorative pieces. They are a testament to Morocco’s cultural heritage.
Craftsmen in Morocco have passed down their tile-making skills from generation to generation. This tradition has made Moroccan tiles famous worldwide.
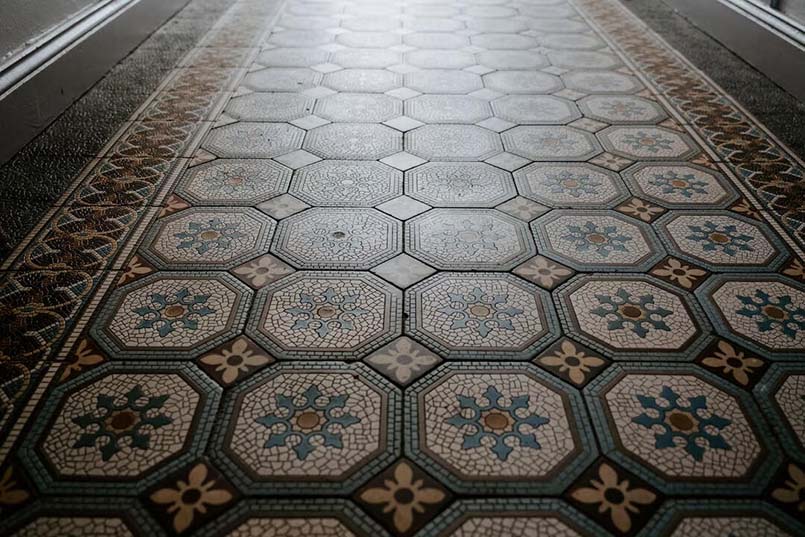
There are different types of Moroccan tiles, each with its own unique beauty. Bejmat tiles are often used for flooring. They are rectangular and can create stunning patterns. Their earthy tones bring warmth to any room. Zellige tiles are another popular choice. These tiles are known for their glossy finish and variation in colors.
No two Zellige tiles are exactly the same. This uniqueness adds character to walls and other surfaces. Handmade tiles are also a significant part of Moroccan tile art.
The handcrafting process gives these tiles a unique charm. The slight imperfections are what make them perfect. They reflect the human touch behind their creation.
Choosing Moroccan tiles means bringing a piece of Moroccan culture into your home. It’s about adding warmth, color, and a story to your living spaces.
These tiles are not just for looks. They are durable and can last for years with proper care. This makes them a wise choice for anyone looking to add beauty and function to their home.
Pre-Installation Considerations
Before you start laying down your Moroccan tiles, there are a few things you need to think about. Choosing the right tiles is the first step. You have to think about where you’re going to put them.
Are they for a bathroom or a kitchen? This matters because you want tiles that can handle water in a bathroom and tiles that can take a lot of foot traffic in a kitchen.
You also want to pick tiles that match the look you’re going for. Moroccan tiles come in many colors and patterns. Some might be bright and bold, while others are more subtle.
Measuring and planning are also key steps. You need to know how many tiles you’ll need.
To do this, measure the area where you’ll put the tiles. Then, plan out how you want the tiles to look.
This might mean deciding on a pattern or figuring out which tiles will go where. It’s like putting together a puzzle. You want to make sure everything fits just right before you start.
Another thing to consider is the look of the space. Moroccan tiles can make a room look bigger or smaller depending on their size and color.
Light-colored tiles can make a small room look bigger. Dark tiles can make a big room feel cozier.
The pattern of the tiles can also affect how the room feels. Some patterns can make a room look busy. Others can make it look calm.

Tools and Materials for Installation
When you’re ready to install Moroccan tiles, you need the right tools and materials. First, let’s talk about the tools.
A tile cutter is a must-have. It helps you cut tiles to fit your space perfectly.
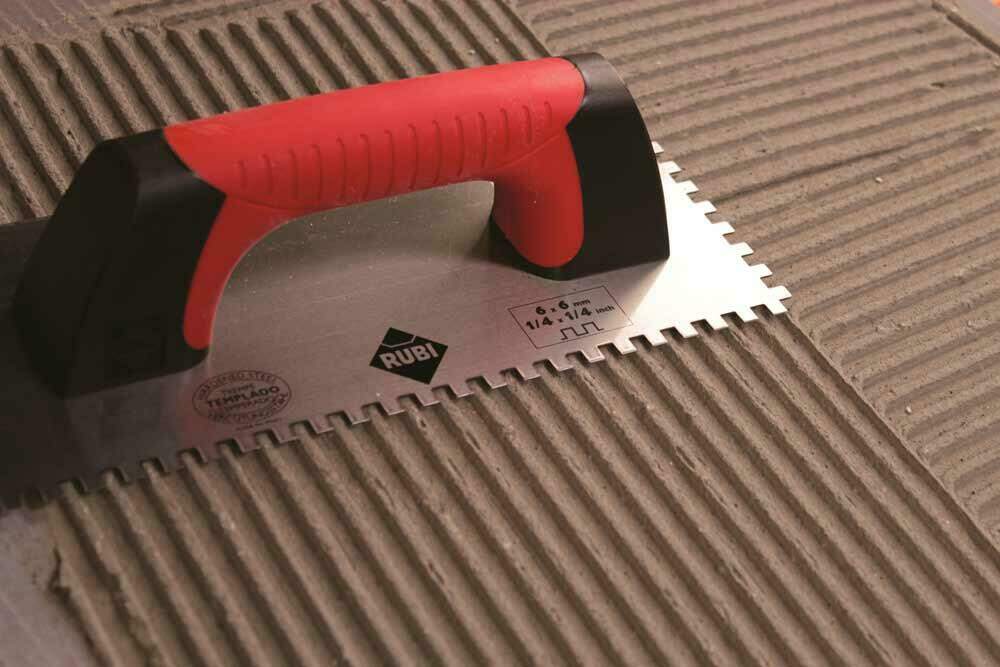
A notched trowel is another important tool. You use it to spread adhesive evenly on the floor or wall. This helps the tiles stick better.
A level is also crucial. It makes sure your tiles are straight and even.
No one wants crooked tiles! You’ll also need a sponge and a bucket of water. These are for cleaning up any mess and wiping excess grout off the tiles.
Now, onto the materials. The adhesive is what you use to stick the tiles to the surface.
There are different kinds of adhesive. Make sure you choose one that’s right for Moroccan tiles and where you’re placing them.
Grout is what you put between the tiles once they’re in place. It fills the gaps and makes everything look finished.
Like adhesive, there’s more than one type of grout. Some are better for areas that get wet, like bathrooms.
Safety is important too, so don’t forget safety gear like gloves and goggles. Cutting tiles can be messy and dangerous, and gloves protect your hands from that process. Goggles keep your eyes safe from dust and small pieces of tile.
Installation Process
Installing Moroccan tiles is like putting together a piece of art. Each step is important to make sure the final look is just right.
The first step is preparing the surface. This means making sure the floor or wall is clean, dry, and level.
If the surface isn’t smooth, the tiles won’t stick properly. Sometimes, you might need to fill in holes or sand down bumps.
Next, you mix the adhesive. Follow the instructions on the package carefully. The right mix will make sure the tiles stay put.
Using your notched trowel, spread the adhesive on the surface. Don’t cover too much area at once. The adhesive dries quickly, and you want to place the tiles before it does.
Laying the Tiles
Now, it’s time to lay the tiles. Start from the center of the room and work your way out. This helps keep the pattern even. If you’re using Bejmat tiles on the floor, remember they’re often laid in a brick pattern.
Zellige tiles, with their unique shapes and colors, are great for walls. They catch the light beautifully.
Press each tile firmly into the adhesive. Make sure it’s level with the tiles around it. A rubber mallet can help tap them into place.
After the tiles are laid, let the adhesive set. This usually takes about 24 hours. Once it’s dry, you can start grouting. Grout fills the spaces between the tiles.
It adds to the look and makes the surface stronger. Pick a grout color that complements your tiles.
Spread the grout over the tiles, pushing it into the gaps with a grout float. Then, use a damp sponge to wipe away any excess grout from the tile surface. Be gentle to avoid pulling grout out of the gaps.
Finally, let the grout dry. This can take another 24 hours. Once it’s dry, you might notice a haze on the tiles, but a soft cloth can buff this away.
Sometimes, you’ll face challenges. Tiles might not fit exactly, or the surface might be uneven. In these cases, patience is key.
Measure twice and cut once. For uneven surfaces, using a bit more adhesive can help level out the tile.
Moroccan Tiles for a Bathroom
Using Moroccan tiles in a bathroom can turn a plain space into a spa-like retreat. The tiles’ colors and patterns bring a sense of calm or vibrancy, depending on what you choose.
For a bathroom, it’s important to think about water. Moroccan tiles, especially Zellige tiles, are great for wet areas. They can handle splashes from the sink or shower.
When picking tiles for a bathroom, consider the mood you want to create. Light colors can make the space feel bigger and more open. Dark or bold colors add depth and warmth.
Patterns can also play a big role. A geometric pattern might make the space feel modern. Floral designs can add a touch of elegance.
Waterproofing is key in bathrooms. Make sure the tiles are sealed properly. This will keep them looking good for years, and it also helps prevent water from damaging the walls or floor.
Moroccan Tiles for a Kitchen
Moroccan tiles can also transform a kitchen from ordinary to extraordinary. They add color, pattern, and texture, turning the backsplash or floor into a stunning feature. When it comes to kitchen backsplashes, Moroccan Zellige tiles are a popular choice.
Their glossy finish reflects light, making the space brighter. The variations in color and texture of these handmade tiles add depth and interest to your kitchen walls.
For kitchen floors, Bejmat tiles are a practical and beautiful option. Their durability makes them ideal for high-traffic areas like kitchens. Plus, their natural earth tones create a warm and inviting atmosphere.
These tiles can be laid out in various patterns, offering endless design possibilities.
Accent features in kitchens, such as an island or countertop edges, can also be highlighted with Moroccan tiles. This adds a unique touch that catches the eye and ties the room’s design together.
The Beauty of Moroccan Tile
Incorporating Moroccan tile into your home brings a unique blend of tradition, artistry, and practicality. From bathrooms to kitchens, these tiles offer durability and timeless beauty, transforming ordinary spaces into vibrant, elegant havens.
RUBI is a leading manufacturer of equipment and tools for laying tiles and construction. Let us help you with information about all your tiling needs!

Post a comment