
So, after weeks of procrastinating, you decided to redo your tile installation yourself. Of course, you also bought all the tile trowels and installation tools. Or so you thought. You sweated and grunted for hours laying tile. But as you admire your finished work, you realize something is off. Your tile isn’t level. It’s because you didn’t use a tile leveling system.
Read why a tile leveling system can save time and perhaps thousands of dollars. Before starting your next professional tile installation job, learn the tips for proper tile leveling.
Improper tile leveling might lead to bad reviews from your clients. Bad reviews can lead to you not being able to pay the bills. So before heading to the tile cutter, learn the power of a tile installation system.
You’ll be unstoppable with the proper tile leveling tips for any tile installation job.

What is a Tile Leveling System?
Tile leveling systems work to accurately level and bond tile onto surfaces. They are also known as tile leveling spacers.
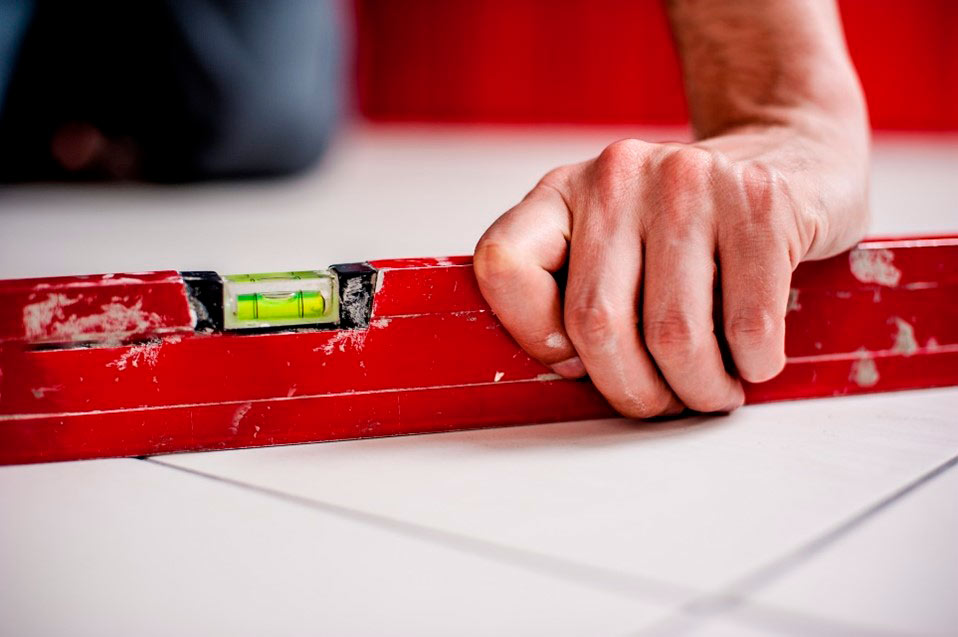
Most tile leveling systems have a built-in level, tile posts or straps, and a wedge or cap. Together, all three components work to prevent tile lippage.
Tile lippage is when one tile’s edge is higher than that of a connecting tile. Uneven tiles might also result in an uneven subfloor. Floors that are uneven might cause tripping and other accidents.
Personal injury from improper tile installation might result in your business getting sued. So here are the benefits of using tile leveling spacers.
- Helps prevent warping
- Uniform flatness
- Identical tile gaps
- Limits tile lippage
- Install tile faster
- Saves on redos
Tile leveling systems, specifically the strips, keep tiles in place during the bonding and drying process. As a result, it can produce a professional, finished look.
The Posts or Clips
The posts or clips lock adjacent tiles into place. These clips keep the proper gaps between tiles in the case of leveling systems that double as spacers. Depending on your tile’s thickness, the gaps will be either one-eighth or one-sixteenth.
Tile leveling clips are reusable and exchangeable. So, you don’t always have to buy new ones. However, if you need new clips, sometimes you can buy them without purchasing a new tile leveling system.
The Tile Leveling Wedges and Caps
The wedges fit inside strips and the caps connect to stips and posts. In both cases, the wedge or cap presses down over the ends of both adjacent tiles to keep them level. To make sure the cap or wedge is applying adequate pressure to do its job, a handy pair of tile pliers can be used to secure them.
The wedges work well with our Delta Tile Leveling System.
Preparation for Tile Installation
Regardless of your tile leveling system tool, you need to prepare the area for successful tile installation. First, the floor or wall surface should be as clean as possible. Unclean surfaces can lead to tile lippage.
Clear away any previous vinyl, tile, or carpet for a clean surface. Laying tile over old tile pieces jeopardizes a strong bond.
Choose the Right Tile
Tiles typically come in vinyl, porcelain, and ceramic styles. They also come in various thicknesses.
Before buying any tile, know the surface they will be going on. Different textures are suitable for specific tiles. This also influences your choice of tile leveling spacers.
It is not wise laying tile over a bare subfloor. This prevents a strong cohesion between the tiles and the subfloor. When that happens, no tile leveling system can fix it.
You might consider laying down a smooth surface like cement boards between the subfloor and your tile. Wear safety glasses to guard against the cement board’s chemicals.
If you are laying tile on a plywood subfloor, leave a one-eighth-inch gap between the boards. Glass fiber tape can provide extra support for the joints. To keep things smooth, add a light layer of mortar.
If you are preparing a concrete subfloor, remove any moisture. Also, fill any gaps or cracks. If the concrete subfloor is brand new, it could take several months to cure fully.
Ensure that your tile installation area is as square as possible. Wherever you begin laying tile, the result should be even and square. A carpenter’s square can assist you in choosing your beginning point. You might also consider chalk to mark your connecting points.

Organize the Tile
Before bonding the tile, lay out the tile pieces to see how they will fit. One of the common mistakes is laying tile without seeing how it works. This way, you can shape the tile for a uniform flat and level fit.
Organize Your Tools
Besides a tile leveling system, tile installation involves many of these tools.
- Mortar
- Rubber mallets
- Grout
- Pliers
Depending on the tile installation job, you might also need a tile cutter or chisels. Measuring tapes help you correctly place the tile. Also, scrapers are handy for clearing and cleaning subfloor.
How to use a Tile Leveling System
The usage of the level depends on the tile leveling system. If you are using clips, place them under the parts where the tiles meet. The wedges are there to ensure uniform flatness.
A good pair of adjusted pliers work to secure the tile wedges. And to guard against lippage, tile spinners maintain the tile’s equal positioning.
Also, consider that different clips work for different tile thicknesses. For example, the typical clip size works for one-eighth thicknesses.
Your clip size also influences how you line up the grout between the tiles. We have three professional tile leveling spacers for any job.
- Tile Level Quick
- Delta Level System
- Cyclone Level System
Your experience and comfort level should decide which tile leveling system you use.
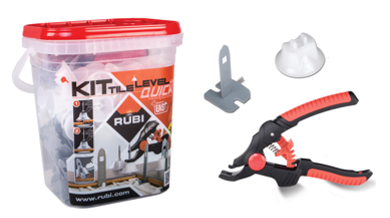
1) Tile Level Quick
Consider this tile leveling system if you are laying tile with a thickness between 3 and 16 mm. Tile Level Quick is also ideal for ceramic and heavier tiles.
It also comes with strips and caps to secure the heavier tiles evenly in place. Tile Level Quick’s pliers keep the tile evenly in place during the adhesive stage.
A rubber mallet works effectively to knock off the strips and caps safely. And yes, they are reusable. Don’t forget to add grout evenly when the tile dries.
2) Delta Level System
Unlike the Tile Level Quick tile leveling system, the Delta Level System involves reusable wedges with strips. It also excels for laying tile on walls. Tiles with 3 to 12mm thickness work well with this system.
The level and pliers help the tiles remain flat with the proper bonding agent. You can insert the wedges into the strips by hand or tighten them with their specialized pliers. Also, you can gently knock them in place with a rubber mallet.
A rubber mallet is also helpful for gently removing the wedges from the strips.

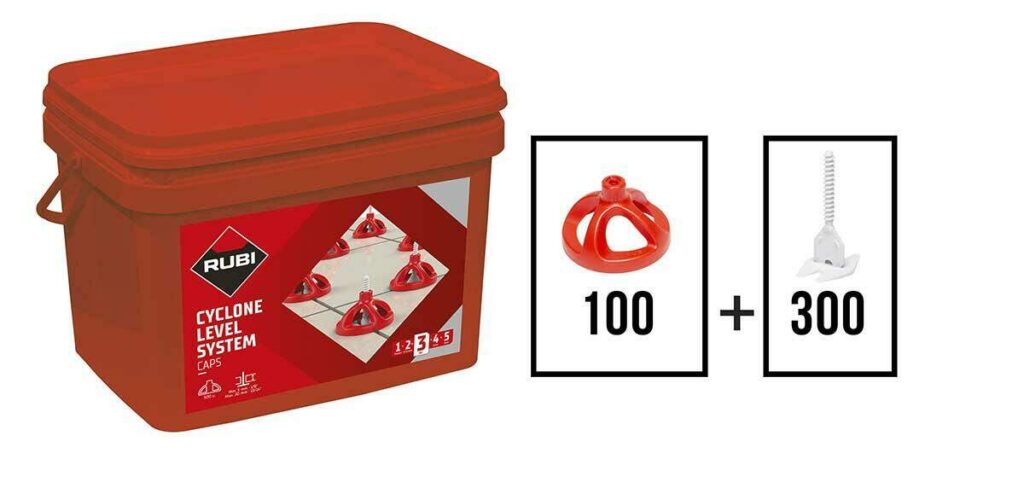
3) Cyclone Level System
This unique tile leveling system works well for novice tile installers. The Cyclone Level System spaces various tiles evenly with reusable caps. Caps instead of wedges, keep the tiles in place while drying.
You can safely remove the caps without damaging them with rubber mallets.
Also consider an auto screw tile leveling system. The screws replace the caps. Once your tiles are level, and in place, the screws keep them together. Then, you can remove them gently with your hands.
Tile Leveling Systems for Walls
Unlike laying tile on floors, gravity is a factor in securing tile to the wall. If you don’t apply enough adhesive, your tiles can fall off. Tile leveling systems excel in securing wall tiles.
Wallboards made of styrofoam and light plywood can work between tiles and the bare wall. Like subfloors, thoroughly clean the wall surface before adding the board.
Use a tile saw to cut your wall tiles. It leaves cleaner edges compared to tile cutters. Ceramic tiles are ideal for walls because they can absorb moisture. They are also easy to clean.
Like floor tile, measure the wall to see how many pieces of tile you need. Then practice your wall tile layout. This way, you save grout, mortar, and tiles. Then mark your tile placings with chalk.
More on Tile Leveling Systems
Picture-perfect tile installation jobs need a tile leveling system. Investing in a tile level spacer can save time, money, and your business reputation. Visit our blog for more tips on laying tile and tile leveling.
For more than 70 years, Rubi has provided tools and tips for the construction industry. In addition to tile tools, we have a wide range of drill bits. Our drill bits work for concrete, diamond, glass, and tile.
We take your safety seriously. In our safety equipment section, you’ll find workers’ gloves, protective goggles, and knee pads. Also, download the official Rubi app for exclusive promotions.

Post a comment