
Before you begin setting tile, decide which tile trowel to use. What should be the right size? Should I use a U-notched or a squared-notched trowel? Those are common questions you must ask yourself before starting your installation project. Basically, there is not a standard trowel size for tile installation, since it depends on the size and type of tile you install. Each type of tile may require a differently sized trowel. Be concerned with the amount of coverage for the tile.
For example; you have two different 24” x 24” tiles for two different floors. Although they are the same dimension, each tile may require a different trowel size. If one of the tiles is fairly flat with minimum warping (cupping), you may meet the proper coverage requirement using a 3/8” square-notched trowel. If, however, the other tile has quite a bit of cupping you may need to use a larger 1/2” square-notched tile trowel to get proper coverage.
Proper thinset mortar coverage means a minimum of 85% total coverage beneath a tile for a dry area installation (most floors, fireplace, etc.) and 95% minimum total coverage in a wet area (showers, tub surrounds, etc.). There is more to that requirement such as complete coverage beneath all four corners of the tile, but those are the basics.

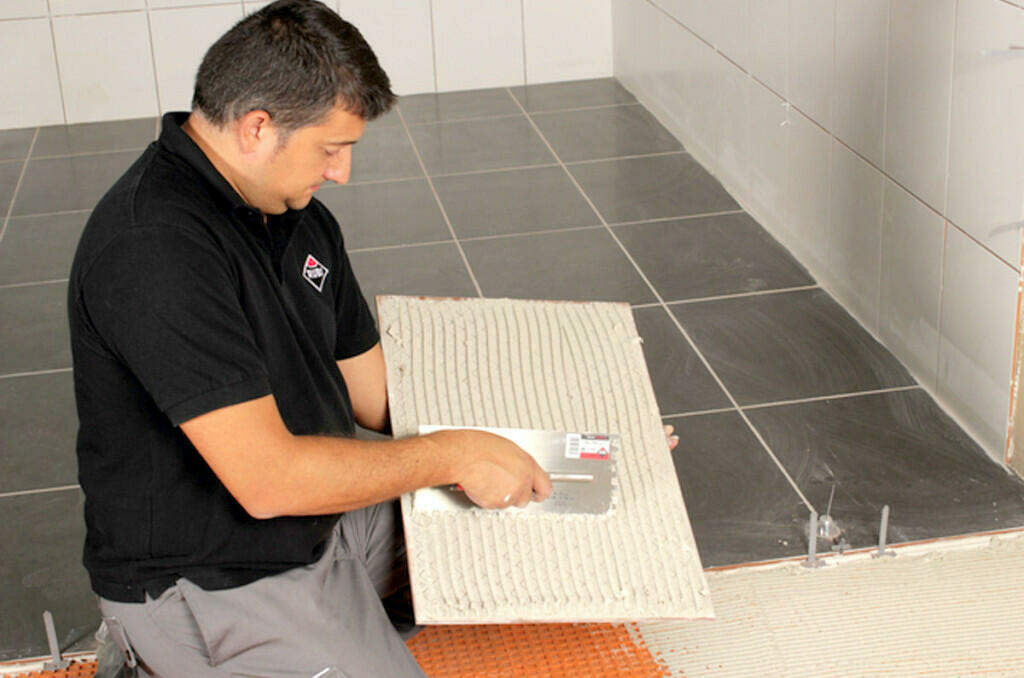
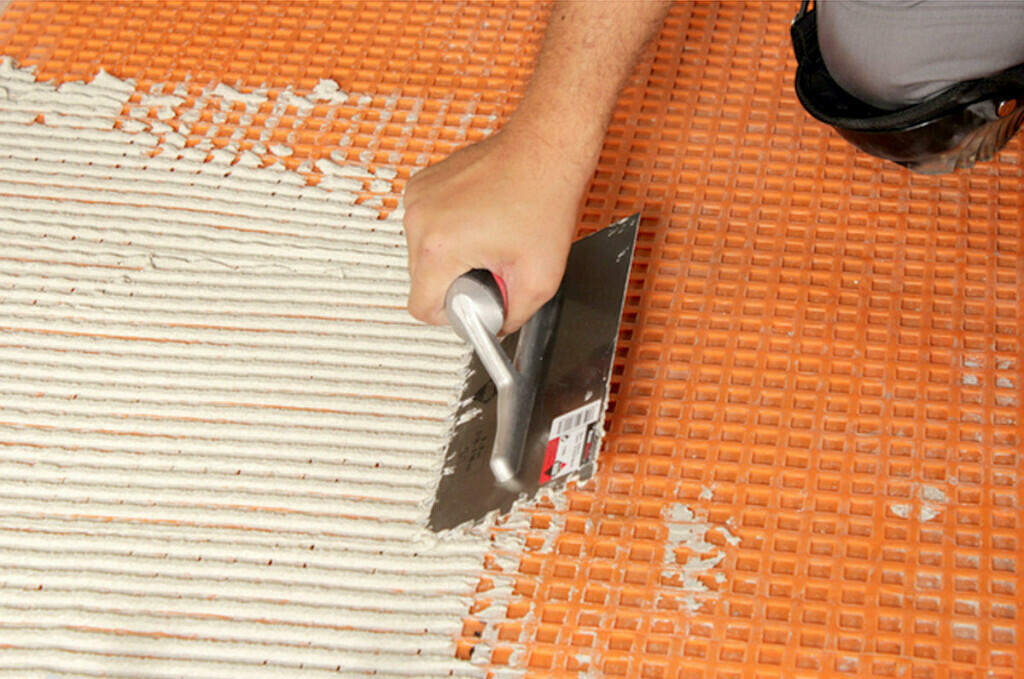
To get proper coverage you need to choose the right sized trowel, one that will give you that amount of coverage beneath the tile. Check this by installing the tile as you normally would, then pulling the tile up and checking the back. There should no longer be any trowel lines and you will see complete coverage of thinset on both the back of the tile and the substrate.
How trowel sizes are measured
The size and spacing of the trowel teeth are the basis to measure trowel size for tile. This tells you how much thinset the trowel will leave on the substrate when you spread it out. The trowel’s tooth shape and spacing determines how much thinset is sandwiched between the tile and substrate once the tile is fully installed.
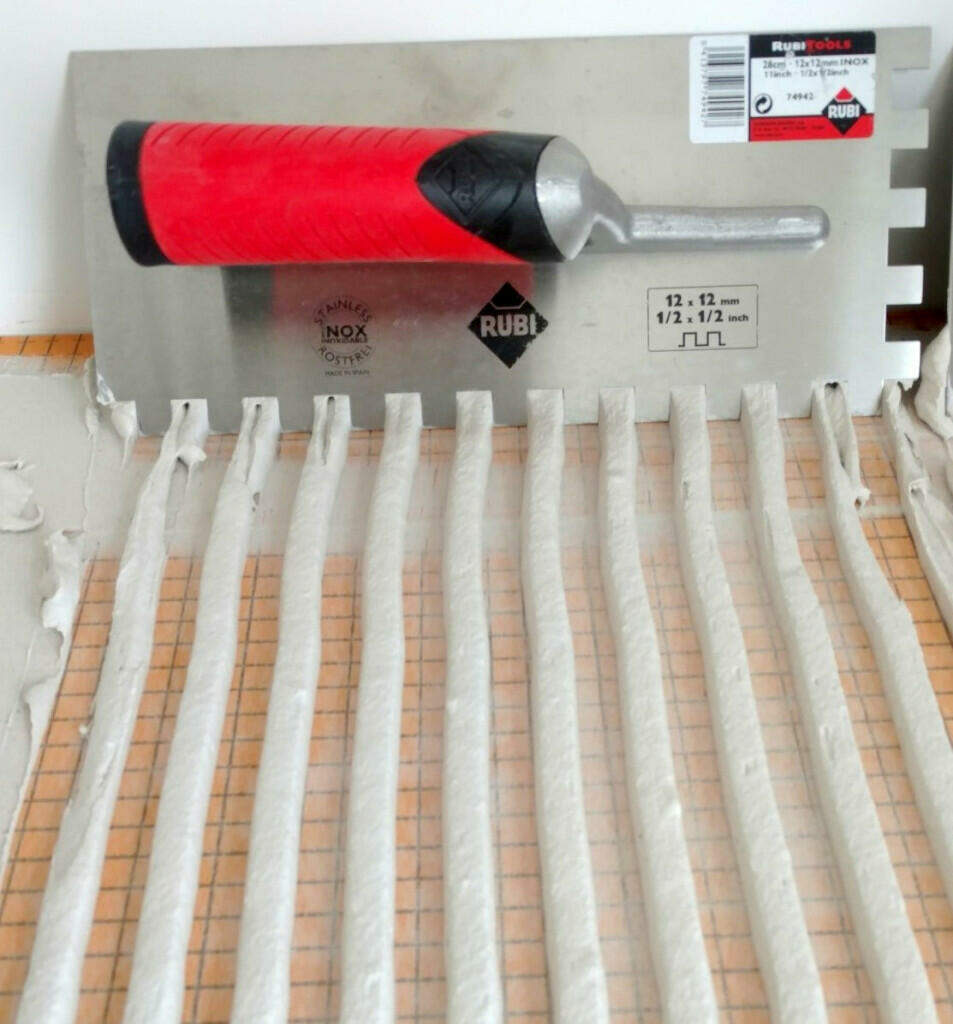
RUBI manufactures tile trowels in two basic types, the square-notched and the U-notched. They are measured in the same manner, the first number is the width of the notches (the distance between the teeth), the second number is the depth of the notch.
Square-notched trowel
- Using a 1/2” x 1/2” square-notched trowel will leave 1/2” ridges of thinset on the substrate with 1/2” spaces between each ridge. A tile trowel with only one measurement (i.e. as 1/2” trowel) means that both measurements are the same.

- When you use a 1/4” x 3/8” square-notched trowel you will leave 1/4” wide by 3/8” high ridges of thinset on the substrate, with ¼” spaces between each ridge.
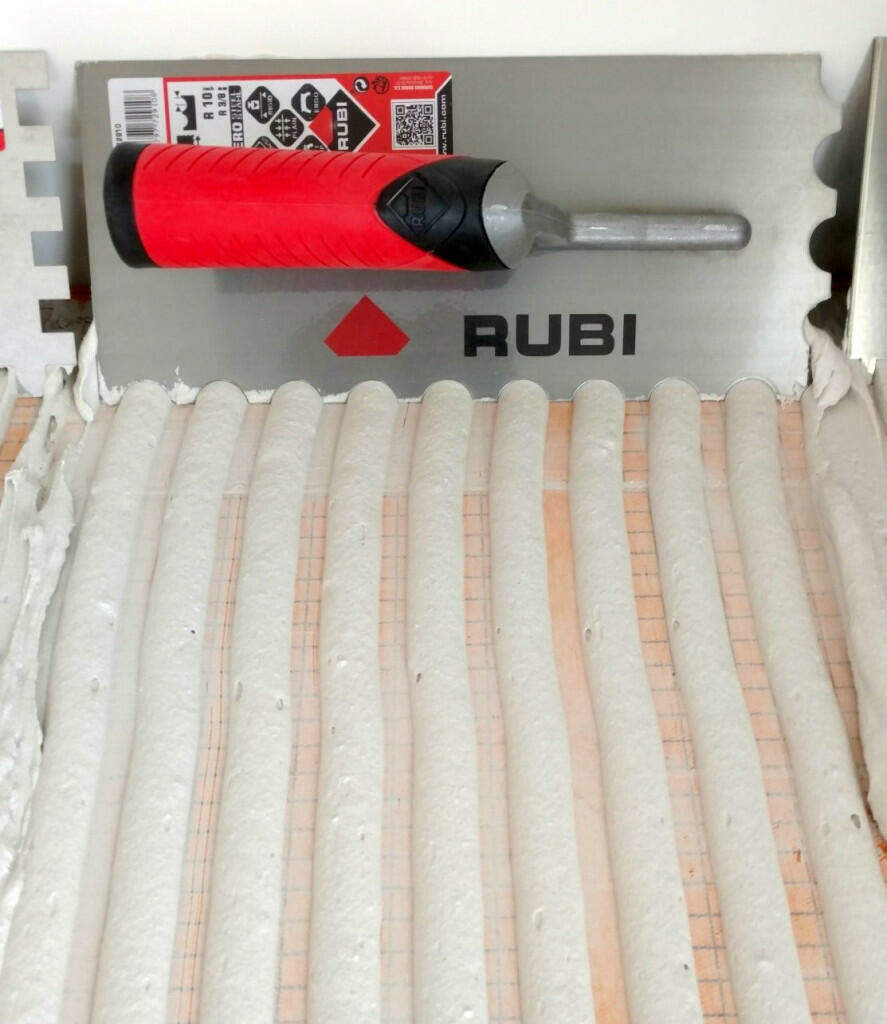
U-notched trowel
U-notched trowels normally only have one number. This is both the width and depth of the teeth. I am using a 3/8” U-notched trowel, which has a half-moon shaped notch.
When you spread thinset with a U-notched trowel, it will leave half-round ridges on the substrate. The height of the ridges and the space between each ridge will be the size of the trowel (in this case 3/8”). The width of each ridge will DOUBLE the trowel size – 3/4”.
How much thinset will a trowel leave under the tile
The trowel size for tile determines how much thinset to put on the substrate, as well as how thick the bed of thinset should be under the tile.
When you use a square-notched trowel with the same size notch and teeth (i.e. a 1/2” x 1/2”), the bed of thinset will be half of that measurement, or 1/4”, beneath a flat tile over a flat substrate.
When you fully embed the tile into the bed of thinset, it spreads out the thinset ridges evenly into the spaces between the trowel lines. Since the spaces between the ridges have the same size as the ridges themselves, this will split the height of the ridges in half. So a 1/2” x 1/2” trowel will leave a 1/4” high bed of thinset beneath the tile. A 3/8” x 3/8”’ trowel will leave a 3/16” bed of thinset beneath the tile.
Using a U-notched trowel and embedding the tile into the thinset leaves you with a bed of thinset beneath the tile a little over 1/3 the size of the trowel teeth. So a 3/8” U-notched trowel leaves a 1/8” bed of thinset beneath the installed tile.

U-notched or square-notched trowel? Which shape of tile trowel to use
Since a 3/8” U-notched trowel and a 1/4” square-notched trowel will both leave a 1/8” layer of thinset mortar beneath an installed tile, why choose one over the other?
The difference in trowel-notch shapes determines how easily the tile becomes fully embedded in the bed of thinset. In basic terms, it is easier to wiggle a tile into a bed of thinset put down with a u-notched than with a square-notched. You collapse rounded ridges rather than square ridges.

The square ridges, put down with a square-notched trowel, tend to collapse over on each side when you embed the tile into the bed. Pushing the tile down into the bed of square ridges causes the ridges to fold over from the top of the ridge, then spread out.
A U-shaped ridge, on the other hand, spreads OUT when embedding a tile into the bed. Pushing a tile into the bed of rounded ridges causes the ridge of thinset to spread out, from the bottom, with less possibility of trapping air.
Which trowel size for tile to use
Determining which trowel size is proper for your installation depends on both the tile itself and the substrate. More accurately, it depends on how flat the tile and substrate are. The less flat the tile is, the more thinset mortar you need beneath it, which means a larger trowel size.
First, you must know how much thinset mortar you want beneath the tile in the finished installation. A finished installation requires a minimum of 3/32” beneath the finished installation, aiming for a 1/8” minimum makes it easier to calculate the proper tile trowel size.
There are two basic ways to determine which size of the trowel to use: calculating the warpage (cupping) of the tile and substrate or visual inspection.
Calculating the warpage (cupping)
Cupping of the tile means the amount of variation from the plane. That’s just a fancy way of saying how ‘out of flat’ your tile is. Figure this out by placing the tile face-to-face and squeezing one corner. If the tile is cupped, the opposite corner will not be face-to-face, it will spread apart. Measure the amount of space between the faces of the tile on the opposite corner then divide that number in half. That is the amount of cupping in the tile.
If squeezing the tile in this manner produces a 1/4” space between the tiles in the opposite corner, it means the tile is cupped by 1/8”. You must add this amount to the minimum thinset amount you want beneath the tile in order to get proper coverage!
If you want a minimum of 1/8” bed of thinset beneath the tile cupped by 1/8”, you must use a trowel that will leave a 1/4” bed of thinset beneath the finished installation. A 1/2” square-notched trowel will accomplish the proper coverage in that instance.
Visual inspection
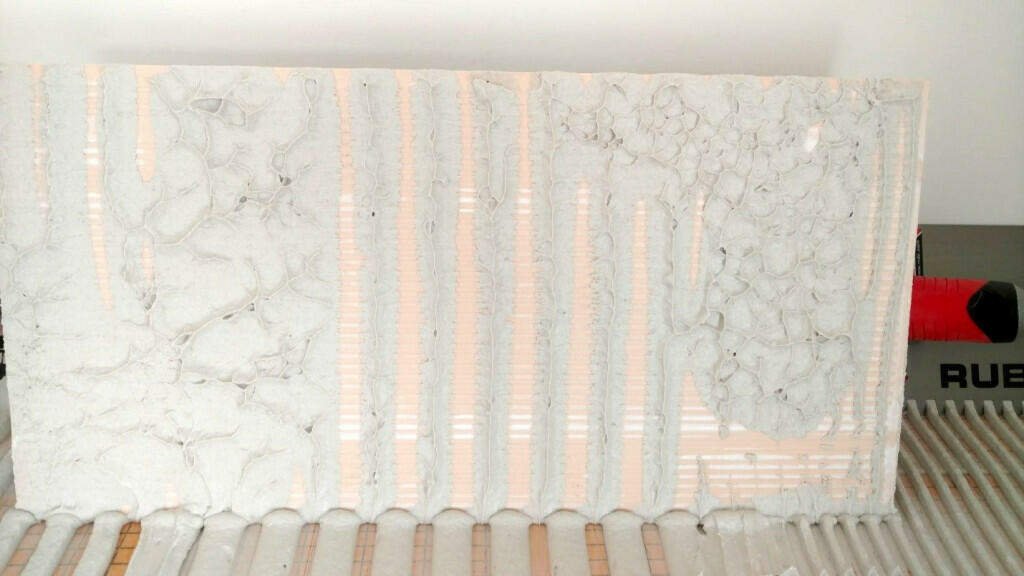
Visual inspection is simply fully embedding the tile into the bed of thinset mortar, then removing it and looking at both the substrate and the back of the tile to determine whether you have proper coverage.
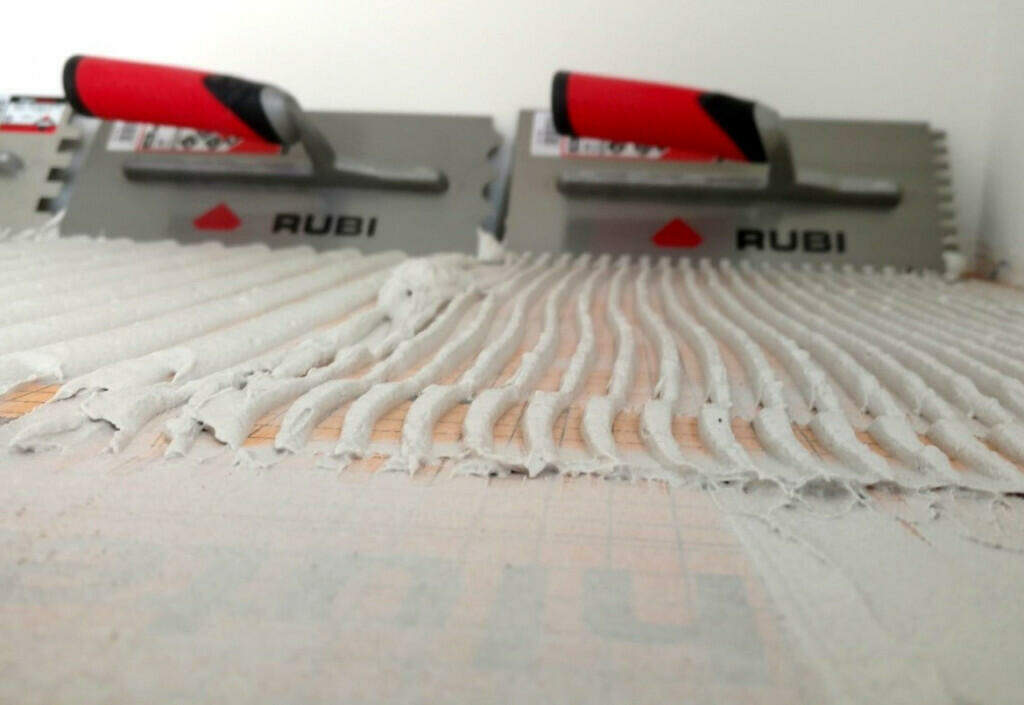
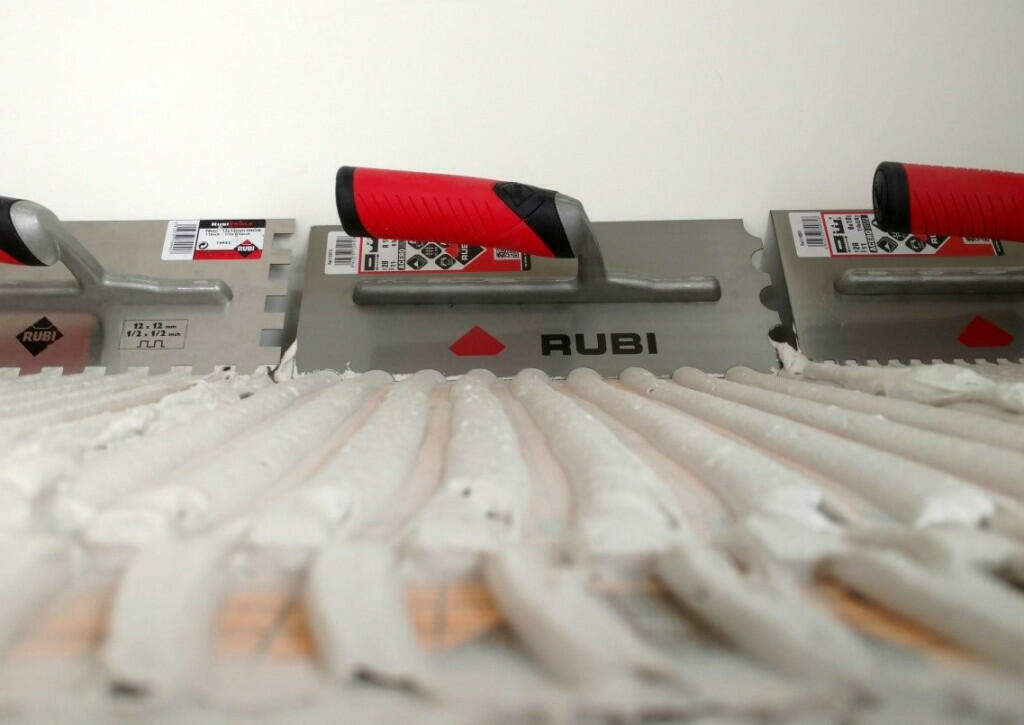
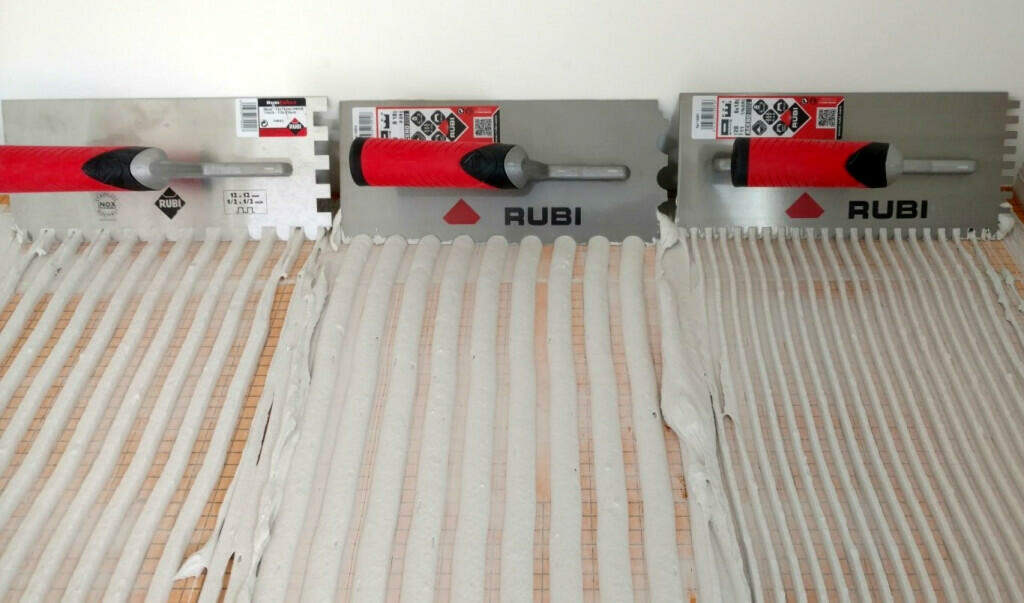
This tile was pushed down only about halfway into the bed of thinset. Notice the 1/2” square notched bed on the left side has the most coverage with the 3/8” square notch in a close second. The u-notch in the center has even coverage, but you need a much larger notch to get the same amount of coverage.
What’s The Trowel Size for a 12×24 Tile?
When you calculate the amount of cupping in the tile to determine the properly sized trowel, you still need to visually inspect the coverage to ensure you use the proper size of the trowel!
To apply what we’ve learned in this article more practically, let’s consider the correct trowel size for 12×24” tile? What kind of notches should it have? Well, in perfectly flat conditions we want a layer of adhesive that’s 1/8” to 1/4” thick.
But in real life, conditions are rarely perfect, so let’s assume that we have about a 1/16th inch of cupping. Like we said before, we need to add the lippage to the normal recommended thickness for our adhesive layer.
This gets us a layer between 3/16th and 5/16th inches thick, which is about a quarter inch.
Next, we need to multiply this thickness of mortar by two, for square notches, or 3, for U notches, to figure out the ideal notch dimensions of our trowel. This comes out to square notches of 1/2 inch by 1/2 inch or a rounded notches of 3/4 inch.
And there you have it! You’ve found the ideal notch size for your trowel!
Personal preferences
Above and beyond using the proper method to get proper coverage for a successful installation, your personal preference will help determine which specific tile trowel you use for different types of installation.
As a rule, the larger the tile the larger the trowel. It is always better to use a larger trowel than you might need for the installation. A little extra thinset beneath a tile is completely acceptable, not enough thinset beneath the tile is not acceptable.
U-notched vs. square-notched is a personal preference. While it is easier to obtain complete coverage with a U-notched, you must also use a larger U-notched trowel to achieve the same bed thickness beneath the installed tile. This is sometimes difficult with vertical installations. It is easier to keep a standing ridge on a wall with smaller square-notched than with a larger U-notched.
U-notched trowels make it easier to keep thinset out of the grout lines as you embed the tile. There is more space between the half-moon ridges with a U-notched than there is with a square-notched. This makes it easier to have the tile drop into the bed with the edge over an open area between the ridges than over the top of a standing ridge. Since the thinset spreads out, rather than folding over first, it is less likely that the thinset will fill the grout line as you embed the tile.
Your turn! Let me know your tips to choose the right trowel size for tile!
Why do many people, including the author of the above article, indicate that the ridges of the thin-set are the height of the grooves of a trowel? If a trowel is placed at a 45 degree angle like it should be for proper application, then that would mean that a right angle is created with the hypotenuse being 1/2″. Thus the horizontal and vertical dimensions squared values must add to the square of 1/2″. Hence, the ridge height should be approximately 11/32″ in height, not 1/2″ as indicated. This affects build up height as the compression of the ridges will become less than 11/64″ (less than 3/16″) instead of the expected 1/4″ with 1/2″ ridges. This might not seem like a big difference until you have to match tiles with different heights and trowels sizes to another membrane or surface. Stack-up height matters and should be represented properly especially by manufacturers of the equipment setting the standards.
Dear Cliff,
You’re right with your comment. On the real site, notched trowels never work at 90o, and the ridge that results from that isn’t the real size of the notched teeth but, there’s no way to measure or to block that trowelling angle, and it depends, always, on who’s trowelling the thin-set. There will be professionals that prefer to work using the trowel higher and others to use flatter… anyway; also, thin-set manufacturers recommend a notched size range for each of their products without taking into account the trowelling angle, because, in the end… this is only a useful recommendation.
The most important practice to check if we are using the right trowel’s size is also explained in our article: “To get the proper coverage, you need to choose the right sized trowel, one that will give you that amount of coverage beneath the tile. Check this by installing the tile as you normally would, then pulling the tile up and checking the back. There should no longer be any trowel lines, and you will see complete coverage of thin-set on both the back of the tile and the substrate.”
Thanks a lot for your comment. We appreciate it so much because it achieves some of our blog’s most important goals: talk about tiling and create Community.”
Does back buttering the tile add to the final thicknesses shown for thin set in the article?
1/2″x1/2″ notch trowel – approximately 1/4″ thin set layer
3/8″ x 3/8″ notch trowel – approximately 3/16″ thin set layer
Dear Tommy,
Thank you so much for your comment and for opening this discussion.
Our fellow installers agree that back buttering does not add to the final thickness, it is a very thin layer of mortar/thin-set to ensure bonding between the tile and your mortar/thin-set. Think of it like buttering a piece of toast, it doesn’t add thickness.
Back buttering does in deed add to the thickness but how much depends on whether there are depressions on the back of the tile and what they look like. If you do not back butter the tile, then some of the thinset will be pushed into those depressions so will not be able to add to the depth from substrate to tile. Back buttering therefore gives you a flat and uniform back of tile surface so its purpose is to reduce voids. Depending on your technique, if you don’t back butter you’ll need to work much harder to collapse the ridges properly and still get complete tile thinset coverage.
Does tile size dictate what trowel to use. Eg i want to raise the total thickness of my 2/8 inch thick 5*5 inch tile to 5/8 inch. What trowel should i use
If you want to apply a 3/8 inch thick layer of adhesive beneath your tile, than you should use a trowel with 3/4×3/4 inch notches.
I see many online tilers back buttering with the flat side of the trowel scraping close to the tile and others butter with the notched side. Our 5/16″ thick tiles are 24″ x 24″ with around 1/8″ cupping. We are considering a 1/2″ square notched trowel. How can we know whether to back butter flat or notched?
The recommended practice is to butter the surface you’re tiling with the notches and to butter the tile with the flat side of the trowel.
I see many online tilers back buttering with the flat side of the trowel scraping close to the tile and others butter with the notched side. Our 5/16″ thick floor tiles are 24″ x 24″ with around 1/8″ cupping. We are considering a 1/2″ square notched trowel. How can we know whether to back butter flat or notched?
The recommended practice is to butter the surface you’re tiling with the notches and to butter the tile with the flat side of the trowel.
Thanks. I was surprised to see such severe cupping in some small tiles I bought from big box–now I know why they were 1/5th the price of those from a tile store 🙂 Still usable, but may go with thicker thinset to account.
Good idea!
Doesn’t it also depend on the space between tiles?
That doesn’t really impact which trowel you need to use. Remember that tile joints are filled in with grout, not thinset, and if you need to keep your joints a consistent width than you do that using spacers.
Hello – The tile manufacturer suggests or prefers a 3/16ths V-notch trowel for thinset under a 1″ hex mosaic. You don’t make a V-notch so is there a U-notch size you can convert that size to?
Or would a 3/16 square notch trowel be best (leaving same amount as a V, correct?)
thanks
We do have V-notched trowels. Check page 161 and 163 of our catalog: https://www.rubi.com/us/catalogue
If you are buttering the back of the tile as well as the surface you plan to install the tile on, then yes, you will use more thinset than you would have if you only buttered the surface you’re tiling.
What size trowel should I use for a 12×48 porcelain wood look tile. Going on concrete that that is flat with minor surface cracks.
We actually offer a specialized trowell for long formats like this. It’s called the YW Notched Trowell. Check it out https://www.rubi.com/en/trowel-and-notched-trowel-adapter-r255
What size trowel is correct for 3×12 ceramic tiles going over a flat concrete floor in a bathroom?
Also, buttering the tile with the flat side of the trowel it the right way to do it?
Hi Charles. For a tile that’s only 3 inches wide, we’d recommend a 3/16″ to 1/4″ V-notch trowell. The air has very little distance to travel in this case to get out from under the tile, so the it makes sense to make small grooves in the mortar.
I’ll be using a 1/2” notch trowel for 12×24 tile, but do I risk having too much thinset resulting in it filling into the grout lines? How can I prevent this? These tiles are the same thickness as 12×12 so any thin set in grout lines will be a disaster. I don’t want to be Scooping out thinset from the grout lines with a popsicle stick. Thoughts?
Hi Frank. Good question. It’s good to use a generous supply of thinset. To make sure the grout lines to get filled in, what you should do is wiggle the tile back and forthe once you’ve laid it down over the thinset and press down, then use a rubber mallet or triller to really work out all the air and extra thinset just in case (this is also good for making sure all the space between the tile and floor/wall are fully filled with thinset to maximize adhesion). Then you just scrape whatever thinset comes out from under the sides of your tile using your trowell. If you follow these steps you should have clean grout lines at the end of your project.
2″ x 2″ mosaics for shower floor on Schulter pan , mosaics are glue dotted together not on a mesh , what size trowel may be best ? Thank you
Hi. Small nothces are the way to go in this case. 1/8 x 1/8 inch or 3/16 x 3/16 inch should be good.