

A garage renovation can cost upwards of $5,000, but DIYing your garage floor tiles can save you some of that cost. Not many people think about new floors as part of their garage renovations, but there are several advantages to upgrading your garage floors. In this blog post, we will walk you through the step-by-step process of installing garage floor tiles. We’ll also provide some tips and advice on how to get the best results in your garage floor tile installation. So, if you’ve been wondering about the different garage floor options, keep reading!


Types of Garage Tiles
There are many different types of garage floor tiles on the market, but the two most popular options are PVC and rubber.
PVC tiles are often chosen for their durability and easy installation. They are also stain-resistant and easy to clean. However, they can be slippery when wet, and they are not as impact-resistant as rubber tiles.
Rubber tiles are a good choice for those who are looking for a more durable and slip-resistant option. They are also easy to install and maintain. However, they are sometimes pricier than PVC tiles.
Snap tiles are one of the easiest types of garage floor tiles to install. They interlock like puzzle pieces and can go over your existing floor. Snap tiles are made of PVC or rubber and are available in a variety of colors and styles.
Step By Step Guide For Installing Garage Tiles
We’ve discussed a few tile options so far. You’ll first need to decide which is right for your space, needs, and budget. Once you’ve selected the perfect tiles for your garage, it’s time to decide on a pattern.
There are a variety of different patterns that you can create with interlocking tiles, so take some time to browse through some design ideas before settling on a specific layout. A consult with a professional to discuss the specifics is a good idea before making your final decision.
You also need to measure the floor. You’ll need to know the square footage of the space so that you can calculate how many tiles you’ll need. To do this, measure the length and width of the floor and multiply them together.
When you have the tiles needed to complete the job, make sure you also have all the necessary tools.
Tools Needed
This job may or may not require some heavy lifting, depending on the size of your garage. You’ll also need a power drill, saw, hammer, and screwdriver. If you’re working with ceramic tiles, you’ll need a tile cutter. You should also have a level, tape measure, and chalk line.
If you’re working with PVC or rubber tiles, you’ll need a utility knife and an adhesive. For ceramic tiles, you’ll need grout, thin set mortar, and a wet saw.
Here’s a list to get you started:
- Tape measure
- Pencil or chalk
- Straight edge
- Utility knife
- Notched trowel
- Rubber mallet
- Bucket
- Tile spacers
- Level
- Sponge

Clean Out Garage
The first step is to clean out your garage. You’ll need to remove all of the items from the floor so that you can have a clean surface to work with. You might want to clear any shelves as well to prevent anything from falling while you work.
Or at least make sure everything is well secured. Once everything is out of the way, give the floor a good sweep and make sure there’s no dirt or debris left behind.
Clean The Floor
After selecting the perfect tiles for your garage, you need to prepare the surface on which they will be installed. This process may vary depending on the type of tile you’ve chosen, but it involves cleaning the floor and repairing any cracks or damage. Before you start tiling, be sure to prepare the surface.
Establish Installation Starting Point
It is recommended that you start at the main vehicle entrance door and work your way back. This will ensure a nice clean garage floor tile installation with no cut pieces at the door threshold.
Cut The Tiles
Once you have the right amount of tiles, you’ll need to cut some down to fit the space. Depending on the size of your garage, you may need to cut some tiles down to size. To do this, simply use a wet saw or a tile cutter.
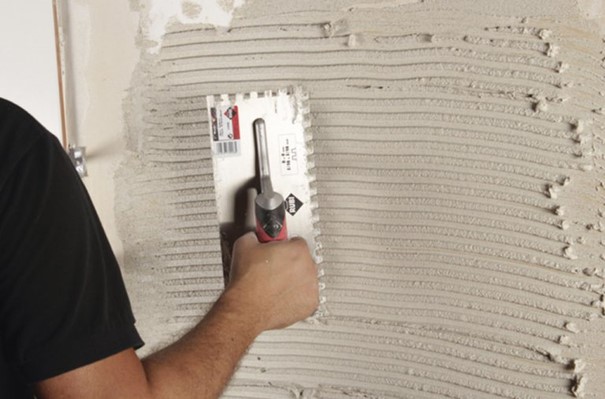
Apply The Adhesive
Now it’s time to apply the adhesive. This will help to hold the tiles in place and prevent them from shifting. To apply the adhesive, spread it over the floor with a notched trowel.
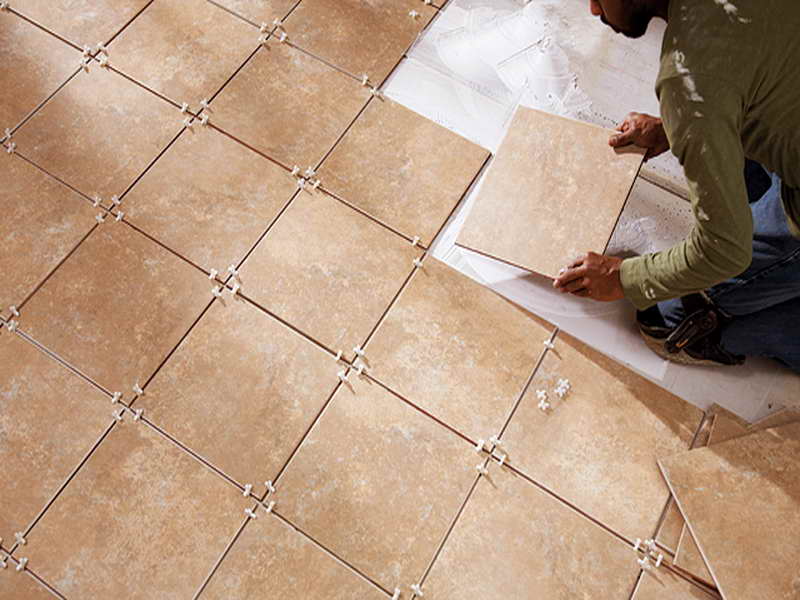
Lay The Tiles
After the adhesive has been applied, you can start to lay the tiles. To do this, place the tiles in the adhesive, press them down, and move them back and forth a bit to help get the air out from under them. Make sure that the tiles are aligned, and make sure to keep the grout line consistent.
Snap Tiles
If you’re using snap-together tiles, the process is a little different. Instead of applying adhesive to the floor, you’ll need to apply it to the back of the tiles. Once the adhesive is in place, you can begin snapping the tiles together.
Be sure to start at one end of the room and work your way to the other so that you don’t get lost in the process and corner yourself.
Once tile installation is complete, all that’s left to do is sit back and enjoy your new garage floor! You can now rest assured knowing that your floor has protection from stains, spills, and other damage. Plus, it will look great for years to come!
Should You Hire A Professional?
While it is possible to install garage floor tiles yourself, there are a few things to consider before taking on this project. First, you need to make sure that you have the time and patience to complete the installation. This is not a quick or easy process, so be prepared to take your time.
Second, you need to make sure that you have the right tools for the job. If you don’t have a wet saw or tile cutter, you’ll need to rent or purchase these tools. And finally, you need to be aware of the potential risks involved in this project.
If you’re not confident in your ability to install the tiles correctly, it’s best to hire a professional. This will ensure that the job is done right and that your new floor will last for years to come.
How to Find a Professional
If you’re interested in hiring a professional to install your garage floor tiles, there are a few things you can do to find the right person for the job.
The first step is to ask around. Talk to your friends, family, and neighbors to see if they know of anyone who does this type of work. If you can’t find a recommendation, you can always look online.
The second step is to research each potential candidate. Once you have a few names, take the time to read online reviews and check out their websites. This will help you narrow down your choices and find the best person for the job.
The third step is to get quotes from each candidate. This will give you an idea of how much the project will cost and help you budget for the work.
Once you’ve found the right professional, you can sit back and relax while they take care of the installation. And before you know it, you’ll have a beautiful new garage floor that you can be proud of!
Give Your Home a Lift with Garage Floor Tiles
Garage floor tiles are a great way to improve the appearance and functionality of your garage. As you can see, installing them is an easy process, but it’s important to take your time and work to ensure proper installation of the tiles.
At Rubi, we understand that not everyone is familiar with installing garage tiles, which is why we offer free installation guides on our website. Pick up our professional tile installation tools used by the experts and follow our guides to complete your project.

Post a comment