
Transforming a standard bathroom into a safe, accessible sanctuary is one of the most impactful upgrades you can make to a home. Whether you are adapting a space for an aging relative or simply enhancing daily convenience, a shower grab bar installation is an essential project that balances functionality with peace of mind.
The prospect of mounting a grab bar in a tile shower brings a specific anxiety: the fear of cracking expensive porcelain or ceramic surfaces. This guide will walk you through the professional approach to ensuring a rock-solid installation without compromising the integrity of your tile installation.


Planning Your Shower Grab Bar Installation: Where to Put Them?
Before you pick up a drill, you must determine the optimal placement. Success depends entirely on ergonomics and structural support. A poorly placed bar is not only inconvenient but can also be dangerous if it doesn’t provide the right leverage during a slip.
The most common placements include the sidewall, the back wall, and the entry point of the shower. While the primary user’s height and physical needs should dictate the final position, following established industry standards ensures the installation remains universal and safe.
ADA Guidelines for Grab Bar Height and Placement
The Americans with Disabilities Act (ADA) provides a reliable framework for where to put grab bars in shower areas. For a standard installation, horizontal grab bars should be positioned between 33 and 36 inches from the shower floor.
If you are working on a new project and learning how to lay tile in a bathroom, it is wise to plan your grab bar locations beforehand to ensure there is adequate blocking behind the wall. For existing showers, you must ensure the bar is long enough to span the distance between two wall studs, which are typically spaced 16 inches apart.
Essential Tools for Drilling Tile Without Cracking
The “secret” to a professional finish isn’t just steady hands, it’s having the perfect toolkit. The most significant challenge is penetrating the glazed surface of the tile without creating a fracture.
Choosing the Right Drill Bits: Diamond vs. Carbide
When you need to drill through tile, the material of the tile dictates your choice of bit. Using the wrong bit is the fastest way to ruin a beautiful shower wall.
| Tile Material | Recommended Bit Type | Why? |
| Ceramic (Soft/Medium) | Carbide-Tipped (Arrowhead) | Economical and effective for softer glazes. |
| Porcelain (High Hardness) | Diamond Drill Bit | Specifically designed to “grind” through the toughest surfaces without cracking. |
| Natural Stone | Diamond Drill Bit | Provides a clean edge on granite or marble. |
- Professional Tip: Never use “Hammer Mode” on your drill when working with ceramic or porcelain tiles; it’s the number one cause of unwanted cracks. The vibration is designed for masonry, not the delicate, brittle nature of tile.
Recommended Materials and Safety Gear
Beyond the drill, you need high-quality materials to ensure longevity in a high-moisture environment. Ensure you have your essential safety gear, including safety goggles to protect against tile shards and gloves for a better grip.
- Stainless Steel Grab Bars: Look for ADA-compliant bars that support at least 250 lbs.
- Stud Finder: A high-quality electronic stud finder is vital for locating the wooden supports behind the tile.
- Level and Tape Measure: For precision alignment.
- 100% Silicone Sealant: To prevent water from seeping into the wall cavity.
Step-by-Step: How to Install Grab Bars in a Tile Shower
Now that you have the right choosing the right drill bits and tools, let’s move into the execution. Installing grab bars in a tile shower requires a blend of patience and precision.
Step 1: Locating Studs and Marking Positions
Start by using your stud finder to locate the vertical wood studs behind the tile. Once found, hold the grab bar in place and use a level to ensure it is perfectly horizontal (or vertical, depending on your goal). Use a marker to trace the mounting holes of the bar’s flange directly onto the tile.
Step 2: Preparing the Tile Surface for Drilling
Tile surfaces are notoriously slippery. To prevent the drill bit from “walking” or skating across the tile and scratching the surface, place a piece of masking tape over your marks. This provides the bit with enough initial traction to bite into the glaze.
Step 3: Drilling Pilot Holes (The RUBI Professional Method)
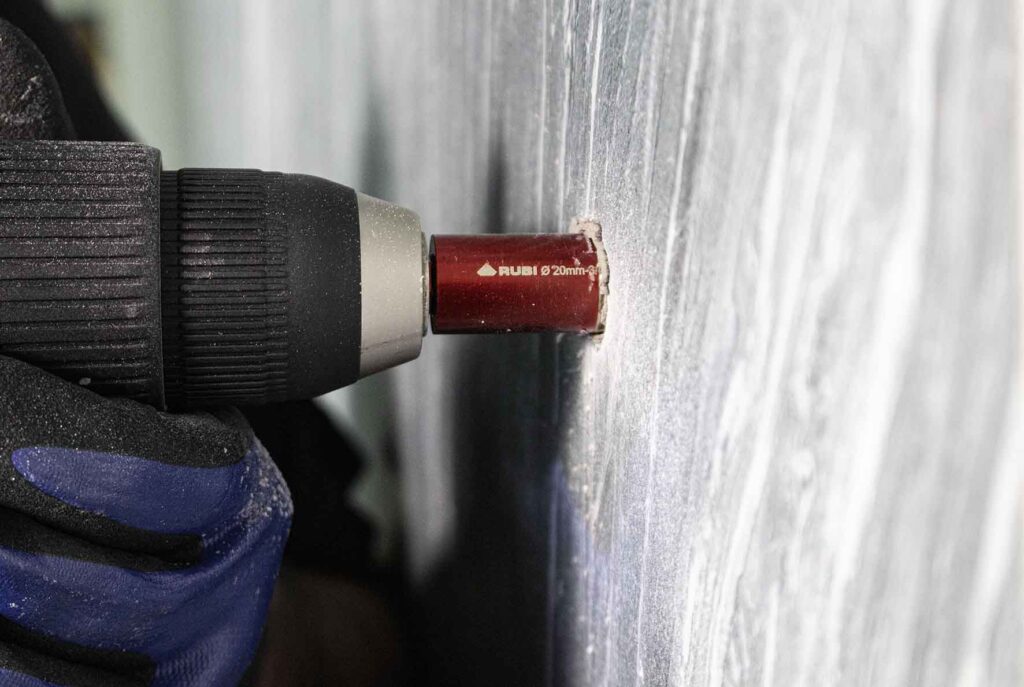
This is where the RUBI differentiator comes into play. When mounting a grab bar in a tile shower made of porcelain, start with a small pilot hole using a diamond bit.
Apply constant but moderate pressure and use a water cooling system or a wet sponge to keep the bit cool. Heat is the enemy of diamond bits; keeping them cool extends the life of the tool and ensures a cleaner cut. Once you have passed through the tile, you can switch to a standard wood bit to finish the hole into the stud.
Step 4: Mounting the Grab Bar and Ensuring Structural Support
Once the holes are drilled, it is time for the actual mounting of the grab bar in a tile shower. Align the bar’s mounting flanges with the holes you’ve prepared. Insert the stainless steel screws, which should be long enough to penetrate at least 1.5 to 2 inches into the wood stud behind the tile.
Using a manual screwdriver for the final tightening is often safer than using a high-torque drill, as it allows you to feel the resistance and avoid over-tightening, which could stress the tile. The bar should feel immobile; if there is any “give” or wobble, the structural integrity is compromised.
Step 5: Sealing for Waterproofing and Durability
In a wet environment, moisture is the enemy of your wall’s infrastructure. To ensure a professional shower grab bar installation, apply a generous bead of 100% silicone sealant around the back of the mounting flange before pressing it against the tile.
Once the screws are tightened, wipe away any excess sealant with a damp cloth. This creates a watertight gasket that prevents moisture from traveling down the screw threads into the wooden studs, avoiding rot and mold growth over time.

Specialized Situations: What if there are no studs?
A common hurdle is discovering that the ideal location for the bar does not align with the wall’s internal studs. In these cases, you cannot simply screw into the tile or the backer board, as they lack the structural strength to support a human’s weight during a fall.
For these “no-stud” scenarios, you must use specialized hollow-wall anchors designed specifically for grab bars (such as WingIts or similar heavy-duty toggles). These anchors expand behind the wall board to distribute the weight across a larger surface area. However, always check the manufacturer’s weight rating; for maximum safety, at least one end of the grab bar should always be anchored into a solid wood stud.
Common Mistakes to Avoid During Installation
Even experienced contractors can run into trouble when they don’t use the right tile installation tools. To ensure your project is a success, avoid these frequent pitfalls:
- Using a Masonry Bit on Porcelain: Masonry bits are designed for brick and concrete. Using them on high-hardness porcelain will result in a burnt-out bit and a cracked tile. Always opt for diamond-tipped bits for hard surfaces.
- Neglecting the Sealant: Skipping the silicone may seem minor, but water ingress can lead to “ghost leaks” that rot the subfloor and wall framing over years.
- Improper Height: Installing the bar too high or too low renders it useless in an emergency. Always verify the user’s reach before drilling.
- Ignoring the “Hammer” Setting: As mentioned, the percussion of a hammer drill will shatter ceramic glaze instantly. Keep your drill on the standard rotary setting.
Grab Bar Installation FAQs
Can I install grab bars directly on tile without a stud?
Technically, yes, but only if you use heavy-duty hollow-wall anchors specifically rated for grab bars. Standard plastic wall plugs or toggle bolts are not safe for this application. For the highest safety rating, anchoring into a wood stud is the professional gold standard.
What is the best drill bit for porcelain shower tile?
The absolute best choice is a vacuum-brazed diamond drill bit. Because porcelain is denser and harder than standard ceramic, diamond bits “grind” the material away rather than trying to “cut” it, which prevents the tile from fracturing under the pressure.
How much weight can a tile-mounted grab bar hold?
An ADA-compliant grab bar, when properly installed into wood studs, is designed to support at least 250 lbs (113 kg) of downward force. If using specialized anchors in a hollow wall, the capacity may vary based on the anchor manufacturer’s specifications.
Secure Your Shower: Your Next Step
Mastering how to install a shower grab bar on tile is about more than just home improvement; it’s about providing safety and independence. By combining the right techniques with high-performance tools, you can ensure that every tile installation you work on is as functional as it is beautiful.
At RUBI, we provide the precision tools necessary to tackle high-hardness materials with confidence. Whether you are looking for the latest in diamond drilling technology or ergonomic manual cutters, we have you covered.

Post a comment