
Whether it’s your pool, bathroom, backsplash, or even flooring, mosaic tiles have made a splash in the last few years. They’re perfect for creating a bold statement in any tile installation project. Want to learn more and how to lay mosaic tile? Read on!
These small tiles can be made from porcelain, stone, or glass, and are used to create intricate designs for an extra layer of luxury. They were applied singularly to a surface in the past, but now they come in pre-fabricated sheets that make installation a breeze.


What Are Mosaic Tiles?
Nowadays, instead of laying each individual tile, you can place mosaic tiles onto mesh fiberglass sheets that make the entire installation process much faster and easier. Each tile is around two square inches or less and can come in a variety of shapes, colors, and patterns.
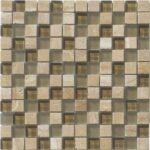
Some mosaic tiles are porcelain, but others are glass or stone. Glass mosaic tiles can come in a variety of colors, but are often clear the entire way through with their color on the back. With ceramic and stone tiles, each one can be different, even if it’s on the same sheet.
Some sheets are uniform, while others can come with different shapes, colors, and patterns. You can also purchase border and trim mosaic tiles.
Though the installation for mosaic tiles is almost identical to that of normal tiles, there are a few key differences.
What Materials Will You Need?
Before we get to how to lay mosaic tile, we must cover the supplies you’re going to need. Here are a few tools you’ll need to get:
- Pencil
- Level
- Chalk line
- Clean rags
- Paintbrush or roller
- Tape measure
- Framing square
- Utility knife
- Electric screwdriver
- Taping knife
- Rubber mallet
- Rubber trowel for grouting
- Washboys
- Tile cutting tool
While these things can help set you up for success, you’re also going to need the necessary materials to lay your tile. You’ll need:
- Cement board screws
- Cement boards
- Fiberglass cement board tape
- Grout sealer
- Grout sponge
- Grout
- Notched trowel
- Thin-set adhesive
- Mosaic tile sheets
Keep in mind that you can fix mosaic tiles (like any other tile) to the floor and walls without the need to pre-install cement boards. Once you’ve gathered all your necessary tools and materials, you’re ready to get started.

How to Lay Mosaic Tiles Step by Step
1. Prep Your Surface
Before you can start the installation, you’ll need to make sure the surface you’re laying the tile on is completely smooth and flat. There are many ways to do this but often, professionals use an underlayment consisting of a cement board applied over a plywood subfloor. The cement board can also be applied directly to your wall studs.
To start, install full sheets of cement board to the walls, then cut to fit any and all of your remaining pieces.
to cut the cement board, draw a guideline where you will make the cut, use your utility knife to score the board, and then snap it along the scoreline.
To secure the cement board, use cement board screws. Leave about 1/8-inch between each and every panel.
Next, tape over each gap with your fiberglass cement board tape and apply thin-set adhesive using a taping knife.
2. Plan the Layout
If your tiles have patterns, it’s important to plan the layout. Lay your sheets on the surface as a dry run so you know you’ll be happy with the arrangement they’re in.
Once you’ve done this, make sure you place them accordingly so it’s easy to pick everything up as you install.
3. Cut Tile Sheets to Fit
While you can cut your tile sheets to fit before or after you’ve placed other tile sheets, we suggest doing it beforehand. You won’t have to stop what you’re doing in the middle of installation, and you won’t have to multitask as much.
You have several options when it comes to making these cuts. You can use a RUBI wet saw or a manual tile cutter like our RUBI multipoint breaker tile cutters. Sometimes, even just a tile nipper can do the job, but that decision all depends on your project, the size of it, and how much tile you’re going to need to cut.
Some wet saws can be relatively inexpensive, like our RUBI ND7INREADY model of portable wet saws. It’s worth checking out with your local distributor for installation tools. If you do not have one, or haven’t found the closest one to your location, contact us, we can help. If you regularly do tile work it’s a good investment.

You can also opt for a tile nipper, which is a simpler tool that doesn’t require any water or electricity. It looks like a pair of pliers and is used to make precision cuts.
For dry cutting of mosaic tiles, other great options include a manual tile cutter, which can score an entire row of tiles with a scoring wheel. At RUBI Tools, we have been developing several options for you. Make sure to download our catalog and take a look.
Once you’ve decided on a tile cutting tool, and have cut your tiles, it’s time to start the installation.
4. Fix Your First Tile Sheet
Using a notched trowel, you’re going to apply a thin layer of thin-set to the center of your layout lines. Work in squares equal to two or three feet wide, and be sure not to apply too much thin-set. You should be able to see the cement board in the grooves your trowel leaves behind.
If you’re unsure about which size notched trowel you’re going to need, take a look at what your tile and thin-set instructions have to say.
From there, working outward. You’re going to fill in the remaining quadrants, or sections, of the space you’re working in. Be sure to take notice of the grout seams as you work to ensure they’re all equal.
5. Tap Your Tiles
As you work, your tile sheets may begin to form waves or ripples on the surface. Take a small piece of plywood and a rubber mallet and, after every few sheets you apply, tap them into place to achieve a perfect finish.
This is done by placing the plywood over the tile and tapping gently with your mallet. This will set the tile in place and flatten it to the surface. Pay close attention to make sure some sheets aren’t higher than others and that grout gaps don’t become uneven.
6. Mix and Spread the Grout
Once you’ve laid all your tiles, it’s best to wait at least 24-48 hours before you apply any grout. This is to ensure that your thin-set has dried and is ready to be set in place.
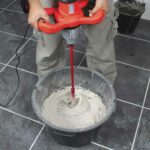
You can choose to mix up dry grout or use a pre-mixed grout, depending on the project.
Generally, you’re going to use sanded grout for wider seams, and unsanded grout for tile with seams of 1/8-inch or smaller.
7. Apply the Grout
Once you’ve mixed your grout, it’s time to apply it to the tile seams.
This is best done with a rubber grout float. Take a decent amount of grout on your float, and then spread it over top of the tile. Holding your float at a 45-degree angle, force the grout into any and all of the joints and seams. The edge of the float is what’s going to allow the grout to sink deep into the joints.
To ensure the grout has equally filled all the joints, alternate directions as you apply it. Continue this until all the grout joints and seams are filled, and then use the edge of the float to scrape excess amounts of grout from the tile.
8. Clean Your Tile Surface
Once your grout has hardened slightly, it’s time to go in and wipe the face of the tiles with a clean cloth or sponge. Most hardware stores carry large sponges specifically for this purpose.
Keep multiple buckets of water on hand, and keep your cloth or sponge as clean as possible to ensure all the grout is removed. To do this, rinse your cleaning implement after each tile is wiped off.
How long the grout takes to fully cure is going to depend on the manufacturer’s recommendation.
9. Seal Your Grout Lines
Back in the day, some grout materials needed to be sealed because the surface was porous, and you would have to ensure that it properly sealed to protect the underlayment. Today’s new grout materials do not need this step anymore, especially if you use epoxy grout. We recommend finding out first if the grout you are getting will need to be sealed or not.
Please consider this step as essential in wet places, like showers. With mosaic tile, and only when necessary, the easiest way to do this is by using a paint roller to cover the entire surface. As you go, you’re going to wipe off excess sealer from the face of your tiles.
You may have to repeat sealing every one to two years. If this step gets ignored, it can lead to mold and mildew in your grout lines.
Enjoy Your New Mosaic Tile

Now that you’ve learned about installing mosaic tile, it’s time to bring this luxury material into your own home! Getting creative with shapes, sizes, patterns, and materials is a great way to bring life into any room. If you’ve been craving change, or simply want to bring something different to your remodel, trying out mosaic tile is a great place to begin.
Rubi tools have the power help you achieve this! With our premium-grade tile installation tools, you’ll wonder why you didn’t try installing your own tile sooner!
If you’re interested in learning more about tiles and what they can do for your space, check out our blog post on mixed media tiles.

Post a comment