
Cutting straight lines into tile is as easy as cutting into cake—especially when you use a proper RUBI Tools electric tile saw with a diamond blade of good quality. But what about cutting curves for your tile installation? If you’re tiling a bathroom, then it’s inevitable that you’ll need to make curved cuts around the toilet. This is where most people get stumped, and start to scratch their heads. No need to scratch your heads for too long though. In this article, you’ll find our best tips on how to cut tile around a toilet.


Should You Remove the Toilet?
Most pros already know the perils of trying to cut corners by tiling around a toilet without removing it first. By not removing the toilet before tiling, you’ll end up making more work for yourself in the long run. You’ll need to make more curved cuts and will have less room to work, as the toilet will be in your way.
Tiling around a toilet base means it’ll need silicone caulk or grout where the tiles meet the toilet. This gives a seamless transition look. However, at times toilet seals need to be replaced. This becomes a hassle if the toilet base has silicone caulk or grout around it.
Also, if you ever need to change or replace the toilet in the future, you’ll run into problems if you can’t find the exact replacement toilet. This is because the base of toilets come in all different shapes and sizes. If you make cuts for one style of toilet, they might not match the base for any future replacement toilets.
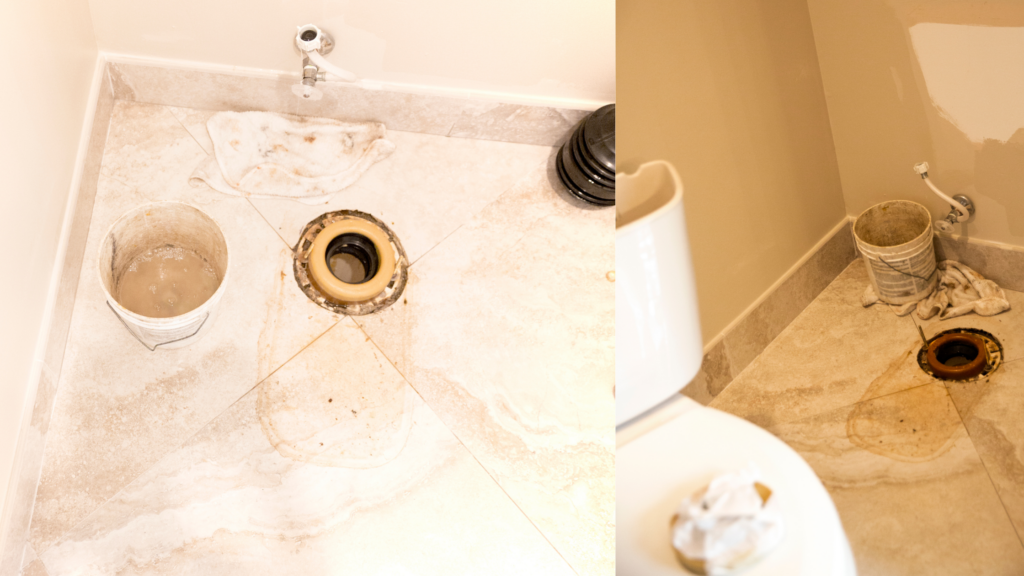
How to Cut Tile Around a Toilet Once It’s Removed
After the toilet is removed, the toilet flange is what you’ll need to tile around. First, draw out your grid and wet lay the tile, except for where you’ll need to make cuts for the flange.
You can begin making your cuts for around the flange once all the rest of the tile in the bathroom has been laid and has had time to fully dry. If you don’t let the rest of the tile dry before working around it, you’ll risk damaging your work.
Tracing Flange for Tile Cuts
The manual way to do it with some construction paper or cardboard to trace and cut a full piece of tile. Now RUBI Tools USA recommends using the RUBI shape template tool which will make tracing the circular shape to your tile with exactitud a breeze. If you need multiple tiles to fit around the flange, then trace and cut as many pieces as tiles that are needed.
Once you have your piece(s) shape outlined, lay them on the floor and on top of the flange as if they were the tiles. Remember to take into account your grout lines by leaving spaces between tiles. Now trace around the flange with your finger first, and then with a pencil or marker.
If you’re dealing with a removable flange, you may want the flange to sit on top of the installed tile. If this is the case, then make your circle about 1/2″ smaller. Ideally, your flange will sit on top of your new tile. Regardless, the flange needs to either sit above the tile or level with the tile.
Cut out the traced lines from your piece(s) of paper and lay them on your tile. You can use small pieces of tape to secure the paper on the tile, making sure it doesn’t slip or move.
Next, transfer the circle cut out on your tile with a pencil. Make sure to keep your paper tile cutouts just in case you make a mistake when it comes to cutting the tile.
Making the Cuts
You’ve traced your tiles and now you need to make the cuts. So what’s the best way to go about it?
There are two techniques we recommend when cutting curves in tile. One is done with the use of a tile scribe and nippers, and another is done with the use of an angle grinder.

Using a Tile Scribe and Nippers
A tile scribe is a sharp handheld tool that is used to score tile before breaking it into the desired size or cut needed. Score your traced tiles with your tile scribing tool. Make enough passes to ensure you’ve etched lines at least 1/8″ deep.
Nippers are then used to break off the part of the tile that is not needed. Start at the corner of the tile taking small bites out as you go. Make sure you take more care as you get closer to your traced lines.
If your curved lines start somewhere besides on a corner of the tile, then you can first make straight cuts with your wet saw. Using your wet saw, cut straight into the area or space inside the circle that you’re cutting out, making sure to stop as close to your trace lines as possible.
Once you’ve made quite a few straight cuts with your wet saw, you should have only small fingers of tile left that can be easily broken off with your nippers. After you’ve completely cut out your traced flange, round off the edges of your cut tile with a sanding stone.
Using an Angle Grinder
Sometimes a flange sits in the middle or off the edge of the tile, making it impossible to use tile nippers. In this instance, using an angle grinder will be necessary.
First, let’s just mention that the type of blade you use with your angle grinder makes a big difference. A 4in high-performance diamond blade from RUBI Tools USA made specifically for cutting masonry is ideal. Using any other type of blade will risk breaking or chipping your tile.
With your traced tile lying flat, angle the blade at 45° to the tile. With the first pass of the grinder, lightly score the traced circle without trying to go too deep. Continue to grind around the circle until you’ve cut through all around.
Grinders create a lot of dust. Wetting the blade can cut down on the amount of dust thrown in the air. Always wear safety goggles when using a grinder tool.
If your traced circle is near the edge of your tile but not on the edge (1 1/2″ or less), score two deep lines into the tile from the edge up to the circle. Make sure not to cut all the way through, as these lines will work as sacrificial breaking points for the tile. If you don’t make these lines, you risk having the tile break at some random spot instead of these controlled spots. Control is what you want when cutting tile around a toilet.
Dry Fitting Your Cut Pieces
It’s the moment of truth, but don’t get ahead of yourself. Always dry lay your custom cut pieces to make sure they fit around or under your flange.
In most cases, as long as you’ve cut within 1/2″ around the flange, your toilet will cover your cuts. However, if you feel you’ve made too big of a cut and your toilet won’t cover it, start over until you get it right.
What to Do When Removing a Toilet Isn’t Possible
If for whatever reason removing the toilet before installing tile is impossible, you can still lay your tile around it. The steps to follow are similar to those explained above. The difference is instead of tracing around the flange, you’ll need to trace around the base of the toilet.
You can do this by using RUBI shape-template to cut out to the dimensions of the tile. Place your shape tool on the floor around the toilet, as if you were tiling. Again, make sure to leave spacing in between each tile for your grout lines.
You can line the shaper tile up to the toilet, making a crease with your finger all around the base. Draw a line following the crease, and mark the rest of the shape of your toilet’s base. Once you have your shape lines drawn on your real tiles, make your guide-lines to cut properly. Don’t forget to cut a little extra space for the grout line between your toilet and the tile.
Tile Cutting Tools Pros Use
If you’re looking at how to cut around a toilet base or other projects with no straight lines, you’ll need the tools that the pros use. You can find them all in our RUBI Tools USA catalog. Getting a clean and professional look not only takes good planning and technique, but also takes confidence in your tools to get the job done. Need a portable tile saw you can transport quickly and easily? Check out our ND-180 tile saw, ideal for finishing and renovation.
At RUBI we stand by our tools with 100% confidence that they can handle any tile job, anywhere. So if you are in the process of installing tile, let us be your team of support with the proper suggestions on tools for a successful installation story when cutting tile around a toilet or any other challenge you might find. 
Post a comment