
You’ve just installed your tiles and everything looks good except there are spaces between the tiles. What do you do? Simply apply grout between these spaces using a grout float. This creates the impression of a continuous surface.

What Is a Grout Float?
This is a tool that’s designed to apply grout in spaces between mosaic, stones, and tiles. Grout floats are typically used by stone and tile installers.
Once the grout is applied, the tile installer uses a grout float to spread out the grout before pressing it into the cracks and crevices between tiles. Since it’s made of rubber, your tiles will have no chips or scratches after the grout is applied.
What Is Grout?
Grout is a cement-based concrete paste that is used to fill in cracks, lines, and crevices. Typically, it is used after tile installation to help maintain the integrity of the design by holding each piece together. Grout can also be applied between mosaic on walls or floors.
Once applied, grout requires proper maintenance to keep it firm, uncracked, and clean. If it’s not cared for, grout begins to harbor bacteria and mold. This will not only damage your floor but it will also pose a health risk to your pets and family members.
How to Apply Grout Using a Grout Float
The first step involves picking the grout you will use on your floor. There are two types of grout: unsanded and sanded. Use sanded grout if the cracks, crevices or spaces you are trying to fill are more than 1/8 of an inch wide.
This is because sanded is stronger, more durable and helps maintain the structure. Also, be sure to pick a color that matches that of your décor.
Dark grout is said to accentuate the layout and pattern of your tiles while light grout creates a more cohesive look. However, light grout requires regular maintenance as it gets shows more bacteria and dirt.
To successfully apply grout float, you’ll need the following:
- Grout mixer
- 2 large sponges
- 4 big buckets
- Hard, rubber grout float
1. Mix the Grout
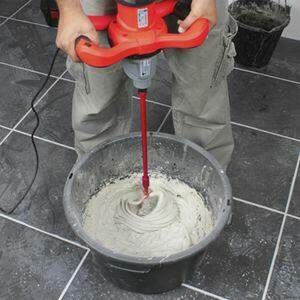
Grout comes in powder form and it is then mixed with water at a ratio that is prescribed on its package. Add the recommended amount of water (check manufacturers instructions) in one of your buckets and then add the grout powder. It is recommended to use an electric mixer to get the perfect blend. Use a hard grout float to stir the mixture. Add the remaining water and mix.
You want your mixture to have just the right viscosity. It should not be too dry nor should it be too watery. The ideal grout mixture should look like smooth peanut butter.
2. Apply the Grout
The best way to test your grout is to apply it to a small area. Once you are sure that it’s good enough, you can apply it to the rest of the floor. Also, if you intend to apply the grout on both the floor and the wall, always begin with the wall.
It’s easier to start with the wall, as this prevents mishaps. Starting with the floor means you have to step on it as you apply your grout on the wall, thereby messing up your finished floor.
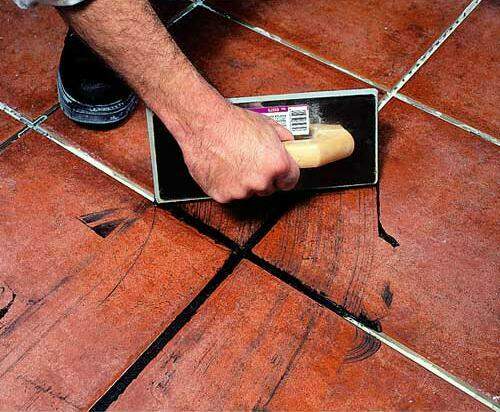
Use a hard trowel to scoop the grout onto the floor. Hold the grout float at 45 degrees to the floor and firmly press it down. Apply the grout in diagonal strokes.
Make sure you cover the entire floor with grout including the tile. Hold your grout float at 90 degrees to the floor and thin out excess grout on the tile leaving a smooth, even surface. This will also make it easier to clean up after you finish.
Limit your grout application to a small area, preferably 3 tiles by 3 tiles.
3. Remove the Excess Grout
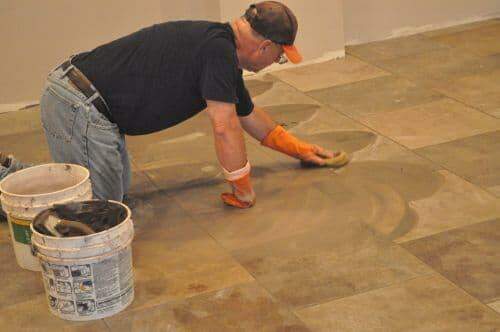
Dip a sponge in clean water and squeeze it until it is damp, not wet. Too much water will result in the grout not hardening and setting. Be sure to squeeze the sponge well before you can apply it to your grout.
Place one corner of your sponge on the wall drag it in a single continuous stroke along the tiles. Rotate the sponge to use the unused corners, drag it along another tile until all 4 corners are covered.
Dip it in clean water, wring it and continue from where you left. This will ensure that all the excess grout is removed in a smooth and effective way. DON’T use to much water or scrub the grout.
Allow the grout enough time to dry. You can test this by pressing with your finger to check for dents. A well-dried grout will not have any dents while poorly dried grout will have dents.
4. Test the Area
To get a feel of what the floor will look like, test the grout on a small area. Apply it to a small area and use a rubber grout float to get rid of the excess grout. Once dried, you can now see how it looks and if you picked the right color.
5. Finish the Floor
If you are pleased with your choice of color, proceed to apply the grout to the remaining part of the floor. Allow it to dry for about 3 hours.
6. Allow the Grout to Cure
Check the label to see how long it takes for the grout to cure. It could be as little as one day to as many as five days. The label should also have instructions on how to cure grout. Typically, grout requires proper ventilation to fully cure.
7. Seal the Grout
Now that your grout is cured, the next step is to seal it. This helps to protect your grout from developing cracks, breaks and bacteria build up. Apply the sealant using a thin-tipped applicator.
In case you don’t have an applicator, you can use a sponge to spread the sealant over the grout. After about 10 minutes, wipe off the sealant and reapply it at least once every year.

Advanced Techniques for Grouting
Using Colour Grout for Design Impact
Using colored grout can significantly enhance the aesthetic appeal of a tiled space. Rather than defaulting to traditional white or gray grout, consider using bold or complementary colors to create striking visual effects. For instance, black grout can make white tiles pop, creating a modern, graphic look, while matching the grout color to the tile can create a seamless, unified appearance. Experimenting with colored grout allows tiling professionals to offer clients customized, eye-catching designs that elevate the overall look of the space.
Grouting Mosaic Tiles
Grouting mosaic tiles requires precision and patience due to the numerous small pieces and intricate patterns involved. To create a flawless finish, it’s essential to apply grout evenly, filling all gaps without displacing the tiles. Using a rubber float, work the grout into the spaces with diagonal strokes to prevent pulling the tiles out of place. After grouting, it’s important to clean the surface thoroughly to remove any haze. This ensures that the mosaic’s vibrant colors and patterns are clearly visible. This technique enhances the detail and beauty of mosaic installations, making them a standout feature in any room.
Grouting in High-Moisture Areas
High-moisture areas such as bathrooms and kitchens require special consideration when grouting to prevent mold and mildew growth. For these environments, using epoxy grout is recommended due to its water-resistant properties and durability. Epoxy grout is more challenging to work with than traditional cement-based grout, but its resistance to staining and cracking makes it ideal for wet areas. Ensure all joints are fully packed and sealed to prevent water leaking in. Proper ventilation and the use of anti-mold additives can further enhance the longevity and cleanliness of the grout in high-moisture settings.
How to Select Tile Installation Tools
Tile installation always has the same tool requirements from a grout float tool, a trowel, a mixer, to a tile cutters. However, the specification of each of these tools varies depending on the project, setting material, tile type, job size, and tile size. Below are a few things to consider when selecting tile installation tools:
Grout floats
Grout float selection is generally based on the workspace, tile type, and grout composition. Remember that a rubber grout float interacts with both the tile and the grout. Therefore, you have to consider both while selecting a grout float. A standard grout float is compatible with most types of tiles and cementitious grout.
On the other hand, natural stone requires a specialized grout float. The same applies to epoxy grout as it requires the use of specialized tile float due to its extremely sticky nature.
Also, consider your workspace, especially if you are required to add tiles in hard to reach areas such as under cabinets. Here, an offset grout float will work better due to its unique handle that extends from its end making it easier to maneuver in small spaces.
Mixer
Select a mixer that is slow and steady. Although there are faster mixers that are said to be more efficient, stick to mixers with that have slower rotations. The minimum recommended rotations are 300 RPM.
Slow and steady mixers ensure that the mixture is thoroughly mixed at a consistent rate. Since mixers are powered by electricity, make sure there is an electricity source nearby and also bring an extension cord.
Tile Cutters

Tile cutters are selected based on tile shape, type, and job size. Your choice should also factor in the design of the tile and that of the job site. For example, small jobs to medium sized jobs that require rectangular shaped tiles as the only design will use tile breaker, nippers or tile scorers.
Larger jobs require faster tile cutters such as wet saws. If you are using natural stone, choose a wet saw but if you want circular cuts, opt for angle grinders or tile nippers.
Trowels
One of the key factors to a successful tile installation is achieving proper mortar coverage. Trowels are critical to achieving this. The most commonly used one is the square notched trowel.
Not long ago, the ¼ by ¼ inch notch was considered the industry standard but the tiles have grown bigger. Currently, the trend is the bigger the tile, the deeper the notch.
Are There Alternatives to Grout Floats?
Although a grout float is considered to be the primary tool for grout application, there are other alternatives such as a grout bag, putty knife, or a sponge and cloth.
If you need any of these tile installation tools, feel free to contact us.

Post a comment