
Picture this: You just bought your dream home. It’s got great bones, but it’s dated. You’re ready to make it your own with a tile installation learning how to cut curves in tile.
In the true spirit of DIY, you want to challenge yourself. But you’ve run into a problem. After all the research you’ve done, now you have to learn how to cut curves in tile.
Well, there’s no need to fear. It’s not as hard as it seems if you have the right information and tools. Even if you’re not a DIYer, and you’re simply looking to improve your professional craft, this article will be beneficial to you.
Keep reading to learn the best tips and tricks for cutting curves in tile.


How to Cut Curves in Tile: When Is It Necessary to Cut Curves?
Let’s talk about when you’ll need to know how to make curved cuts in tile. Here are some of the most common places you’ll find tile in your home. In each place, there’s a reason to make a curved cut.
Keep in mind that a curved cut in the tile may ultimately be the result of an aesthetic choice. It’s not always due to functional needs.
Bathroom

There are several places in the bathroom that may require tile. Let’s start with the bathroom floor. It’s likely that you’ll have to cut a curve in the tile around the edge of where the bathtub will go.
Some choose to also have tile on the bathroom wall. The necessity of a curved cut will depend on the shape and style of the bathroom.
Kitchen

In the kitchen, you could use tile as a backsplash or as an accent on the kitchen island. Where this tile will curve often depends on the style of the kitchen and your personal aesthetic choice. It’s good to know how to cut curves in tile for the kitchen space just in case.
Entryway
There’s nothing quite like a nice, unique splash of tile when you first walk into a home. Cutting curves in tile for this space is an elegant way to make sure people get a good first impression of your home.
You may need to do this for a curved hallway or a rounded, open-plan entryway. Being able to cut curves to fit any circumstance will add a level of professionalism to the job.
Fireplace

The fireplace is meant to be a warm, cozy place in the home. Using tile to accentuate its coziness is always a good idea. In this instance, a curved cut will likely be more aesthetic than functional.
Bar

If you’ve got a bar area in your home, luxury is already one of your priorities. A tile accent in this space is a great way to add some sophistication. Again, knowing how to cut a curve in tile will be an aesthetic priority here.
How to Cut Curves in Tile: Determine What Type of Tile You’re Using
Before we discuss tools, you need to establish what type of tile you’re using. There are four main types:
- Ceramic
- Porcelain
- Glass
- Marble
Ceramic is the most commonly used of these four types. In bathrooms, it’s easy to clean. Also, it is the easiest of the four to cut and install in the home.
However, if you know what you’re doing, all four of these types can have properly cut curves to give your home a professional look.
How to Cut Curves in Tile: Tools You’ll Need
The best tools for cutting curves in tile are the manual tile cutter and the tile nipper. These tools are great for cutting curves in ceramic. It can also be used on thin porcelain as well. Depending on your other tiling tasks, you may need more tools. Make sure to do your research before purchasing!

How to Cut Curves in Tile
Once you have the right tool for your type of tile, it’s time to get to work. Here’s a step-by-step guide for cutting curves in tile using the various tools.
Manual Tile Cutter
The most recommendable tool for cutting curves is the manual cutter.

Step 1: Measure and Mark
The first thing you need to do is measure your cut and mark where you’ll make the cut. It’s best to do this with a pencil. For clean lines, tracing a round object like a cup or bowl is helpful.
Step 2: Position the Tile On the Manual Cutter
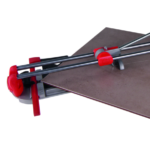
The tile should be placed with its visible side up on the manual cutter, and it should be placed far enough from the ends of the manual cutter to rotate it as much as will be necessary to execute the cut.
Step 3: Score
Scoring, also known as marking, is the term used to refer to the act of scraping the top of the tile with the scoring wheel. As you score for a curved cut, you will need to rotate the tile so that, as you push the handle of the manual cutter froward, the scoring wheel scrapes along the line that you marked in step 2.
Step 4: Break
Move the tile to the end of the cutter where the separator works strongest and position the tile so that the end of the scored line is centered beneath the breaker. Then press down over the score with the breaker until the tile separates along the line you marked.
Step 5: Smooth
The edges of the tile after they’ve been cut with a manual tile cutter are very sharp. You need to smooth them down once you’ve finished your curved cut.
It’s a good idea to see how the curved cut matches up to its intended shape, like the edge of the toilet or shower drain, before you smooth.
Tile Nipper
Remember that a tile nipper is a handheld tool. Be sure to use it with caution and precision. Even though it’s a smaller tool, it’s still smart to read the user’s manual before proceeding.
Step 1: Measure and Mark
The first thing you need to do is measure your cut and mark where you’ll make the cut. It’s best to do this with a pencil. For clean lines, tracing a round object like a cup or bowl is helpful.
Step 2: Position the Tile Nipper
You want to make sure that you’ve got a firm grip on the tile nipper. Also, properly position it on your measured mark.
Step 3: Snap!
You’ll make small, firm snaps along your measured mark. Do this slowly and carefully; there’s no need to rush. Remember, this tool is for smaller, more precise curved cuts.
If you go too fast, you risk breaking the tile beyond the mark you’ve made. If you do this, you’ll end up having to start over which wastes time and resources.
Step 4: Smooth
The edges of the tile after they’ve been cut with a tile nipper are very sharp. You need to smooth them down once you’ve finished your curved cut. It’s a good idea to see how the curved cut matches up to its intended shape, like the edge of the toilet or shower drain, before you smooth.
Angled Grinder
An angled grinder is larger than a tile nipper. Be sure to read the user’s manual before proceeding with your work.
Step 1: Measure and Mark
The first thing you need to do is measure your cut and mark where you’ll make the cut. It’s best to do this with a pencil. For clean lines, tracing a round object like a cup or bowl is helpful.
Step 2: Position the Angled Grinder
Make sure that the tile is placed on a flat surface. To be sure that your glaze doesn’t chip, place masking tape around the edge of your mark. Then, secure your tile with a clamp.
Make sure that you’re using the correct blade for your type of tile.
Step 3: Cut
Follow your measured mark carefully with the angled grinder. For rounded cuts, you want to make sure that the tool is angled horizontally.
Step 4: Smooth
Like with the tile nipper, your edges will be sharp. You can smooth them out with the flat side of the blade or sandpaper.
Some Final Tips & Tricks
Here are some final tips and tricks to help you cut curves in tile like a pro:
- With a tile nipper, snap over a trash can to avoid a mess
- Always place your cut tile along the curved shape before you smooth it down
- Do your research before buying tools
- Read the user’s manual before handling your tools
Now you’re ready to get started. Happy tile cutting!
Use the Best Reference for All Your DIY Needs
Hopefully, you’ve learned a lot about how to cut curves in tile. If you’re looking for resources on how to remodel your home like a professional, there’s more where that came from.
RUBI has all of the best blogs for your tiling needs. We’re here to be the best reference for you! Download our free app today to join Club RUBI. You’ll get all sorts of tips, tricks, and promotional codes to help you get the job done.

Post a comment